
Revisions and clutter
Remember the diagram 1973 mineral wagon I posted a few entries ago? Turns out I missed some of the reinforcing bits that were added after they were built. Im not sure how as they were in the prototype pictures I was looking at! Anyway thats been corrected now
 Ive finished off a few Bachmann RTR wagons too.
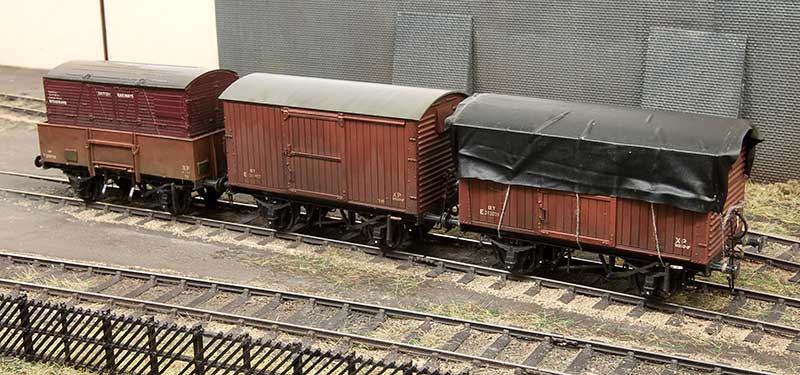 The steel high-fit was actually already done. Ive just added a container to it. The other 2 are actually 2 of the 3 vans I first brought for the layout. Discounted in Modellers Mecca bargain bin! The tarpaulin is black latex cut from a surgical glove.
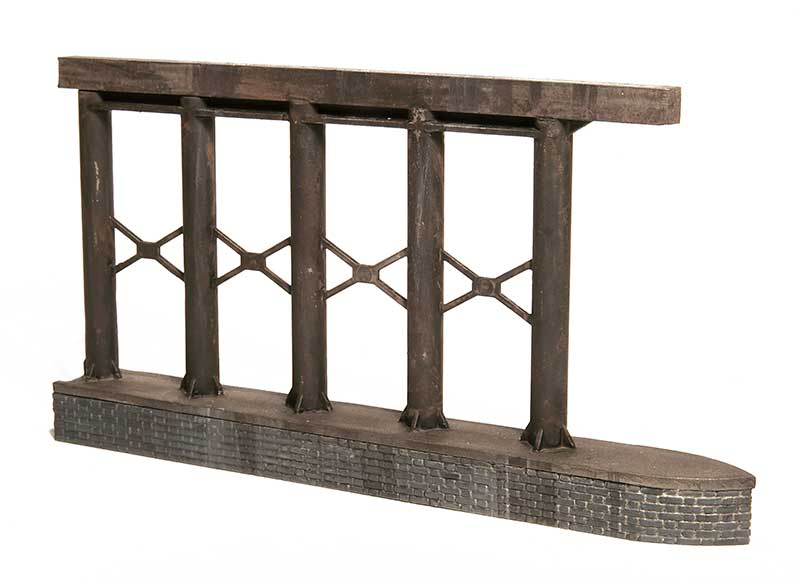
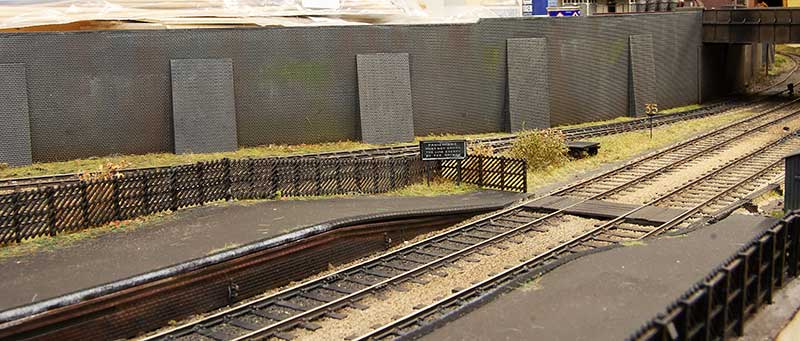 When I built the retaining wall for this side of the bridge I did intend to do something a little more substantial but decided that It would look weird if the wall was 2 different designs. However a friend mentioned that the buttresses looked a little too puny so I reverted to what i should have done originally and modified the existing wall to match. I admit I did want something more grandiose than this but for where it is it wouldn’t have made a lot of sense to have something to elaborate. I definitely don’t subscribe to that inane ‘rule 1’ idea of its your layout do what you want. There has to be some degree of plausibility in there somewhere.
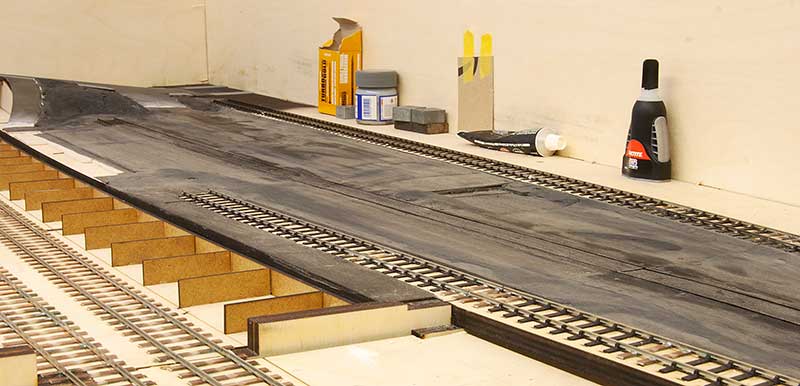
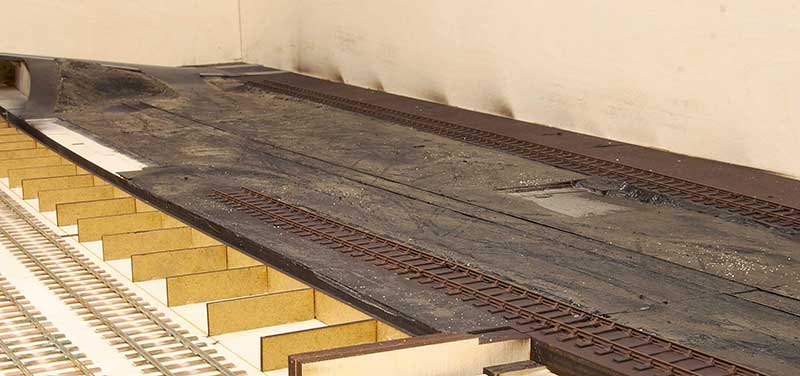
Clutter – What is a yard if it doesn’t have some clutter in it? Much like the retaining walls though you don’t want to go too mad. At the end of the day this is someones product and they aren’t all that likely to leave it lying around on the floor.
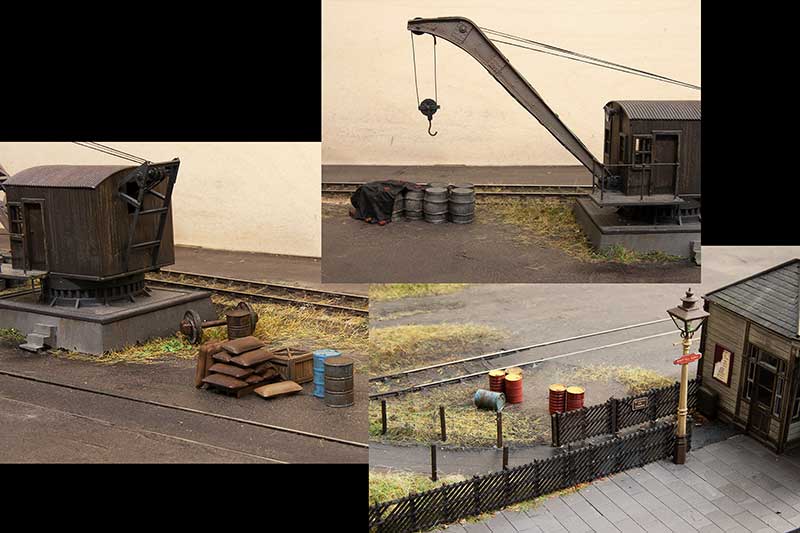 So I opted for 3 small groups of stuff as can be seen above.
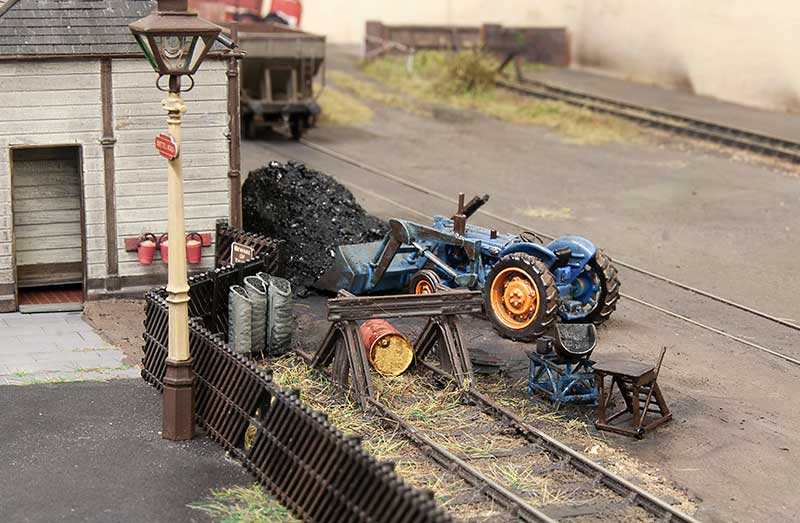 I always wanted some coal facility and I had this in mind when I built my tractor. Again nothing too posh, no coal staithes or anything like that – just a few piles and some more clutter. The steps, scales and the conveyor (behind the tractor) are 3D prints kindly donated by my friend John.
Finally a couple more evening shots.
Signs of life
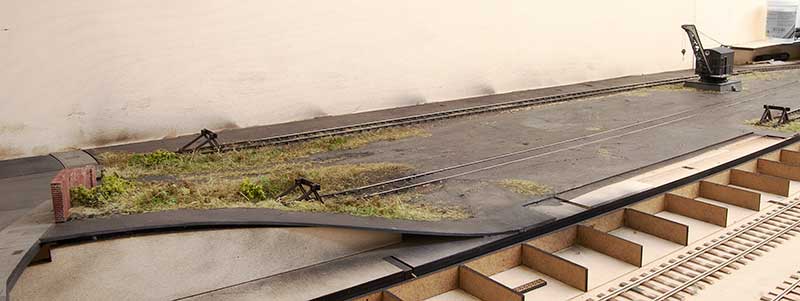
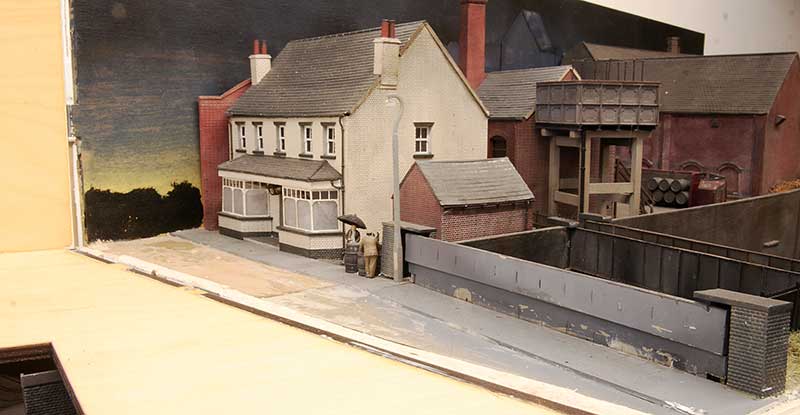 With the Stourbridge end of the layout looking half decent attention has turned to the Dudley end of the new boards or the middle of the layout. Theres a few things that jarred about this scene now that it’s more open. Before you couldn’t really see them. The pavement doesn’t flow properly and there are big gaps at the end of the bridge girder. Also the lower part wasn’t finished. When I designed the bridge I did have the foresight to include a half etch to allow the rivets on this side to be punched through. However when I built it i didn’t bother! Ive already pulled up the road.
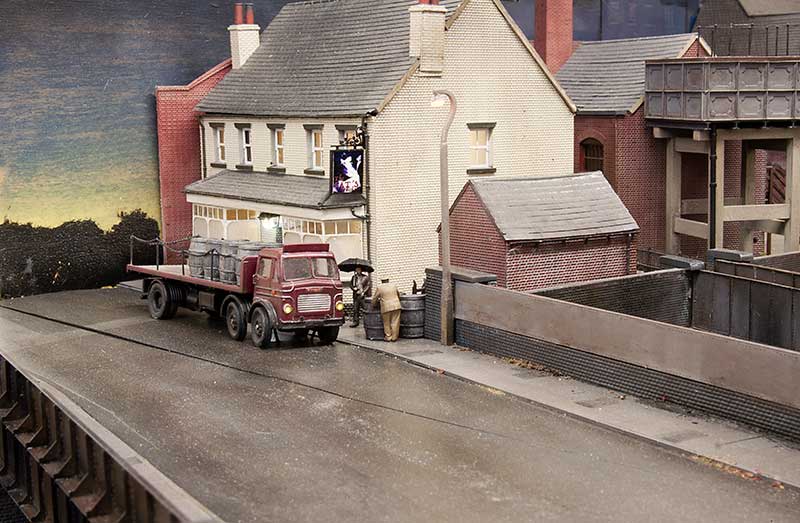 So the road and pavements have been redone. I made an overlay for the bridge from paper. The pub sign is from Model scenics and features our much missed cat Moo. The figures are from Modelu.
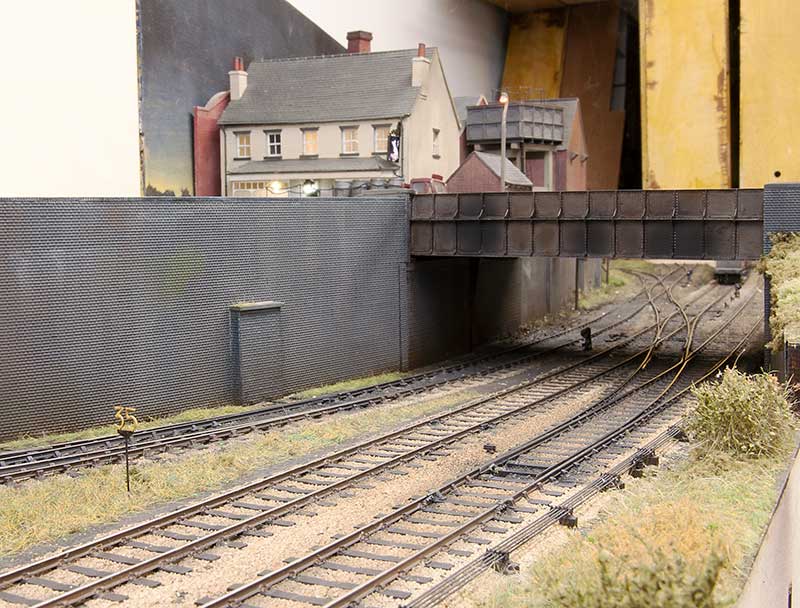 The bridge from track level. Ive added the retaining walls with some nifty top capping that Tim kindly cut for me.
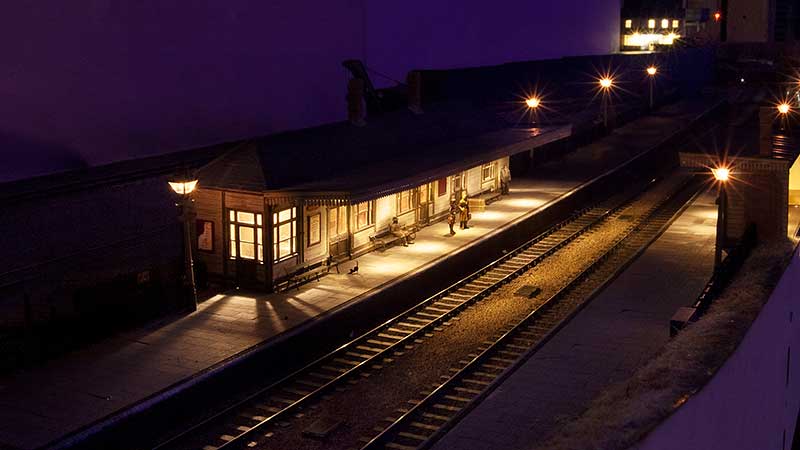
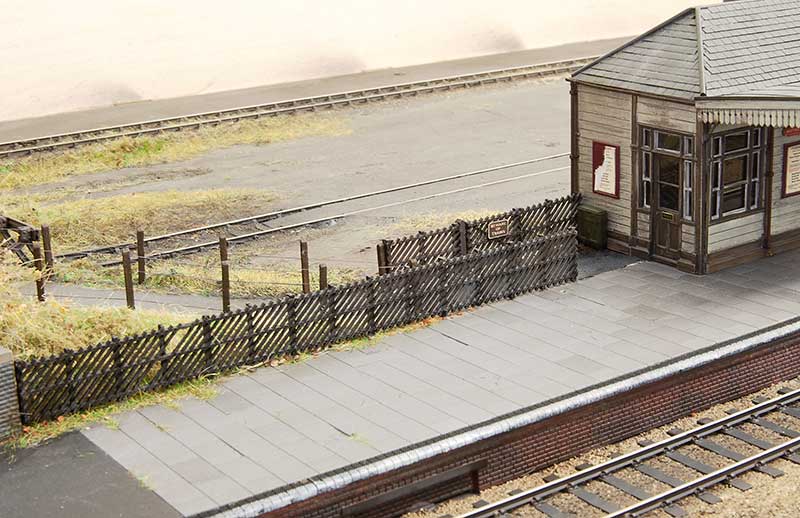
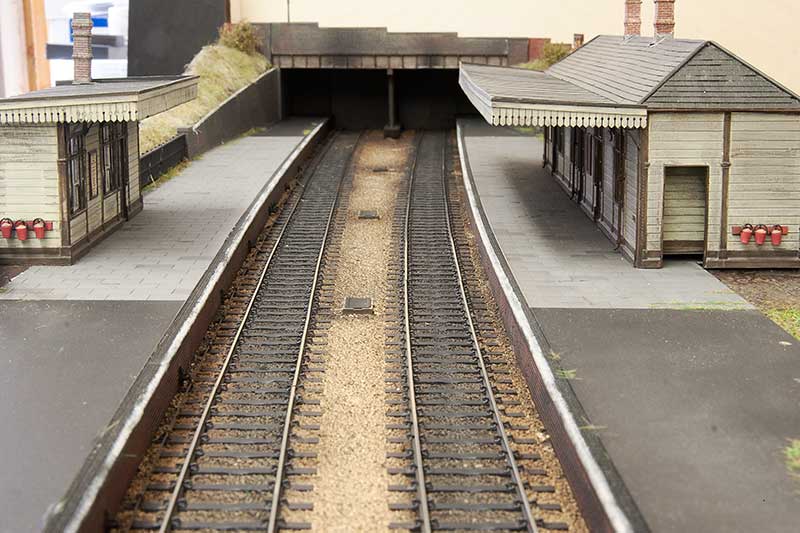
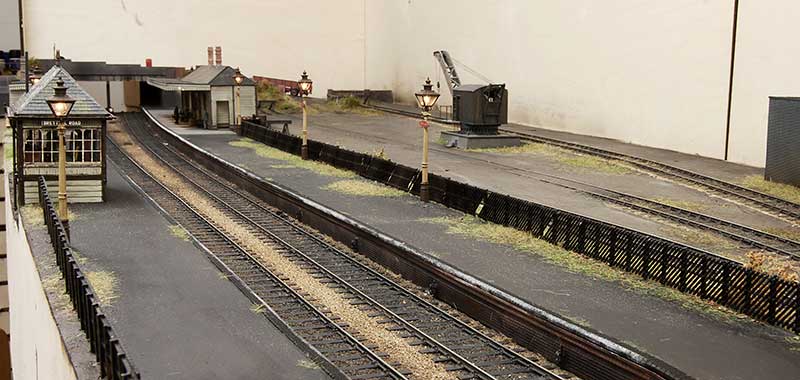 Turning around we see an overview of the somewhat neglected platforms.
 An overview of progress so far.
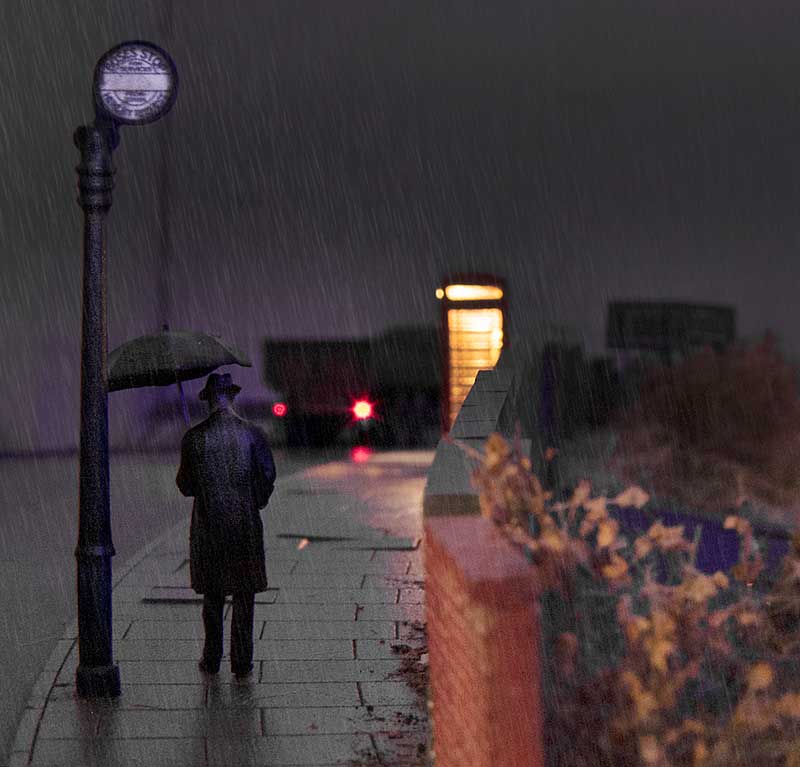
 Ive added a scattering of people from Modelu and Airfix. I thought the lady with the umbrella was particularly suitable. I still need to do more work to bed this end of the building in. Considering this is the rush hour theres not many people about.
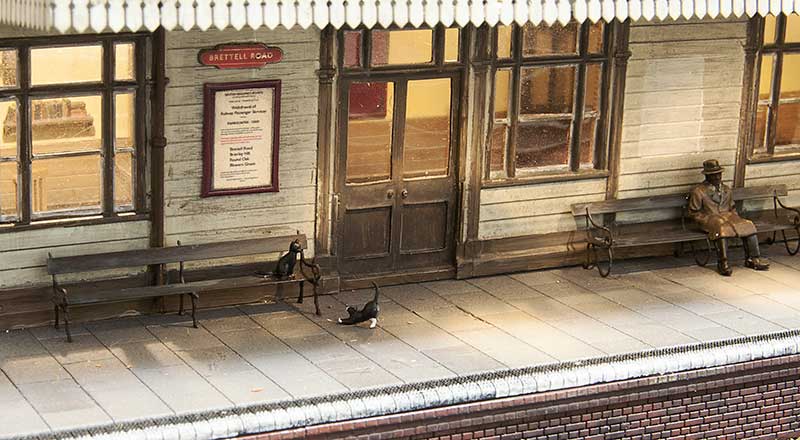 The station has 2 cats. The sensible one is Shadow while the mischievous one who wants to play is comet They are more interested in chasing each other than the local rat population!
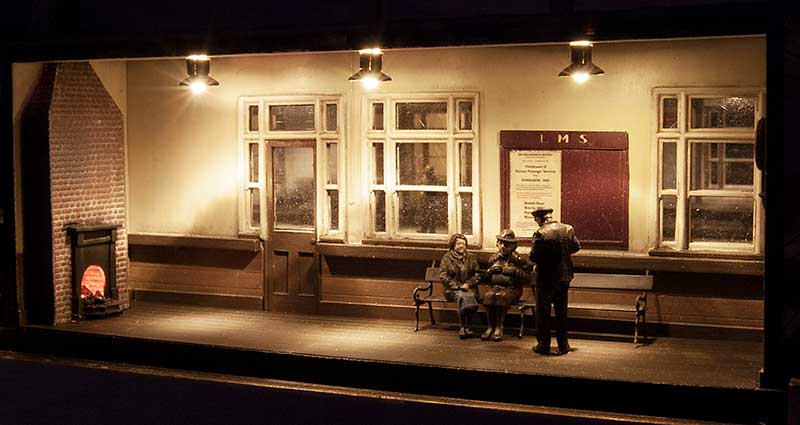 On the other platform a couple of elder ladies discuss the immanent closure of the station with the station master.
Agent 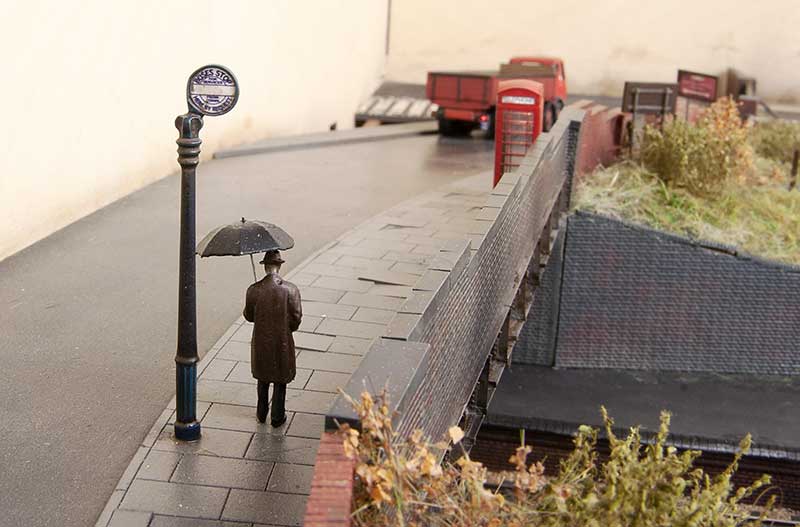 A gent waits for the bus. It’s late as usual!
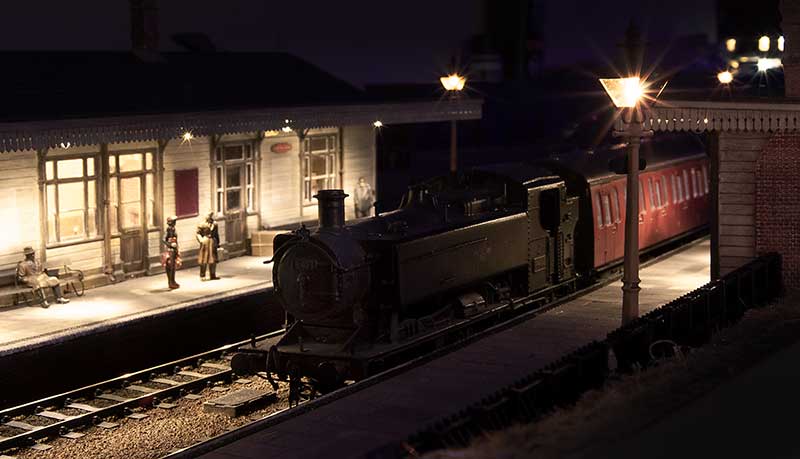
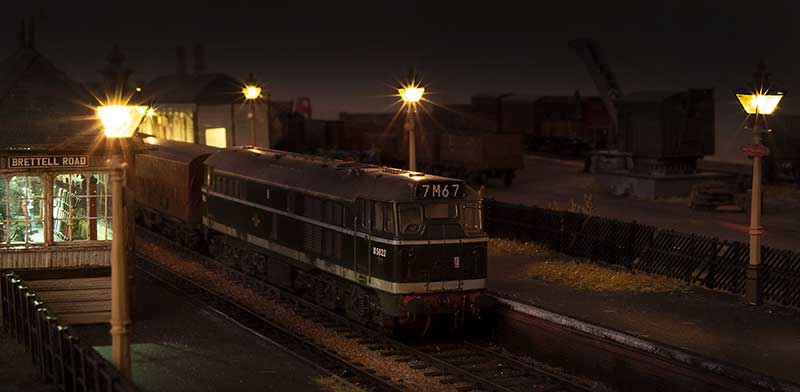
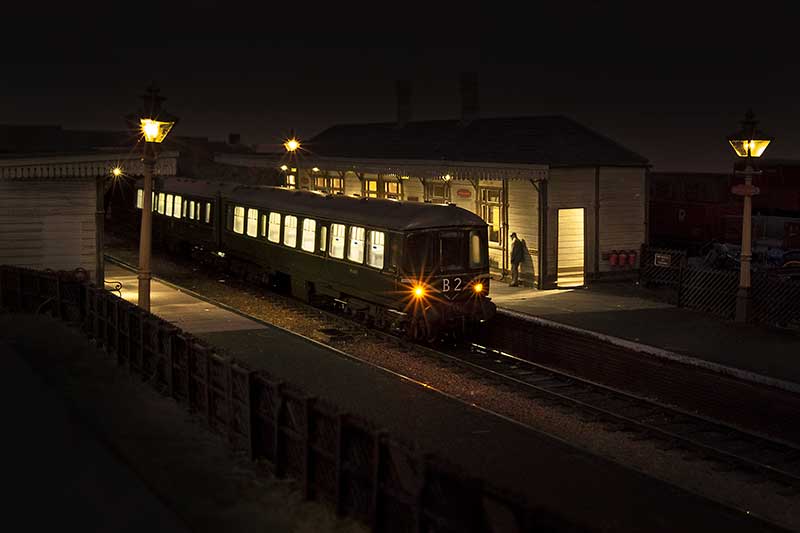
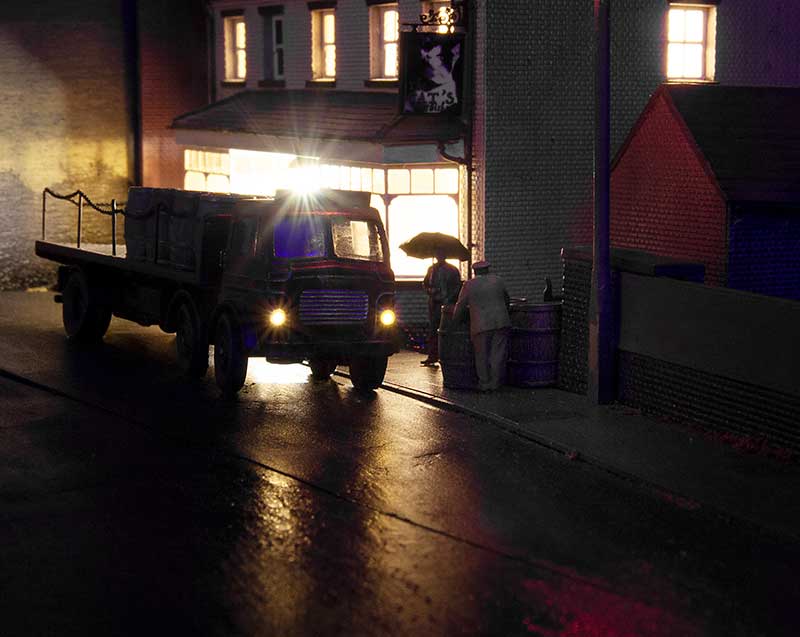
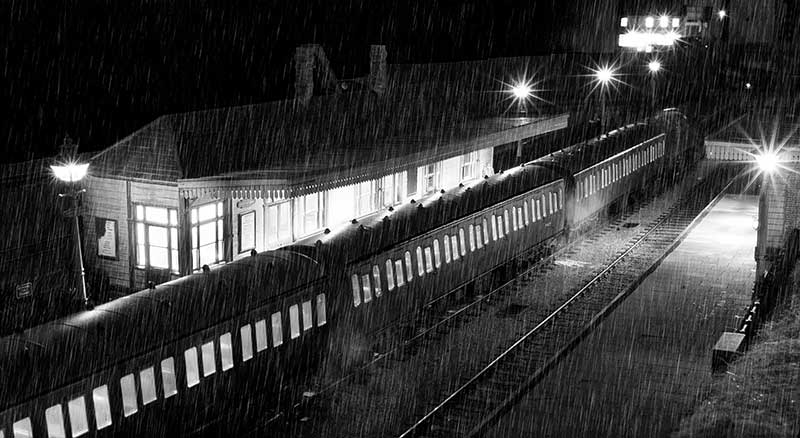
Now that the some of the lighting is in place a few dark shots.
Greenery and decoration.
I’ve reached the stage where all the significant greenery is pretty much done and I can move on to some titivating of parts of the layout.
 I’ve made a basic wooden fence to block off the line that crossed the road originally. The rudimentary gate (which looks like it hasn’t been actually used for years) is simply a few bits of 1x1mm brass soldered together.
 Proverbially walking up the road a little we come to the station signs. These are based on a photo I found somewhere. The fading on the signs themselves was actually an accident. The result of me handling the printout a little too early.
 Continuing our walk we come to this. What can be more of a model railway cliché than the good old bus on a bridge? Well since I am not going to be doing any buses for this layout I have gone for a midlands style bus stop instead. The main column was something I had in my spares box. The rain on the layout is always going to be going left to right as you look at it, so it makes sense that the autumn leaves and litter do the same. The top of the bridge is particularity known by the locals as being a bit blustery. (Theres actually a real location nearby known locally as ‘windy corner’)
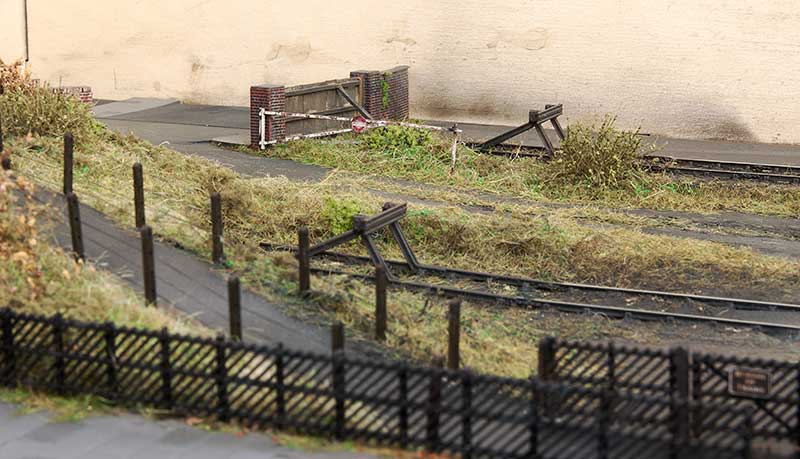
 Peering over the bridge we see the lower end of the station footpath. The Midland style fencing and wire fencing posts both come from Scale Model Scenery as does the little beware of trains sign.
 Looking back at the bridge we just walked over. The girder is 2 of my previously designed etches combined together. I still need to add the top capping to the sloping walls yet.
 Overview looking towards Stourbridge. The 2 buildings are still just loosely placed at this stage.
 … and towards Dudley. You’ll have to use your imagination for the moment for fill in the bridge and the wall on the left.
 Old warning sign from Ambis Engineering
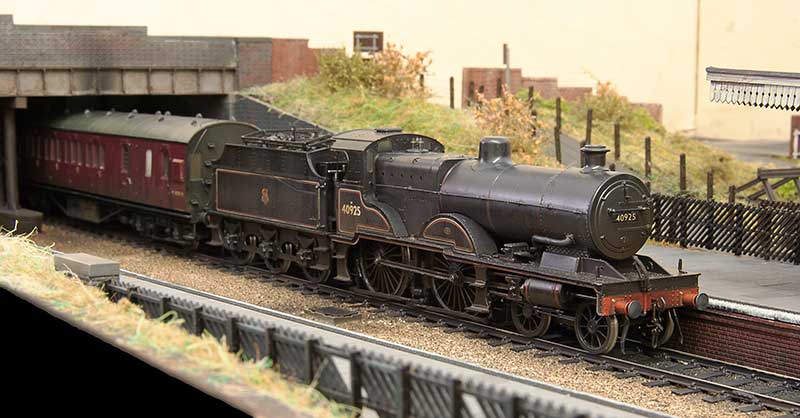 A train! Remember those?

The march of progress
Ive been a bit busy. All the track is not ballasted and the first stage of weathering in complete. I have also put the platforms in.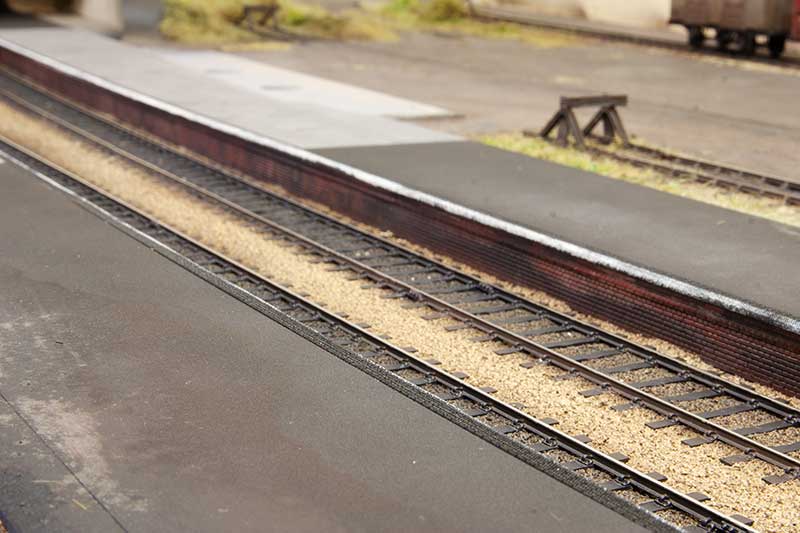 The sides and tops were cut when I was over at Tims. The brick platform edges are something Tim developed and they do look really smart.
 Overview from the Stourbridge end.
 And from the Dudley end
 Co-Bo lurks in the weeds.
 Up until now i have resisted the urge to plonk the building in place but my resistance has now caved.
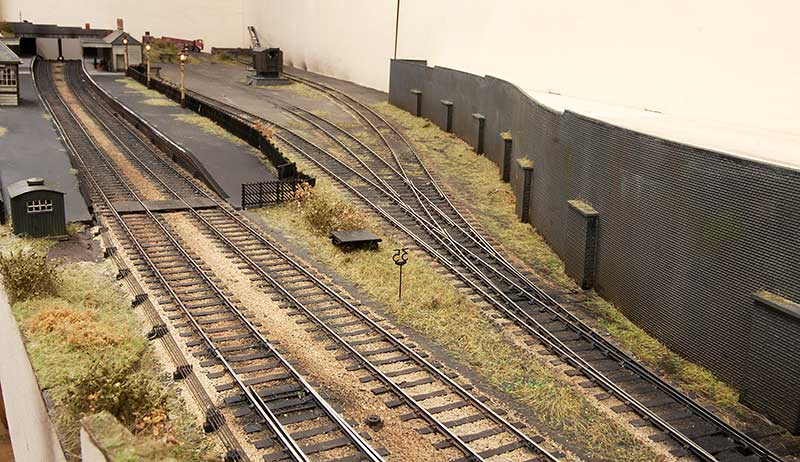
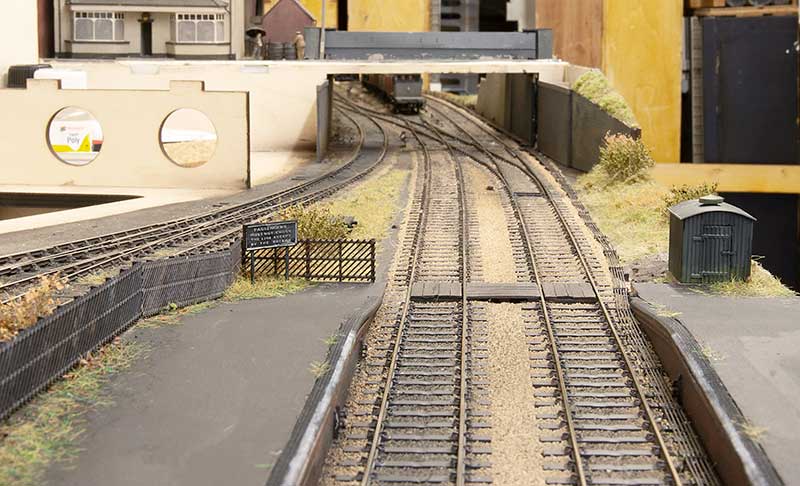
 View from under the bridge. This gives a good idea of the elevation changes in the yard. And before anyone says anything, doing the point rodding was probably a bit of a pointless exercise if I’m honest!
Bitsa post
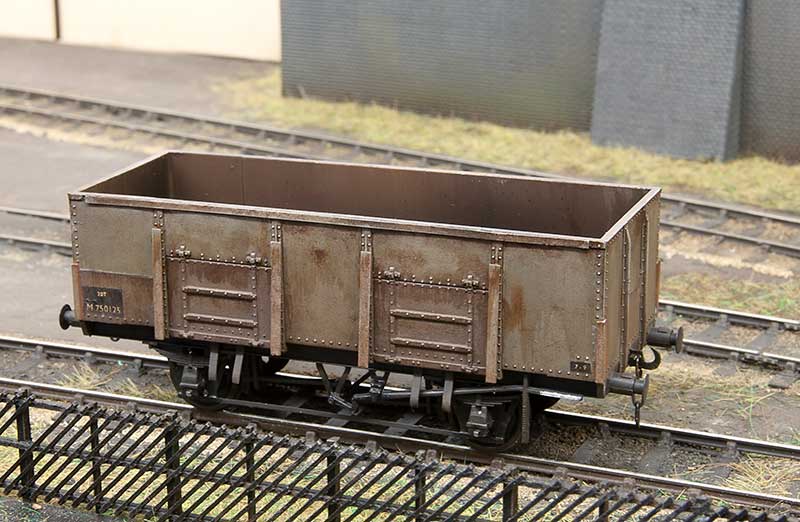
This post kind of jumps around a little but lets start with a simple wagon as we’ve not had one of those for a while. 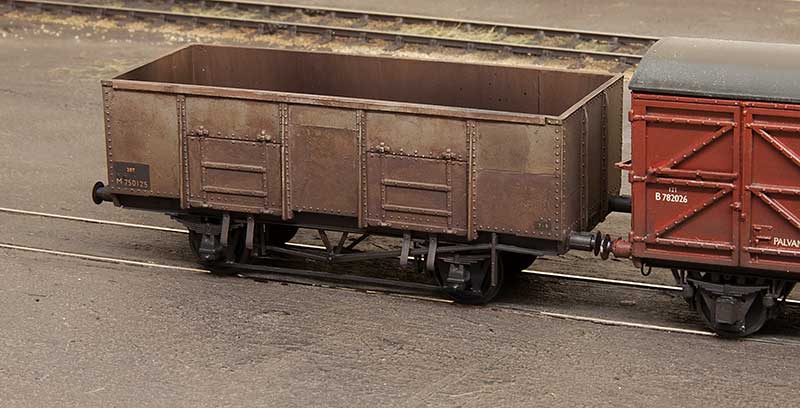 LMS diagram 1973 mineral wagon. These were a little odd as they had no end doors just side ones. The model was created by splicing 2 sections of the Dapol (ex Airfix) mineral wagon body together and mating the result with a Parkside 12 ft wheelbase chassis. The W-irons are Bill Bedford, door springs Rumney models and buffers from Accurascale.
 Both the real Brettell Lane and Round Oak stations had central supports under the bridges. As this will be right at the end of the layout, under a bridge and in the dark I didn’t feel I had to go mad as a silhouette is pretty much all thats needed. The main pillars are actually nothing more than a couple of Hornby gradient supports spliced together.
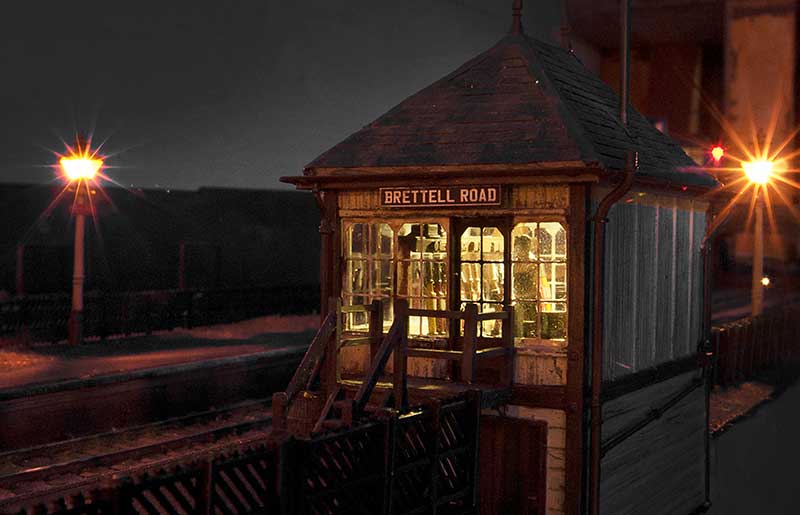
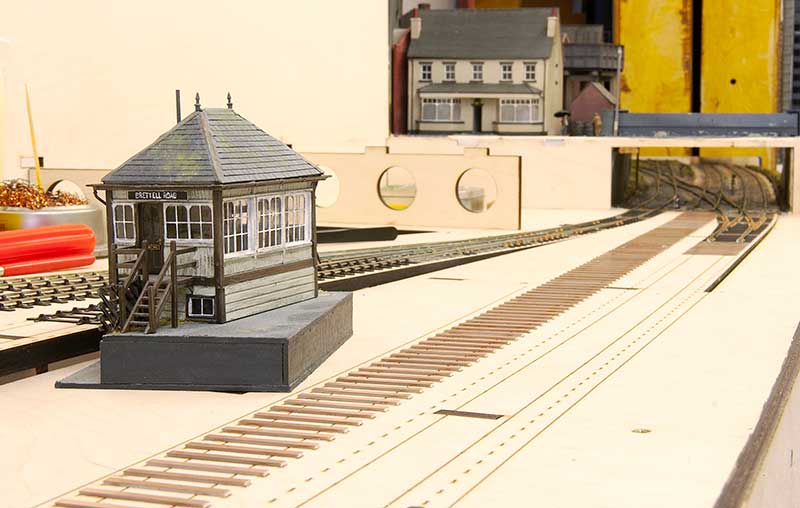
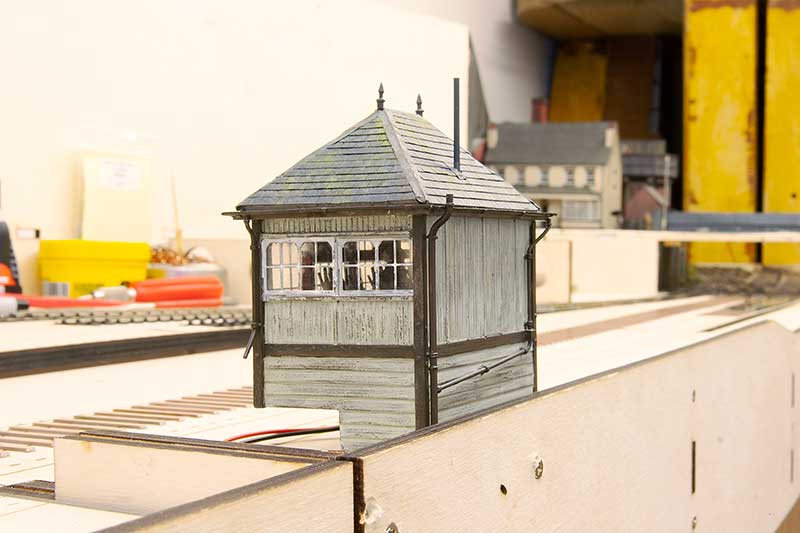
 I mentioned in a recent post that i needed to reverse my signal box so the steps are at the opposite end. Thats ticked off now and the results can be seen above. To see the original build click here.
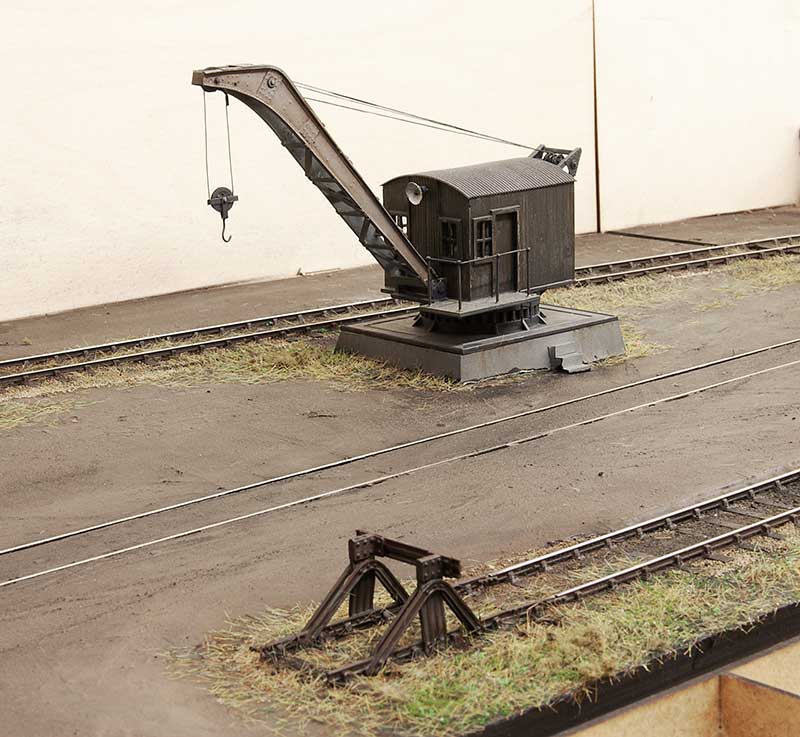 Moving back to the layout itself the much modified Airfix crane has now been planted and the yard track has been ballasted and suitably ‘neglected’.
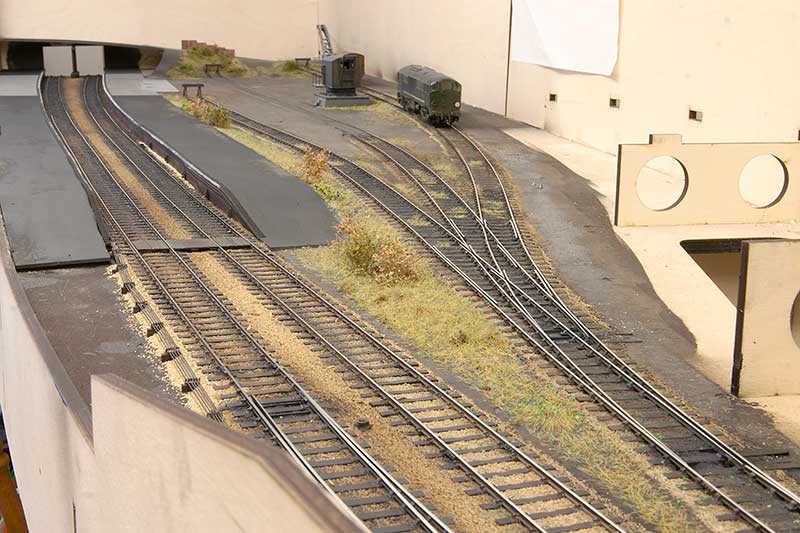
 Overall view of the yard so far.
Landscaping and a couple of firsts.
Don’t worry, I’ve not ditched model trains and took up gardening. As far as I am concerned a garden is just somewhere where a model railway shed should live!
With the track and wiring done on Brettell Road part 2 thoughts have turned to the landscaping of the yard. 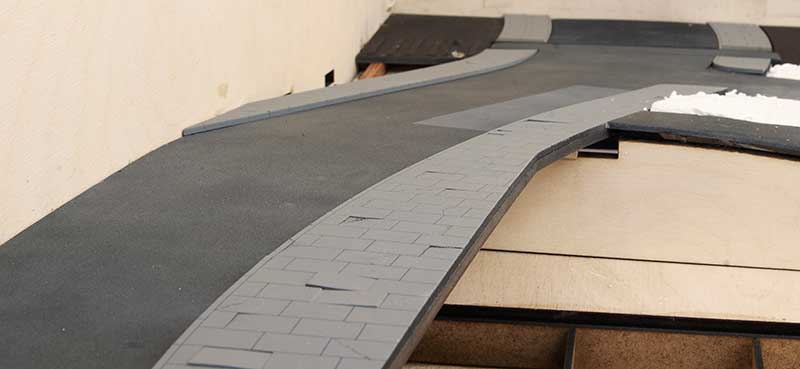 Before I could start on the yard I needed to get the road in as this will need to be blended into the yard. The parts for this were cut out at Tim’s but I did add a layer of 1mm balsa to the road and sanded a camber into it. The thing with laser cutters is they are so neat. By using 2mm mdf for the pavements i could carve away some of the slabs to make it all look a bit more scruffy. I also cut a few of the slabs out completely on the laser so that I could add plasticard instead and do a couple of raised slabs. Brettell Road is set well before the ‘where theres blame theres a claim’ culture. I guess people back then just looked where they were going or called themselves an idiot if they ended up on their backsides!
This is my nod to Brierley Hill’s level street. Which if you’ve ever been there, is anything but level! At the bottom is a now abandoned level crossing (the real Level street had 2 that were part of the Round Oak system). The line it was on now forms the back siding. The road will need more work yet and weathering but this was far enough to let me move to the yard.
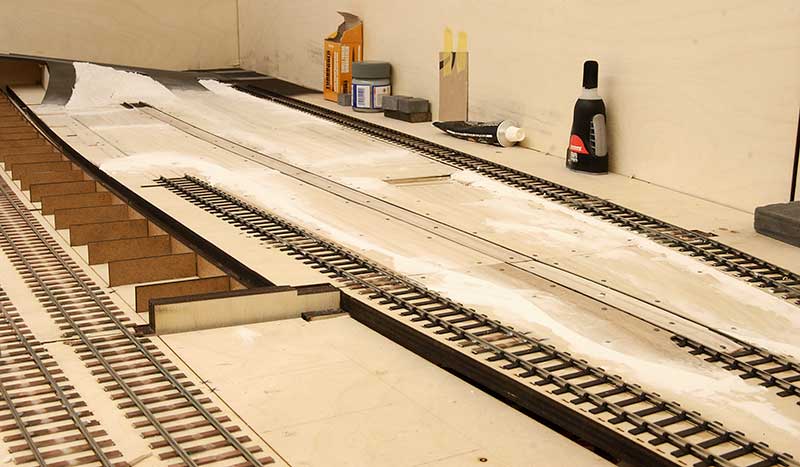 I’ve never done inlaid track before and, added to the bright idea to have different levels, I figured the easiest way would be to infill the gaps with layers of balsa The top layer is 1mm thick and is glued to various different shapes underneath as I didn’t want it to be all that flat. The infill in the track is 1.5mm balsa as I figured a half mill difference between the surface and the rail would aid track cleaning and wouldn’t be noticeable. I used track pins to hold it all together as well as PVA. Incidentally, I think this was the first time I’ve ever brought track pins!
 Despite my half mil’ gap idea i was still a little concerned that track cleaning would result in patches of nice fresh wood showing through. So rather than paint I decided to stain the wood black.
Time for another new (to me) product. I’ve used 2 colours of ‘mud’ from WWS Scenics. Peat and dark brown. These are like a very smooth liquidly filer. I used the peat first with the dark brown over the top. Applied with a plastic spatular and then stippled with a large brush. Ive also added some tire marks and a light sprinkle of chinchilla dust while it was still wet. More to do to it yet but I’m pleased with how it’s coming along so far. Lets just say the yard at Brettell Road was somewhat agricultural! For WWS muds click here.
Tracks and tweaks.
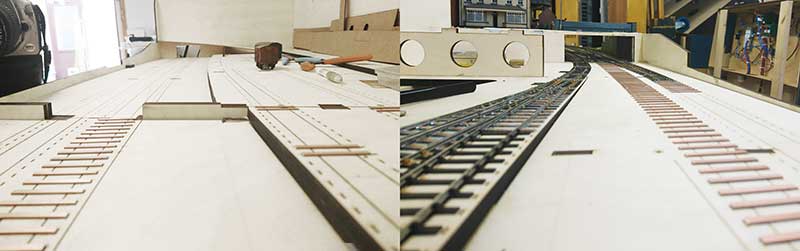
Been busy doing the fiddly bits of track for Brettell Road part 2.
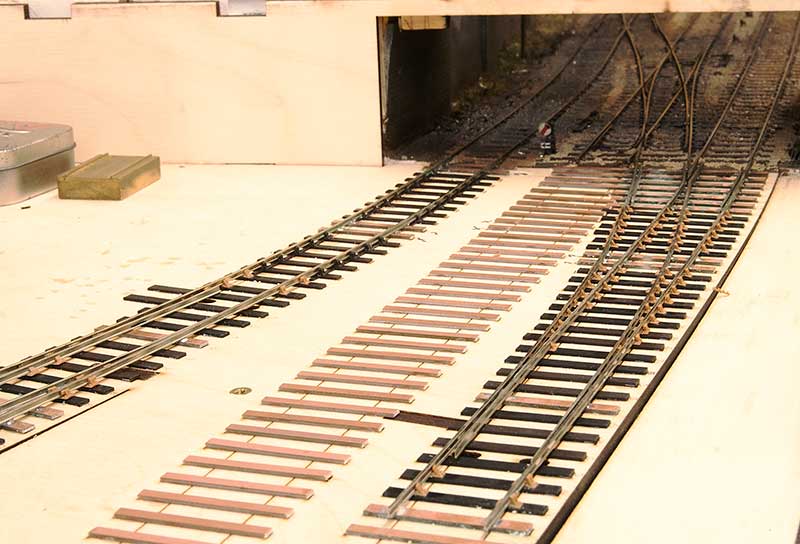 Ok, this is just a B9 on a slight curve, not exactly fiddly.
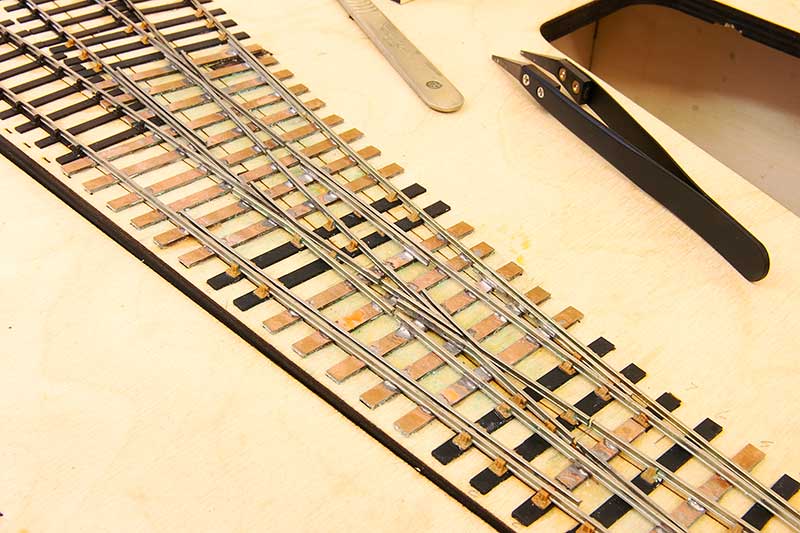
 This is a bit more entertaining though. Ive tried a slightly different approach from my usual norm by using more copper clad and building more in situ than I usually do. I normally build the crossing assembly away from the layout but decided this time to only assemble the vees themselves remotely. I think its a bit quicker and allows a little more wiggle room doing it this way.
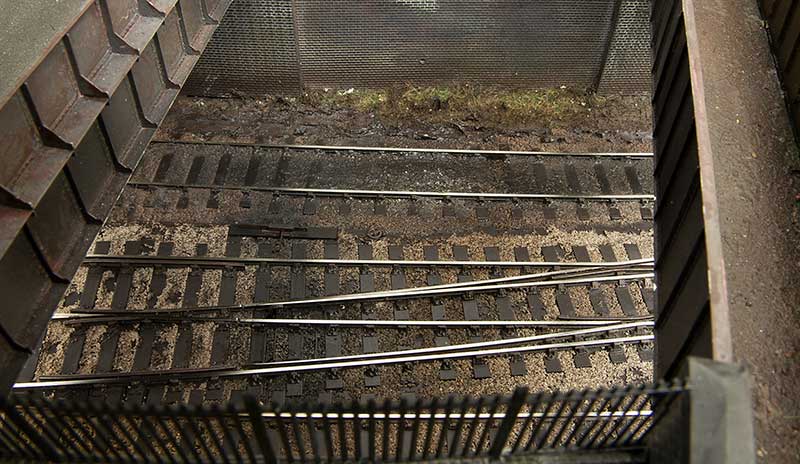
 The view from the bridge.
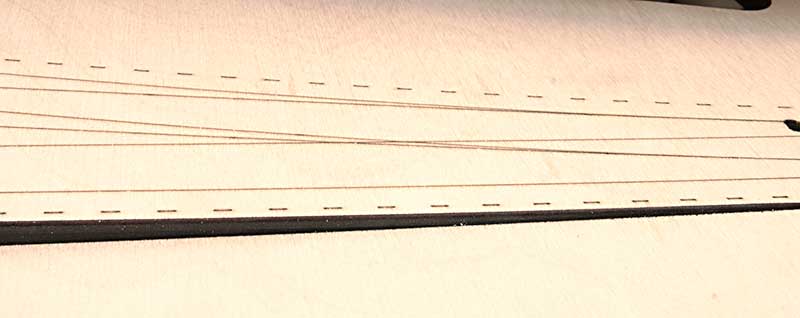 No matter how designed you think something is theres always some tweaks needed when you see the thing in the flesh. I never noticed how the 2 vees had ended up virtually on top of each other.
 You can see here how the middle road has been realigned. The original alignment showing through under the sleepers.
 Another tweak is the position of the signal box. I don’t think I fully took into account the curve and the sighting lines are worse than I thought they would be where I put it originally.
By moving it to to the other platform and along to the left a bit the sighting lines are much better.
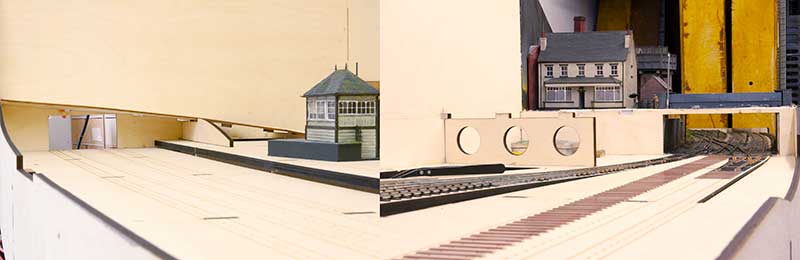
So the signal box will go here instead. I will need to move the steps to the near end and I plan to fit deeper windows so that it more like a type 3 box.
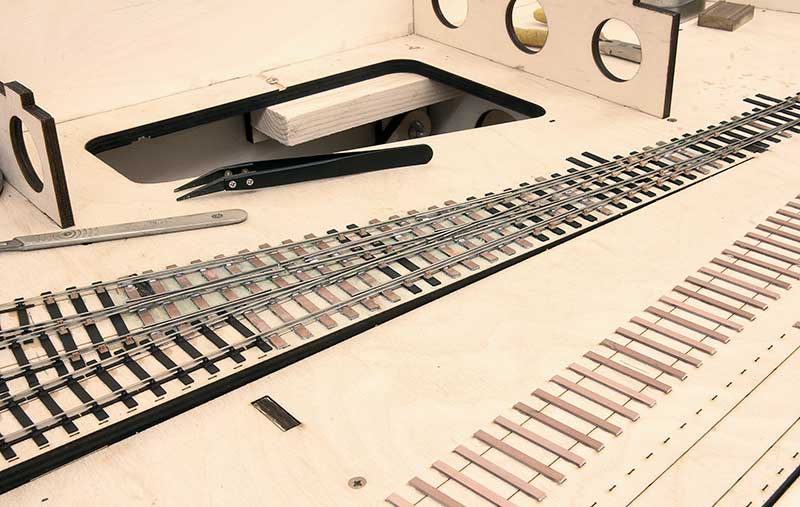
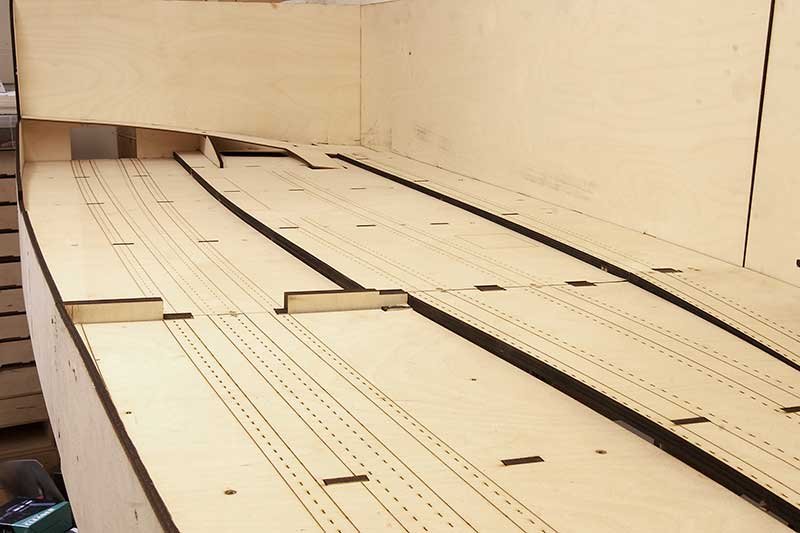
Brettell Road part 2
I guess I was supposed to be here about a year ago but Covid happened. I actually had a trip over to Tims planned between the first and second lock down but that got delayed to the start of this week. Tim Kindly agreed to me using his laser cutters for 3 days but in the event it only took 2 to do the new boards for Brettell Road. I must say there was only a few of the most minor amendments needed which I was very pleased about and unlike some of our previous efforts next to no scrap bits this time!
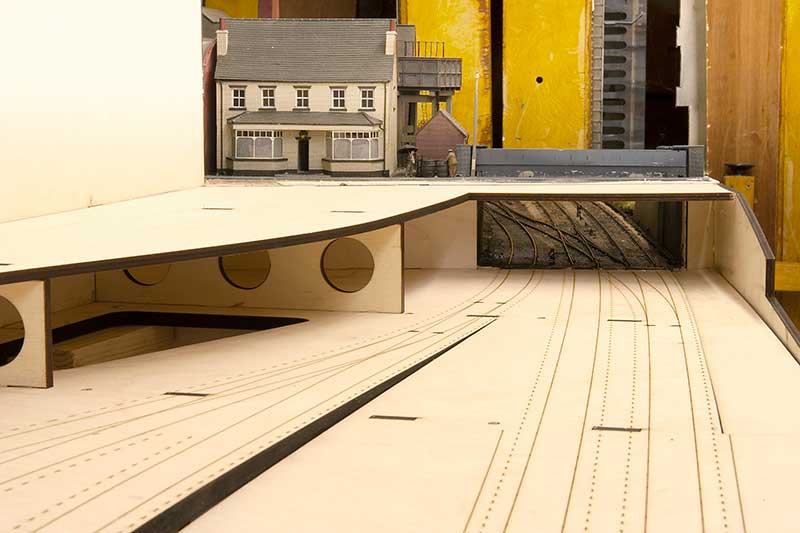 Here we see the new board meeting the old. Perhaps one of the biggest advantages of drawing baseboards up digitally and cutting them on a machine is that everything should be consistent. In the event the track bed was about a mill and half too high which considering I had rebuilt the main lines wasn’t to bad at all. Nothing a few minutes with a saw and a chisel didn’t fix anyway! The end back scene from the original layout has been cut away.
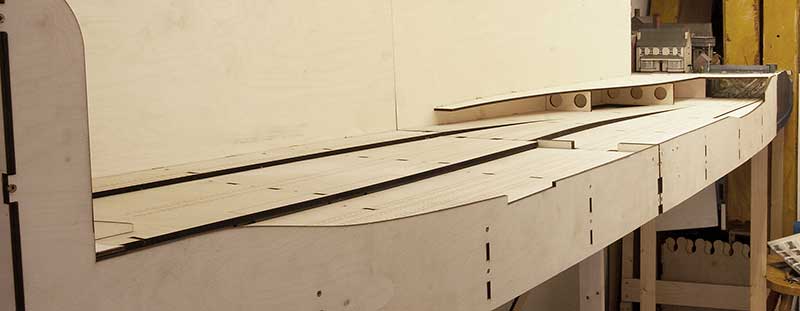 Overview of the 2 new boards. Unlike the previous boards the mainline is flat on these boards with the yard rising behind them. Kings Heath station was the inspiration for this arrangement. Time will tell if I need to get creative about how the wagons in the yard stay put.
 Looking towards Stourbridge. The platforms will fill all of the view here along the mainlines I have a thing for stations with much longer platforms than the trains that serve them. I wonder if its because much of the northern half of the North Warwickshire Line had stations like this (as a kid our garden backed onto it)?
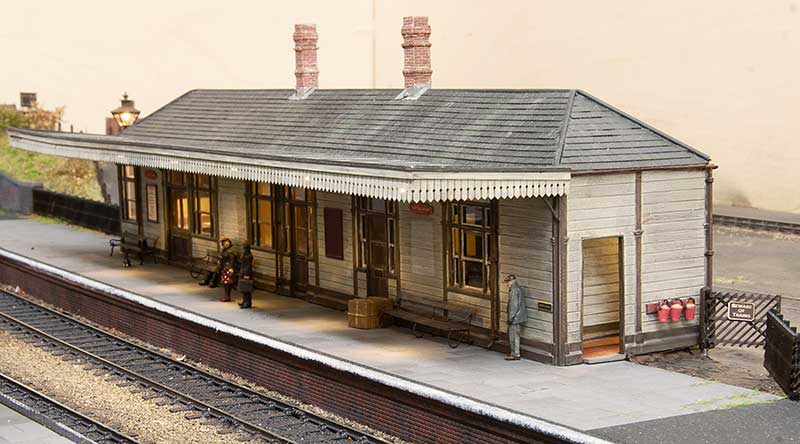
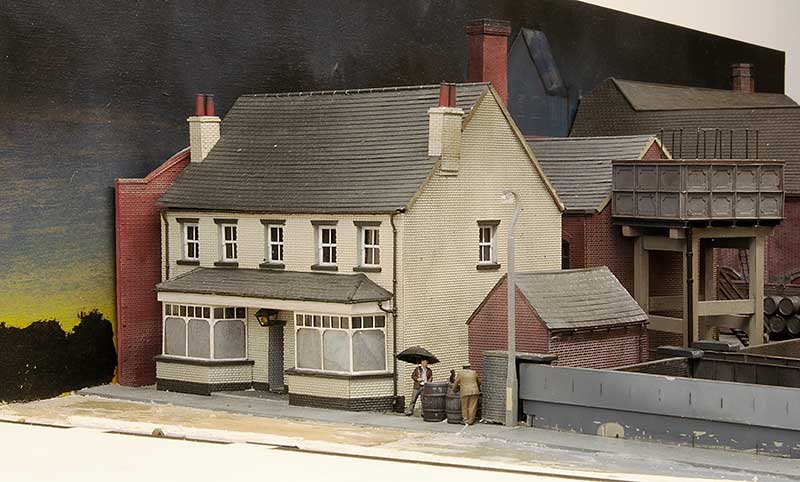 With hindsight it was probably a good thing I was a tad obsessive about the buildings and detailed up the side of the pub that, at the time of building it, I never thought anyone would see!
Nothing new here
 With the point rodding redone and signal wires back in place theres not really anything left to do on Brettell Road part 1. I was hoping to embrace the latest technology with the rodding and decided to go with 3d printed BR stools from Modelu. However those didn’t work out for me at all and proved to be far too fragile. Ive sent them all back and Alan is going to investigate as he believes there was a problem with the resin. I’ll do a follow up post when he comes back with his findings. So as the old adage goes, sometimes its best to stick with what you know I went back to the trusty Brassmasters etched ones instead.
 The cranks are also Brassmasters although I’ve used the MSE bases as I thought they were better. The rodding itself and signal posts are also from MSE with the signal wires from ezline. Unlike the previous version where I made some of the point rodding work, just to see if i could, I didn’t feel any need to to it again.
 A few more detectors for the ground signals were knocked up from bits of brass and my rain technique of coats of Tamiya smoke and AK wet effects fluid reapplied. I guess you could say I’m back to where I was a few months ago!
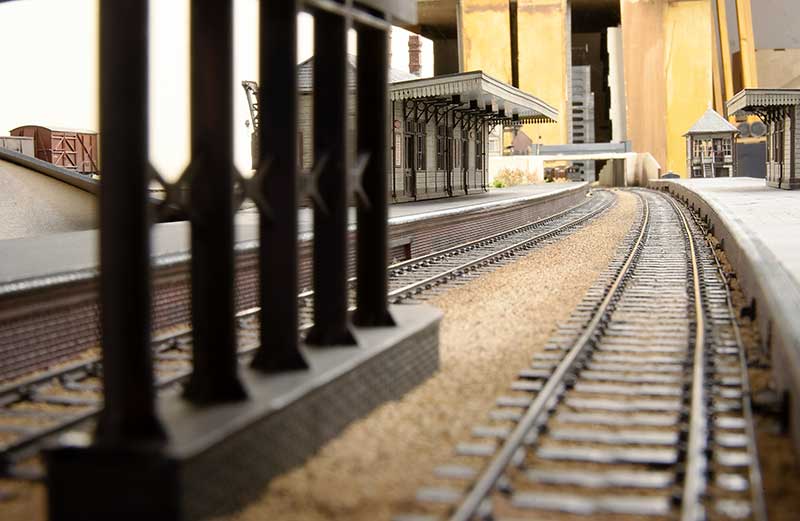
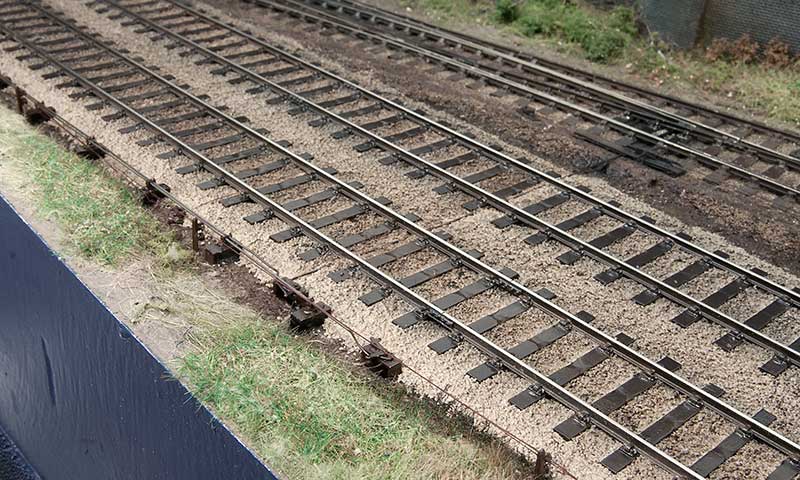
 Theres something oh so familiar about glimpses of grubby track between bridges and retaining walls.
 At the other end of the layout the extra bits of the bridges have been added.
 One thing I forgot to mention before is this stuff. Its great for fixing ballast and while its no where near as cheap as the traditional PVA/ water/ washing up liquid concoction it can be used straight from the bottle with no messing around wetting everything first.
Wires and signals
Part of the process in upgrading Brettell Road and preparing it for part 2 was to redo the wiring. Those that have been following from the start will recall that it was initially only a plaything and not an exhibition layout and the wiring reflected that being just 4 wired between boards. 2 for the DCC and 2 for the AC supply. A concession was made after the first show to provide short protection for each board but its not really how things should be done so its been mostly stripped out and done again.
So now the DCC is split into 3 sections. One for the yard, one for the mainlines and one for the accessories. Theres little point having short protection if said short cuts off the ability to throw the points and resolve it. The AC is also split into 2 sections as well, the second being a DC supply for LEDs. You can use AC for LEDs anyway but the flicker can be noticeable sometimes. So now theres 10 wires between boards instead.
Signals
The new arrangement for entering the yard has required a few new signals as well.  Mainly a couple of ground signals from the MSE kits. I need a couple more for part 2 (one of which is a double) so I built them all together. these are powered by servos controlled by a Tam Valley control board.
  I guess this also comes under signals? A simple limit of shunt sign from a MSE lamp a bit of brass tube and some microstrip.
Below a couple of mood shots .


No going back now! part 2
Well the engineering works, true to form, over ran and took a bit longer than I expected. However the mini people of Brierley Hill will be pleased to hear that services can resume. I used to be a fan of the JLTRT track colour spray paint but as that range is long gone now and my last can was pretty much done for an alternative was required. Halfords do a ‘camouflage’ range of very matt colours in their rattle cans and the brown is ideal as a basic track colour.
  The completed track ballasted and weathered from under the bridge. The blocks on the right are for the point rodding and I haven’t fitted the point motors yet.
 The left hand end from the other side of the bridge. I have a couple of ground signals to add yet.
 And the right hand end. This is the end that required the most adjustment of whats already there.
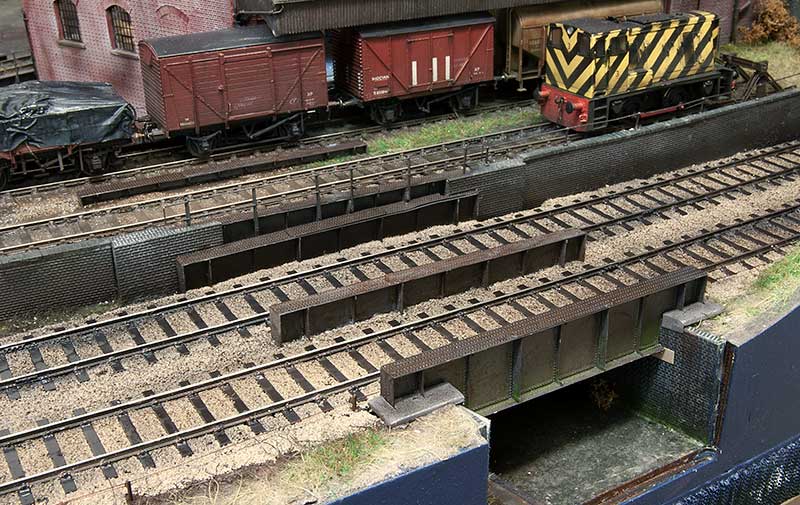
  The bridges over the canal have been adapted to fit in their new locations. I still have a bit of work to bed them in properly and I intend to fit a couple of central girders between the tracks on both levels.
  The nearer buffer stop has been repositioned slightly and a new bridge built. I decided to angle it a little and do a bit of scruffy road to go behind it.
  Old meets new!
No going back now! Part 1
It seems that the good folk of Brierley Hill need to rely on buses for a while… …Brettell Road is currently somewhat disrupted! Work progressing on the plan to double track the layout. One of the advantages of designing a layout on a computer and having a friendly laser cutting chap is you can design bits to replace things you really should have thought more about the first time!
Ive talked before about the regret at not making the layout a double track and I’ve also touched on using MDF as a trackbed which turned out to be a tad too unstable. The main lines have been replaced with 6mm ply and a hole cut for it to sit in. Pictures of Brettell Lane in the period show some encroachment of flat bottom trackwork but in the form of pointwork. Further down the line, north of Dudley the Midland lines were also flat bottom in the period I am modelling and since Brettell road has always been more Midland anyway I decided to go with flat bottom trackwork for the plain lines. Specifically mills clips courtesy of Colin Craig. (the actual clips will be added after testing.

Chains of slips under bridges all seem oddly familiar for some reason! Like my other model nothing in this one is straight either!
Thanks to Colin and Tim for their assistance in supplying bits.
Bit of a mixed bag
Bit of a mixed bag this post, starting with;
A kind gift.
My friend Tom contacted me to say he had an old Millholme models kit for an LMS 30t bogie bolster and did I want it? Of course it would be rude not too!
The kit represents, as best as I can tell, a diagram 1682 45 ft bogie bolster. These were a continuation of a Midland design with the only obvious difference being that the earlier ones had handbrake wheels rather than compound levers. The sides and solebars were, nicely, cast in one piece and being as old kit the bufferbeam and ends where missing. The trussing was also cast in whitemetal and was somewhat optimistic as its a long piece in a not very strong and somewhat bendy material.
 So to work I replaced all the trussing with 1mm L section brass from Eileens. The brake lever castings were OK and they are both mounted at one end. It appears that only the bogie at this end is braked at all.
 The bogies are ratio ones and I ditched the swivelling plate idea as supplied preferring to pack them out and mount them with a screw. The bufferbeams were from my scrap kit parts box and the extra rivet detail from Archers transfers. The buffers were the ones supplied in the kit.
Lampost conundrum
My plan to extend Brettell Road includes completing the road currently on the left of the layout as well as adding a new road. Digging around looking at local pictures in the late 50s the lamposts seem to be mostly the concrete cast type. Theres a couple of options for these. Hornby Scaledale none working ones and woodland scenics working type. I immediately discounted the latter as they are far too chunky and just look awful.
 Not that the Hornby ones look any better. Im not sure why they bothered to produce these as they are basically crude lumps of resin and they don’t even provide a foot for modellers to mount them. The idea of fitting a surface mount LED and hiding the wires on the none viewing side went out of the window! I must be able to do something better than this surely? Especially as, at most I will only need 5 of them.
 So with some K&S metal section (1.5mm square for the top and 2.4mm Hex for the main trunk I made this.
  The base was blended into the main columns and sprayed with Plasticote suede. I also very lighty dusted some grey primer and blank over it to give a more concretey colouring. Below is how it looks in position.
Baby Grampus
Flicking through Simon Bendall’s bookazine ‘Modelling British Railways – Engineers wagons’ I was taken by a wagon I’d not come across before. The GWR designed ling. A 14 ton open wagon that looks like a baby grampus. In the bookazine, Hywel Thomas built one by cutting down a Chivers Tunney but I decided another route would be to stretch a Cambrian starfish instead.  So 2 starfish kits were found and a lot of cutting ensued. The doors on a Ling are shorter than a Starfish so each door had a section cut from the middle with new strapping from microstrip. Buffers are from Lanarkshire models, W irons from Bill Bedford, door bangers and steps from Rumney Models and the test of the underframe from plastic section and the spares box.
 Above is the reason i referred to this wagon as a baby grampus. Along side one it’s considerably smaller. Comparisons between the shortened doors and the starfish originals can also be seen.
Midland brake van evolution – a visual guide.
One thing the Midland did well was use standardised bits and adapted them as they went along. This is quite noticeable in their signal boxes but also in their brake vans and, visually at least, the evolution is pretty obvious and logical. So from left to right…
 So starting with the early midland 10 ton van. This was very much of its time and featured 3ft 6in wheels with a veranda at one end only. The open platform thats so familiar to the idea of a brake van wasn’t something that the Midland really went with and only one lot (D2096) of 4 vehicles would feature this in the future. The rest of standard Midland brake vans would all feature a full length roof.
The later 20 ton van was built to diagram 1659 between 1924 and 1927 and featured a longer 12 ft wheelbase with 3ft wheels and a cabin that was 13ft 4in inside. This would become the standard size cabin for the rest of the midland vans that followed The similarities between the 2 type shown are pretty obvious with vertical planking and basically the same end panels.

Next came diagram 1657 (the diagram numbers don’t seem to follow in a chronological order) built between 1927 and 1931. The obvious change was the duckets on the side. The outer ends also evolved to feature a smaller opening and flush planking but still with the same offset central vertical spar.
 From diagram 1657 to diagram 1940 built in 1933/34. Virtually identical except for an increase in wheelbase of 14ft which resulted in a visually less nicely proportioned vehicle. It’s suggested that the increase was an attempt to improve stability at higher speeds.
 On to diagram 1890 also built in 1933/34. Still 20 tons but with another wheelbase increase to 16ft and an increase on overall length from 20ft to 24ft. The cabin size remained the same but there was a change from vertical to horizontal planking. Note the end central spar now really is central!
 Finally diagram 2036. Basically the same as before but with the door opening moved to the far end. The planking on the ends is now gone as is the central spar as well as the upper part of the opening following the roof line. There were a few slightly different variants of this design such as diagram 2068 (the last being built in 1950) which featured a deeper ballast box between the wheels. Some of this last batch were also fitted although many of the other types were through piped at times in their lives.
Good old fashioned kit bashing (with a spot of RTR bashing too)
 OK this one isn’t a particularly difficult exercise. The Oxford tank wagon re-liveried to Shell/BP livery. On my first Oxford tank I mentioned that the printing came off really easily with white spirit but not this one. This needed IPA and a fair bit of elbow grease! I added a discharge pipe and the logos came from Fox (they are a smidge to big for this little tank to be honest). I noticed, too late, that Oxford have modelled both of the vertical end ribs facing the same way on these tanks.
 Next up, a bit more fitting in with the post title. A diagram 2070 12 ton goods van. When I built my diagram 2108 van from parkside kit I used the ends from a ratio 12 ton van as the Parkside ones are the wrong shape. The rest of the ratio kit sat in it’s box until I recently decided to do something with it. These vans, although looking very LMS were actually built (for the LMS) by the Southern in 1942. I files off the metal framing a the ends and re-scribed the planks. The ends were just scratchbuilt from plasticard using the vent left over from the afore mentioned Parkside kit.
  The finished van. Bufffers are from Accurascale and the old label from Holler.

Next, an Airfix LMS brake van chopped up to be rearranged into a Diagram 1890 version or ‘reverse Stanier’ as they are sometime called.  As can be seen theres not much too this one and it makes quite a good project for those new to chopping stuff up. These models can be found really cheaply so theres not a lot to loose. The ends have been scribed as the upper ‘window’ section squared off with plasticard as filler. A bit of microstrip for the vertical frame and the upper beading on the sides was sanded back.
  The finished Van. Don’t forget to redo the steps on the solebars!
 This is a cheeky little one. Basically the Parkside kit for the diagram 1657 20 ton brake van but with the wheelbase extended from 12 to 14 feet to produce a diagram 1940 version. One of those ones that i’ll be surprised if anyone notices!

 The same cant be said for this though, I think people might notice! Same start point of the parkside kit but rebuilt to a diagram 1799 40 ton bogie brake van. The LMS built 3 of these specifically for the Copley Hill to Armley line and thats where they stayed. I just liked it for its wierdness really!

Old stuff
While I’ve been in a brake van kinda mood I finally got around to improving an old Hornby LMS 20ton version I had and making it a tad more suitable for Brettell Road.
Pretty basic detailing job on this one.  A selection of Midland versions.
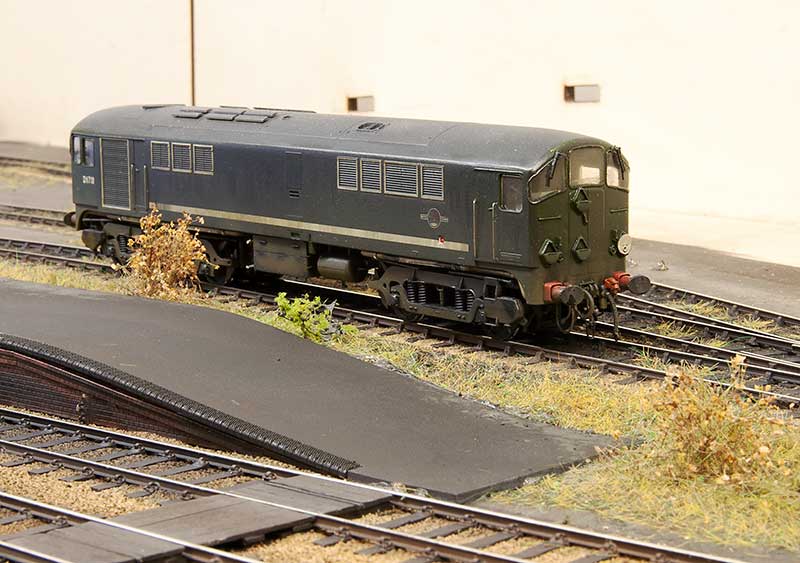
 Actually this brake van originally came from the Amlwch layout along with the above 47 and 24. Of the three the class 24 is as it was brought. the 47 having been brought a bit more up to date (well 1987 anyway). I wonder if Amlwch is still around somewhere?

Bit of a different angle. Let’s call this train an internal user?

Haven’t done a rainy pic for a while. NBL class 21 nestles between another pair of type 2s.
Building plastic kits – some thoughts
Thought I’d do a bit of a more detailed post about building and finishing plastic kits and the thoughts behind it as I go along. As always other methods are available and no one has to follow every step slavishly. Just take from this what you want if it helps at all. The intended victim in this case is a Parkside LMS (ex MR) 20 ton brake van, kit PC58. Im not sure how long this kit has been in the Parkside range but it has the look and feel of one of the later kits however the instructions do refer to the Woodhead transfer sheets as a source of lettering and they vanished a long time ago now. More importantly and the reason to devote a little more than my usual ‘heres a bunch of pictures, hope you like them’ approach is this is the last original Parkside kit in my stash so it’s also the last kit I will build that I brought from Richard Hollingworth himself.
So armed with the kit, the instructions, a selection of glues and other rudimentary tools plus the all important prototype references I set to work. Generally parkside kits are as close to model railway lego as you can get. They kind of fall together however don’t take this for granted and in this case I found that the floor was about 30thou too narrow. This was evened up with a couple of bits of microstrip either side. The importance of a dry run to check the fit of all of the parts parts cant be overstated.
Another thing not to assume is that the kit is right or accurate. Again generally speaking the vast majority or Parkside kits are but theres a couple that have a few clangers. The vac’ braked 16ton mineral wagon with a 10ft chassis not 9ft and the LMS fruit can with the wrong shaped ends are the better known examples. It’s strange how the right chassis is in the range for the mineral wagon and the common fix for the fruit van is to use the ratio LMS van ends and roof. As these are all under the Peco banner now you would think this would be an easy fix for them. Perhaps they don’t know? The glues I will be using. as theres no metal to metal joining required the soldering iron can stay turned off for this one. The main glue I will use is the Tamiya extra thin cement.
Building the body
 The body assembled, I drilled the holes for the handrails before putting it together, the instructions say to do this after but i find it easier this way. Although not really a decision as such with this kit as the handrails aren’t moulded on this is usually the first point where you will start to make your own decisions.
Handrails – do models look better with separately fitted ones? Yes provided you don’t mangle the body too much removing the moulded ones and the replacements are not all wobbly. I use 0.35mm nickel silver wire and flat nosed tweezers to shape them. You need to keep the bends crisp and the straight bits straight. If you mess up a bend don’t waste time trying to straighten the wire out as you wont. Just start again. Separately fitted handrails that are all out of shape against a gouged body will not look any better than the moulded ones you carved off. Whatever you do though if you do have messed up handrails and someone points it out don’t try to claim its because they were bashed about in real life as it’s obviously a bodge! I think this stems a lot from the late 90’s when people were fitting all manner of after market bits and dodgy etches to Lima diesels. The fact that a lot of these parts were worse than what people were carving off the original body seemed to pass people by as separate bits was what you did back then!
Decision 2 – the lamp irons. Will they look better separately fitted? Yep but theres another thing to consider, will I knock them off in layout use? When people are new to finescale models (I don’t like that term but it serves a purpose here) theres a tendency to fit every tiny bit of detail that you can. With experience of operating your stuff at exhibitions you will find that you tend to draw back from that to point where practicality takes over. Where that point ends up will naturally be different for each of us.
It helps a little to delve into how human beings work. When I was working as an illustrator we placed a lot of emphasis on learning to see. Although we have sight we are not really wired to properly look at things. We are designed to make quick judgements and move on, basically can I eat it or is it going to eat me? What we are good at though is spotting something wrong or out of place. So a moulded lamp iron in this case will go unnoticed by most people. But one thats been knocked off wont. This pre-determined fascination with the out of place can cloud our judgement of many things. We notice graffiti on a wall so we think it’s prevalent. We don’t notice the 100 other walls we walked past that didn’t have any. We notice the wagon in a train that looks like it should be in the scrap yard and ignore all those that don’t look like anything like that. This extends to our history too, especially our photographic history. Photographers like the rest of us will ignore the mundane as focus on the thing that catches their eye. If you look at pictures of New Street in 1987 you would believe pretty much every train had a class 50 on the front and there was one DMU a day, as for EMU’s you can forget those completely!
 This next stage will be dictated by how the kit in manufactured and can in the right circumstances save time later. If the kit is moulded in all the same colour (and its not black) you can skip this bit. However if the body is one colour and the underframe is black you can safe a lot of painting later if you paint and finish the body before you move on to the underframe which is what I have done here.
The Underframe
 A wagon of this size is border line for needing springing or compensation in my experience. On wagons that don’t need it one tip I’ve found that works is to slip a piece of thin paper between the axle and the bearing at one end only while putting it all together. The other end should have no slop but the width of the paper gives just enough movement of 1 axle to keep everything on the rails. A piece of glass to check that the wagon sits square on all 4 wheels at this stage is another must however. Another handy thing is the Brassmasters axle spacing jig that ensures the axles are parallel. It doesn’t matter how nicely your wagon sits on the glass if its constantly trying to steer itself off the track!
 This is the underframe with all the supplied bits in place (except the steps) Its up to you if you chose to stop here or not.
 I went for ‘not’ and added the break linkages and safety loops. If you are going to do this drill the holes you will need in the brake shoe moulding before you fit them to the model, it’s nigh on impossible to do after. The safety loops are glued in to bits of 80thou microstrip that have a hole drilled through them. This is my stop point as there’s more detail that you can add regarding the correct shaped linkages and operating gear behind each wheel. It’s not something i can see on the layout unless I make a really determined effort to look for it.
Hang on a minute, what was all that rubbish about bits of paper and not compensating stuff then? Well sometime you can kill 2 birds with just the single bit of garden aggrigate! Of all the options I am on record as believing that rocking compensation is not the first or even second best option of the 3 we have. However the internal ones do handily provide more rolling resistance than pinpoint bearings and on a brake van and a layout with gradients thats not a bad thing.
 Let’s talk about buffers. If your plastic kit has moulded plastic buffer heads, let’s not beat around the bush here, they will be crap! I have yet to see any that aren’t! Options for replacements come from Lanarkshire models, MJT, Wizard and Accurascale. As always check your prototype pictures as the ones on the wagon you are building might not be the ones the kit represents. This applies to axleboxes a lot of the time too.
In this case I opted to keep the moulded stocks and replace the heads with those from MJT, The housing was drilled out very carefully using a hand held pin chuck. Don’t be tempted to use a powered drill as the wall you are left with is very thin and even the slightest bit of heat from the drilling will melt it. A 0.5mm hole was drilled through the centre of the buffer and through the bufferbeam to account for the tail of the buffer head. You can chose to spring the buffer if you like. I don’t find it makes any real difference though.
 Weight – I try to aim for 50 grams for a 2 axle wagon. If you have the room inside then these self adhesive car wheel weights are ideal. This brake van needed an extra 30 grams adding.
 Next stage is the running trial. With any kind of van I do this before fitting the roof as once its on i don’t want to try and get back inside. The wagon is tested through all the pointwork and sidings and any derailments or unpleasant jolts or bumps are investigated and corrected. In this case I’m happy to report there were no problems.
 The finished build, even at this stage you still need to constantly check your work. note the bit of white near to the closest handrail? Something I’d not noticed until I looked at the photo. I used the Revell liquid polly shown earlier to fix the roof. The reason is that the Tamiya stuff evaporates too quickly. The Revell version is thicker, wont run and gives me a little longer to position the roof.
Weathering
Im very much of the opinion that a restricted pallet is best for all sorts of modelling applications, You don’t want to go too mad! As discussed earlier unless you are going for the scrap yard look you kind of need your weathering to be one of those things thats there but its not really noticed. An important point I feel is don’t expect one technique to give you all the effects you want and try to work with each technique rather than against it, Things are so much simpler if you do!
 So stage 1 washes – to represent washed on dirt you need to wash on the dirt! I make the wash from a mix of Revell 89 and no 9. If you are doing multiple wagons at once keep changing the mix and the paint to thinner ratio unless you want them all to look the same. Don’t be afraid to go in with neat paint as well to mix it all up a bit and work ‘wet in wet’. Ive done that here on a few planks and the roof. It doesn’t matter if it looks a mess at this stage as you will need to leave it for no longer than 24 hours and potentially clean it all off again with cotton buds and clean thinners. A big part of weathering is not about how you put stuff on but how you clean it off. Having said that I have found on many occasions, especially with planked vehicles, you can skip the cleaning stage and this was the case here.
 Next stage is airbrushing. For this I use AK interactive dark mud as it comes and a mix of black and Humbrol gummetal for greasy/ sooty deposits. Think about in the real world the direction that the atomised dirt hits the vehicle and try to emulate this. Track dirt from about 45 degrees below the model and roof dirt straight down. As aways refer to photos. What you don’t want is a rally car look as if the model has been flinging itself around a Welsh forest for a week!
 The last stage is best described as titivating (and its pretty hard to show the effect it has in pictures but i still think its worth doing). I use the burnt umber gouache for small deposits of rust. It doesn’t want to sit on enamels all that well so will naturally give a rust like effect. This can be fiddled with with water or paper towels/ cotton buds until you are happy. Its worth noting that if you are doing a vehicle with a lot of rust it’s best to do the gouache stage before the washes. Ak interactive also make sets of weathering pencils, including a set just for rust, which work well in combination with the gouache.
The lighter brown and gunmetal were used to dry brush areas of wear on the steps and the underframe respectively. The grease is a wash that contains particles and is used neat around axleboxes and bits of the underframe that are greased in real life.
 As I said its hard to see the difference this has in photos. The oval crop is before and the main picture after. While you have the gunmetal out you can pick up some of the thicker paint that always forms on the inside of the lid with a cotton bud and dab it on to the buffer faces to represent more grease.
 And there you have it. All that work for a mundane wagon that will hopefully just blend into the scene and go about is business in a most unremarkable, unnoticed way!
Here comes the PR!
A while ago I showed a picture of a Powsides ED 7 plank wagon. ED stands for Earl of Dudley and I said at the time that it was a bit early for the layout and that that PR, Pensnett Railway would be more appropriate. A chance discussion on an industrial railway modellers Facebook group revealed that Planet Industrials actually do a set of transfers for PR wagons so a set was duly ordered.  A couple of existing wagons were repainted into red oxide (the ‘shunters truck’ and a grey 7 plank RCH design) and a couple more RCH wagons were knocked up from good old Parkside kits. I decided to keep the Powsides ED one as it was (although weathered a bit more to make it look more tatty) and do the shunters truck as ED too in a sort of crossover period. Ive never found a photo of ED and PR wagons mixed together mind you.
The above train is all very ‘corporate’ and it wont appear at shows like this. The PR wagons will be jumbled up among other mineral wagons. One thought I have had though is by making Brettell Road 2 tracks the industrials will look too out of place on the mainline so the plan is to extend the siding the train is on to the fiddleyard and have them appear from behind the warehouse, using the yard as a exchange sidings.
 I was intrigued by the recent Oxford rail tank wagons and decided the yellow Carless Petrol version would break up the sea of grey and bauxite wagons on the layout. As with the ED wagons its really a bit to early for Brettell Road so I’ve weathered it up to look pretty tired. Theres a few things worth noting with this model. The first is the axle length is odd. Happily its still 2mm and its not odd in a crazy short, Lima way so you can swap P4 wheels onto it and use the original axles. The second thing is that the lettering and the red stripe don’t react well to white spirit. If you want to remove them then great but if you use enamel washes thinned with white spirit for any of your weathering, as I do, and you want to preserve the livery its best to give it a quick coat of matt varnish first.

Just the simple things.
Sometimes it pays to drop back a gear and just do a few simple things that are not too taxing. Things like a few simple wagon kits or just some pictures.  And what could be more simple than the good old Airfix mineral wagon kit? This ones been converted to a diagram 102 variant and weathered with gouache and a hint of AK interactive weathering pencils for the rust.
  Next up a mix and match of parkside bits to produce a Hybar. The rail itself is a neat little etched kit from Rumney Models.
Below a few pictures.


DMU project – Done!
One of the things that struck me as a bit weird with the pics of the class 103 underframes I showed last time was that the bogies seemed to be too far inboard from the ends. The class 103 (and class 110 for that matter) have bogies centres of 40 feet but Hornby have them set closer to 38 feet. This is not something I’ve ever seen mentioned before with regards to the Hornby 110. On the trailer and the none powered end of the DMBS, because i had used Brassmasters bogies it was simply a case of moving the bogies out. Originally the mounting plate sat neatly inside the moulding (although raised by some 100thou evergreen strip. Now they sit outside of the moulding by 20thou as can just be seen in the picture. At the powered ens U opened out the floor at the inner end and simply bent the forward clip of the bogie to push everything back (the sideframes aren’t the best fit to the power bogie and were way to stiff before anyway!).
The bogies have been backdated with bits of wire and microstrip.  Happier now. With that, some paint, the seating modified and some LEDs, aside from some windscreen wipers I can call these done.
Class 103
 The roof vents were kindly printed for my by my friend John Chivers and I extend my thanks.


Class 129


And finally both units together. 
The last few DMU’s – Part 2
Attention has moved the the under frames of my DMU project. As I mentioned when building my class 114 the easy option for the 103 would be to stick with the 110 under frames and I would expect most people wouldn’t notice. However as per my 114 project that wont really do.
 The DMBS. Its easier to start with a center car chassis than a power car as when you cut off the Hornby details it gives you a flat floor to work on rather than just a hole. The battery boxes are from Replica and most of the other (black) bits are spares from a Heljan class 128. The white bits are scratchbuilt and the buffers are from Lanarkshire models. The heating ducts on a class 103 are quite distinctive as is the way the exhausts are routed past the inner bogie.
 The DTCL I must add a note of thanks to Eddie Knorn for his assistance in helping me work out were the bits all go.
 For the class 129 the obvious thing to do would be to mount the body on a Bachmann class 105 chassis. However the class 129 chassis is a bit different to a normal cravens unit and shares some parts with a class 108, especially the distinctive battery boxes. So most of these one came from a Bachmann 108 with again some scratchbuilt parts Buffers and their stools again come from Lanarkshire models.
With all these there is still a little more to do before paint, namely bogie steps, air horns and lamp irons.
The last few DMUs
 Long time followers will recall this old picture of a Hornby Class 110 DMU that I intended to chop up into something a little more ‘local’. With the acquisition of a Bachmann Derby lightweight as a gap filler it kind of fell off the radar a little. I did debate doing another class 100 but in the end I have decided that a Park Royal class 103 would be the target of my attentions.
A little about the prototypes
These units were introduced in 1957 to the Birmingham LMR region. 20 sets were produced and the last vehicle in passenger use lasted until 1983. A few vehicles survived a little longer in departmental use (Derby RTC Lab5 lasting until 1991) or as a Sandite unit (1985). There was another oddity in that one set was converted to a Viaduct Inspection Saloon. This was withdrawn in 1978 but was saved for preservation.
The 20 sets were all allocated to the Birmingham area for their first decade operating mainly Walsall services before moving on initially to Chester then spreading further afield. Although none standard they did use the blue square coupling code so could work with the majority of other DMU types. Pretty early on they started to suffer from cracking in the bogie frames and their poor reliability saw steam hauled services return to many of their diagrams while the problems were sorted out. Aside from the oddballs mentioned earlier they only carried 2 liveries. Green (with or without whiskers and later with a small yellow warning panel) or BR Blue (small panel or full yellow end). None received blue and grey livery.
The Model
The similarity between a class 103 and the class 110 is reasonably obvious and (as with my class 100 and 114 conversions) the desired result can be achieved buy cutting parts out and shuffling them around, Plus a few spare panels from previous projects.
 The above diagram may be of assistance. The red lines are cuts or areas than need to be removed. The orange areas are surplus and the blue areas need filling in. On the driving trailer everything aft of the last door stays the same as the class 110. I didn’t cut into the roof.
 Initial stages of assembly. You can see the additional panel from another body shell in white.
 Face on you can see where the windows are opened up to match the class 103. The new frames are 10 x 30 thou microstrip secured to the inner edges. Incidentally in working on this conversion I have come to the conclusion that the class 110 windows aren’t right as supplied. They need to be wider and the angles tops need a slight curve.
 The 2 body shells after a coat of primer and more work with filler. The angled tumblehome Hornby used has been rounded off and any missing hinges replaces with etched ones from Southern Pride. I need to add another cental filler to the DMBS yet.
Why do one when you can do 2?
 While in a DMU kinda mood I have started work on a class 129 DPU using a DC kits body kit.
A bit on this prototype as well
3 of these single car units were ordered from Cravens by the LMR. These had a none standard coupling code (yellow diamond) meaning that the could work with the original Derby Lightweights. Introduced in 1958 they lased until 1973 with one going to the RTC initially for brake testing but later for hydraulic transmission tests and gaining the name ‘Hydra’. None of the 3 survived into preservation. Although 55997 was initially allocated to Walsall it was 55998 that was most often to be found working int he Birmingham area during the late 1950s mainly on New Street to Walsall, Wolverhampton or Coventry services. Later it would regularity continue on to Rugby and one slightly unusual service was Alrewas to New Street with produce from market gardens. As with the other DPU class, class 128 they would regularly pull a tail load.
The Model
Charlie supplied his class 129 kit with a standard class 105 cravens DMU cab moulding (no doubt tooling up another cab just for this class of 3 units wouldn’t make a huge amount on commercial sense). So there is a little work to do to make it closer to the prototype, mainly removing the destination box and moving the marker lights down. I elected not to use the supplied flat bass etch for the route indicator box and made my own from microstrip.
 The main bodyshell assembled with extra little details. On something so plain sided it pays to add these little things to break up the sea of grey plastic
More thoughts on Brettell Road 2 but not kinda not at the same time
A while ago I shared my initial thoughts on extending Brettell Road. For those that missed it click here.
The initial plan required some modification to the Left hand end of the existing layout but otherwise it was pretty much an add on. Then the coronavirus happened and while plans were firmed up no wood was cut (lazered) and its not progressed to any kind of physical reality. In that time my thoughts have turned to correcting the first regret, that being that Brettell Road 1 wasn’t double track to begin with. This would also have the benefit of replacing the mainline track bed with ply as initially I used MDF. The layout was only supposed to be a play thing if you remember.
This would require some additional tweaks to Brettell Road 1 but actually not as drastic as one might think.
 Starting with the left hand end, where the new boards would attach to the existing layout in addition to the track. I was actually quite generous with the track spacing and the double track would fit with only a slight tweak to the wall shown by the arrow. There’s another advantage here as my first plan would involve splitting the single slip across the baseboard joint but the double track pulls everything further in to the layout meaning the entire slip falls on this board. No changes would be required to the bridges.
 At the right hand end there’s a benefit to slewing the track away from the front of the layout with space then for the second track in front of it. The plan is to extend the furthest siding a little while shortening the front one a smidge. This would allow me to start curving the front wall just after the canal bridge to generate the extra space. I will need to build a new bridge. None of these tweaks are particularly drastic.
Below is a mock up of how it would look.

Compound finished off.
So back to the Bachmann compound then.

The body looks pretty much spot on to me and the firebox Bachmann had modeled suits the loco I have chosen to do. 40925 was a late survivor and based at Bournville so that’s local enough for me. I added the lifting points to the front frames and the large pipe coming from the smokebox. This is an exhaust steam injector and not all compounds had them. As far as I can tell they were only fitted on one side, that being the side opposite the driver (compounds came in both left and right hand drive versions). The smoke box has been painted in Revell no9 and the difference looks a little stark at this stage.

The ejectors are the Bachmann ones cut down, again refer to a pictures of your specific loco as these varied a lot. There’s a connecting rod that appears to go from the back of the ejectors to somewhere near the slide bar support bracket. In the pictures that show this well it always looks extremely close to the face of the rear bogie wheel. I decided the best way to replicate this was to mount it on the actual bogie instead.
 Crew from Modelu – the driver looks distinctly uncomfortable straining to see. As the compounds had very large cab roofs I haven gone for a rain sheet on this model.
On to the tender

The body Bachmann supplied was a later Fowler type with coal tunnel and doors. Of course the loco I had picked had the earlier type without them. Luckily Brassmasters do a conversion kit and coal rails so that was what I used. The floor in the Bachmann model is flat so I knocked up the coal chute from plasticard. Incidentally the supplied handrails are absolutely fine and don’t need replacing. They had to be on the one side for no other reason than I mangled it!
So the model has been weathered (to look tired but not scrap line) and aside from the wheel balance weights I can call this one done.


