 Those who kindly stopped by for a chat at Scalefour Crewe will have seen me fiddling with a set of loco frames. Above is the progress I made over 2 days which to be honest isn’t a lot but that’s a good thing. I always feel that if you get a decent amount of stuff done demoing at a show you’ve kind of missed the point of why you were there!
The Johnson 2f minefield.
The frames are an old Alan Gibson kit for the Johnson 2f or 1142 class, sometimes referred to as ‘mineral engines’. These and the similar 1357 class are often lumped together as 2Fs but there are a whole ton of differences between locos regardless of the actual class. I recommend a couple of books if you want to go into a lot of detail These being Stephen Summerson’s ‘Midland Railway Locomotives’ Volume 4 and Bob Essery and David Jenkinson’s ‘An Illustrated History of LMS locomotives’ volume 4.
The 1142 class 2fs were built by 4 builders over a 2 year period. Those being Kitson, Dubs, Beyer Peacock and finally Neilson. Initially they were very handsome locos and had a family resemblance with the 700 class Kirtley goods, if you put the laters outside frames to one side. As with all things Midland they were modified over their lives with Belpaire fireboxes and 2 different types of Deeley cab. The lower roof one being the better proportioned of the 2. The class had so many modifications that it’s definitely a case of pick a prototype and model what you see. Some had sandboxes at the outer end of the frames. Some either side of the middle driving wheels. Chimneys were all sorts of different heights too. The main oft’ quoted difference between the 1142 and 1357 classes is the wheel size. the former having 4ft 10in drivers and the latter 5ft 3in. An easy way to tell them apart is the 1142’s had brake linkages outside of the wheels while the 1357’s had them inside. Well most of them did anyway but there are some exceptions to that as well.

 So my intended victim. Pictured here at Harbourne station in 1957. Ive long like the first image due to its run down nature. The station having been closed to passengers in 1934. At the time the picture was taken it was beign used as a wood store for the nearby Chad Valley toy factory. Note also the LMS open stil with its LMS lettering. Both images © 2015 – 53A Models of Hull Collection and used with kind permission.
58185 was one of the Neilson builds being constructed in 1876 and lasting until 1962 (86 years!). It was originally numbered 1245, then 3013 followed by 23014 before receiving the BR number in 1948.
The Kit
It would be fair to say the Alan Gibson kit is of its time and was probably towards the higher end of kit design when it was released. It doesn’t have any of the slot and tab style niceties we are accustomed to these days though. You can see from the top picture that I used some Alan Gibson frame spacers and drilled the frames for CSB suspension using the info on the CLAG site as a guide (see here)  Progress so far handrails and details next. I found using a High Level Kits road runner plus gearbox with their D1 drive stretcher and a smallish motor I can get the gearbox into the boiler without having to cut into the boiler itself (which was just a bit of brass tube). It’s worth noting that if you want to do the original version London Road models do a kit for it.
The Johnson tender
Yes another minefield. These come in a multitude of different sizes. those being 2,350 gallons, 2750, 2950, 3250 and 3500 gallons. Some of the early ones came with springs above or below the footplate and there were were different inner face designs too. My kit came with the 2,350 gallon version but my prototype has the 2,950 gallon version. As the kit as clearly too small a Bachman spare body for the 3,250 gallon one was brought from their spares site. Im far from put off by a bit of plastic bashing.
The Bachmann model is pretty accurate for what it represents. A comparison of the key tank dimensions are (Bachmann/3,250) length – 77mm, width – 28.3mm, height – 16mm. The 2,950 gallon tank is length – 76.3mm, width – 26.1mm, height – 15.6mm. So that differences of 0.7mm, 2.2mm and 0.4mm respectively. I often think it’s a good exercise to think of these number in 2 ways – percentages and relationships. Dealing with percentages first the differences are 0.9%in the length, 8% in the width and 2 and a half% in the height. Its fair to say that the difference in length is all but impossible to see. The height probably not but the width is probably pretty noticeable. That brings me on to relationships. The tender and cab width are the same. If the tender was over a mm wider each side that would definitely look odd. The height as a number is harder to tell but the bottom of the beading lines up with the top of the cabside beading and this relationship is kinda obvious. Some of the class had the larger 3,250 gallon tender and this height is pretty obvious once you are aware of it.
Modellers licence
Some quick measurements showed that dropping the height of the tender by half a mm wouldn’t give the relationship to the cab I was after so I reduced the heigh by 1mm. Yes it means the tender is now a bit too low but the relationship to the cab is better.

The Bachmann tender cut into manageable chunks. The new lower beading is 10×60 though evergreen strip.
 A rough mock up. The inner chassis is Brassmasters from their 3f easychas and the outer frames, brakes and springs are from the Gibson kit. The bufferbeams are also Brassmasters and the buffers are from Lanarkshire models.

Progress so far.

 Appearing at Scaleforum was this Hurst Nelson 14T chlorine tank, incredibly generously donated by Colin Craig. He was building a batch for Mostyn and added an earlier version for me. These would not have ventured to the Black Country but years ago I helped Dave Clarke, Along with Simon Stephens, take out his layout Amlwch to various shows around the country. Amlwch (pronounced Amlook) was the location of the Associated Octel plant and while the exchange sidings for it never featured on the layout and we never had the chemical tank trains its a nice little nod to a bit of my personal modelling history.
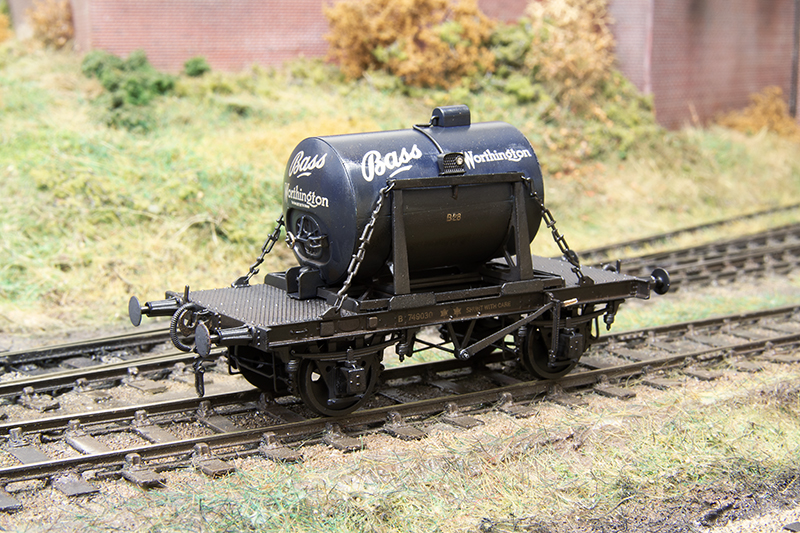 Next up another tank that I’ve not had a lot to do with really. The recently introduced demountable tank wagon RTR from Clarke Railworks. I rarely buy anything new RTR and this is the first brand new rail vehicle I’ve brought from any of the new generation manufacturers. In fact it’s the first new RTR thing I’ve brought since 2017 and the time before that was 2012 I think. I seriously doubt I’m paying any bonuses in RTR land at the moment.
 It’s changed a bit since the first Scaleforum we did back in 2017. Next up is Macclesfield in April 2026.


 And D2173. These had sloping tanks and discharge at only one end. Justin kindly supplied me a test etch for the platform.
 My little milk train in its entirety.
 Concluding my 2F project by starting with the tender The coal rails were from the kit as was the tool box.


 The kit includes a casting for the injectors but its the later combined type. I previously made the version I needed for my 2441 tank from bits of wire and tube so I just copied what i did last time.
 Some rudimentary cab details – I tend not to go too mad on this stuff as there will be a crew in the way. The floor is a bit of lead as any weight helps. The inside of the firebox is also lined with lead.


 A comparison of the 2 tender sizes.
 Not by any kind of deliberate design I have ended up with quite a little family of Johnson designs now.
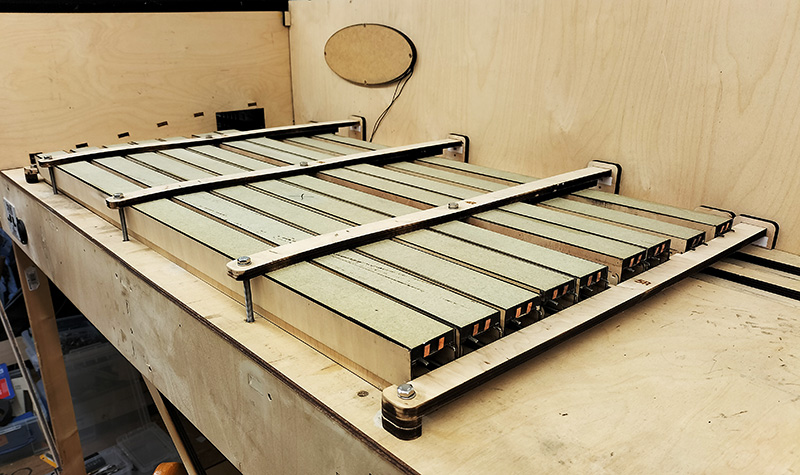 The cassettes are finally done. This is the long ones in their storage position in the station end fiddleyard.
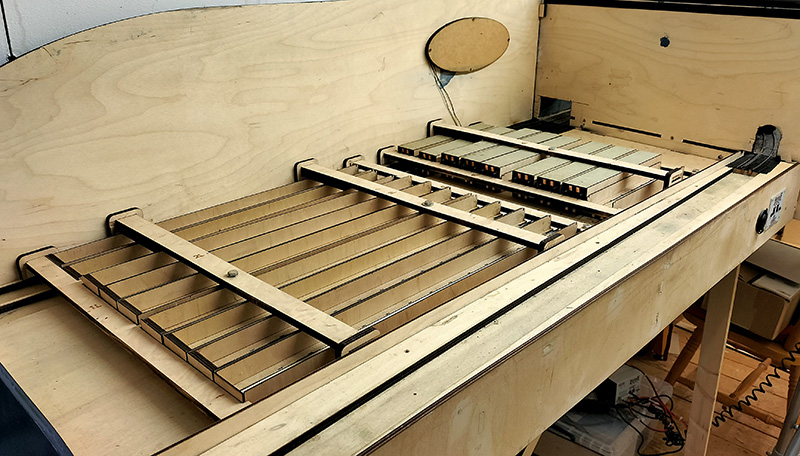 And the DMU and loco ones in the Dudley end fiddleyard. Im not usually one for counting parts but including the 5 connectors on the layout thats a total of 86 ends, 172 springs and just over 6 meters of copper strip. Ive had better projects to do before now!
 On to the tweaks on the layout itself. Just a few of these. Those at the show may have seen the odd derailment of stuff coming into the Stourbridge platform. The Derby lightweight seeming particularly susceptible to this. Turns out the barrow crossing on the left hand rail has become loose and was higher than the rail head. The crossing on the Dudley line was also a tad high but not loose so I’ve removed both to get a better fit. The Derby lightweight will be checked too to see if theres any problems on the stock side.
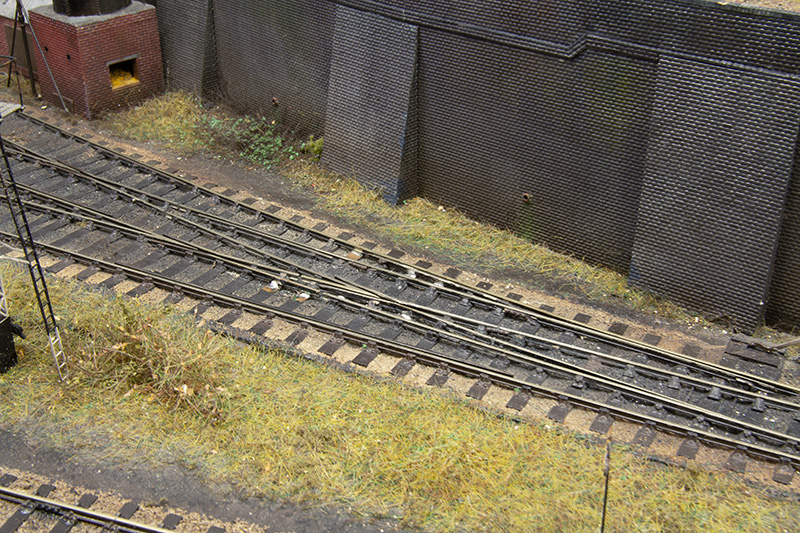 I noticed when cleaning the track that one of the smaller sections of track on the threeway was a little low. I don’t recall anything coming off on this particular bit but I’ve fixed it anyway. There were a few tight spots that have been amended too. My mint block would go through but with a bit more resistance than I liked. One of the tight spots was between the running rail and the check rail. Just need to put new half chairs in place and cosmetic fishplates. Then paint the rail and blend it all back in.
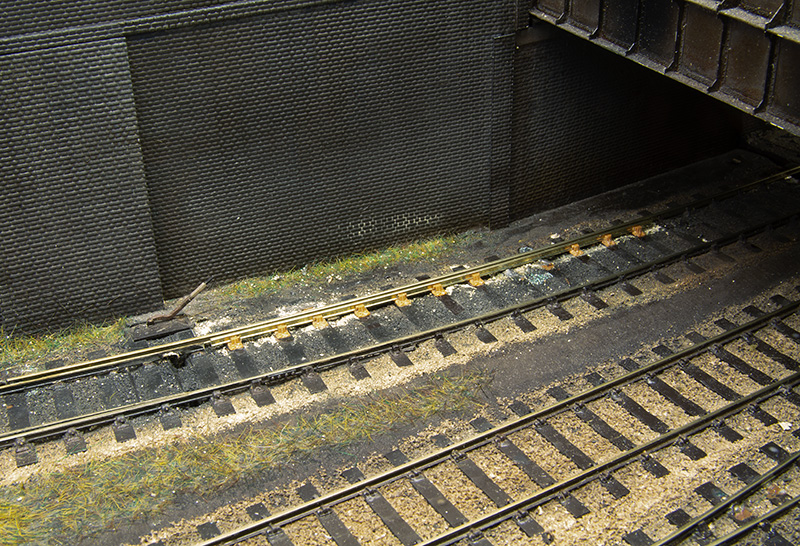 Finally the check rail coming in to the yard was originally an after thought on normal flexi-track. It wasn’t as neat as it could have been and being normal track there was no gauge widening on what it the tightest curve on the layout. The far rail was removed with the moulded chairs smoothed away and the rail replaced with proper check rail chairs.
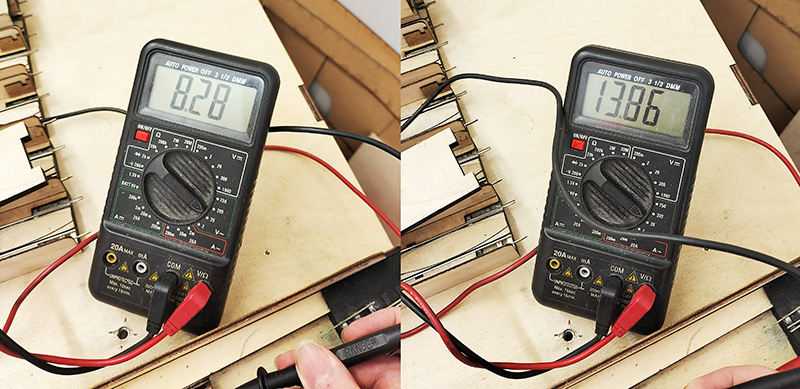 When I built and tested them originally, I tested them for resistance using the buzzer in my volt meter. What I didn’t test was if there was any voltage drop or not. On the left are 3 loco cassettes of the design we had at York showing a voltage drop of over 5 and a half volts or as good as 40%! Little wonder it caused us grief. On the right a revised design tested on 3 cassettes with no loss of volts at all.
 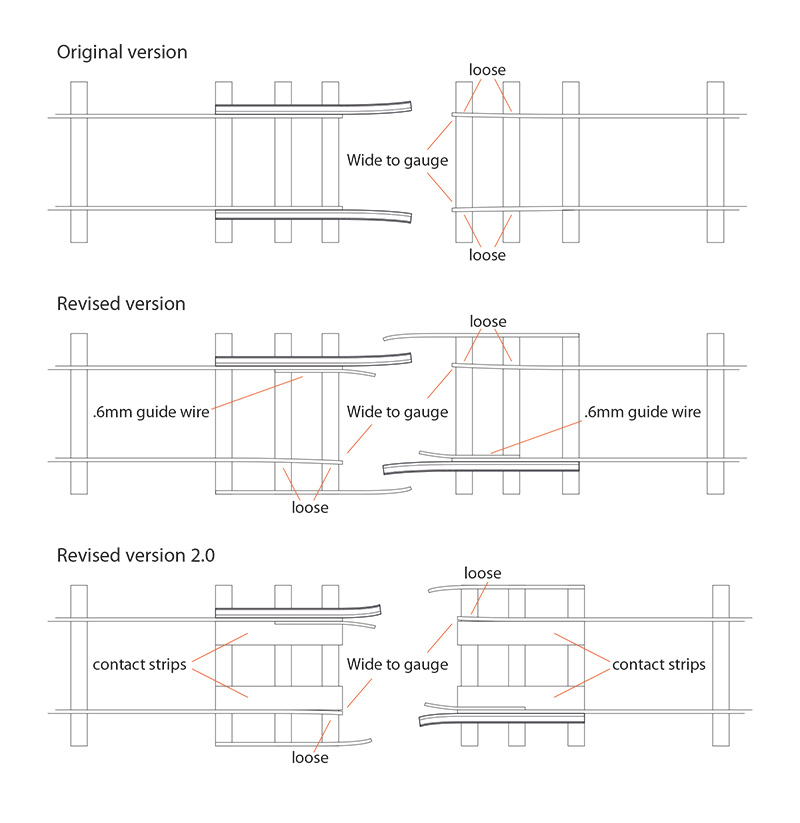 A little diagram of my cassette evolution. The top design is what I used on the short version of the layout and that seemed to work fine. As these cassettes were single ended I also fitted a light to them so that we could see that they were electrically connected.
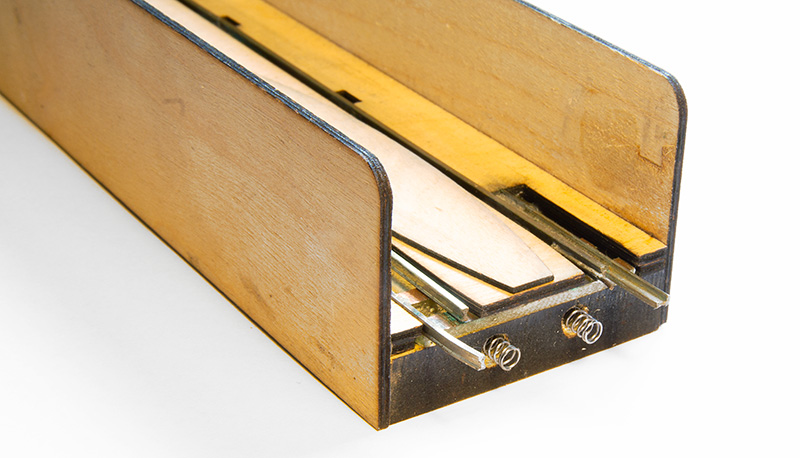 Now this is a bit belt and braces but on an exhibition layout thats never a bad thing. Rather than just rely on the springiness of the copper strips I drilled holes behind them and fitted a couple of spring (actually springs from smiths coupling hooks that id been saving for some unknown reason).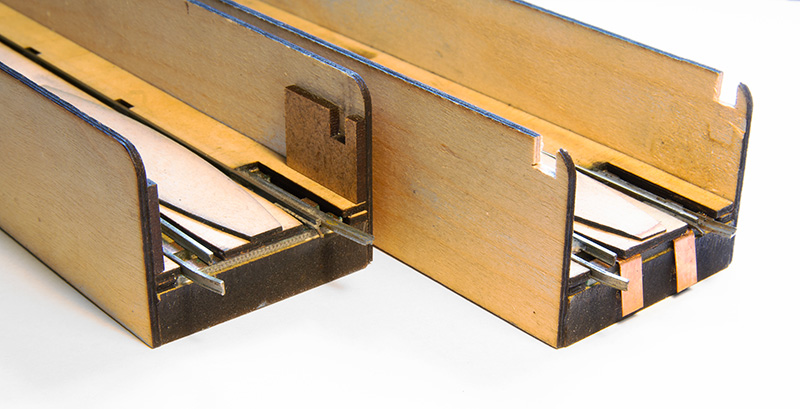
 I also took the opportunity to move the cassettes back a little and extend the lead in roads as we were having derailments coming onto the layout at both ends. This may have been the cassettes or it may have been something else. Originally I had check rails here but tests of the new sections without them is making me think they were unnecessary.