Bitsa post
This post kind of jumps around a little but lets start with a simple wagon as we’ve not had one of those for a while. 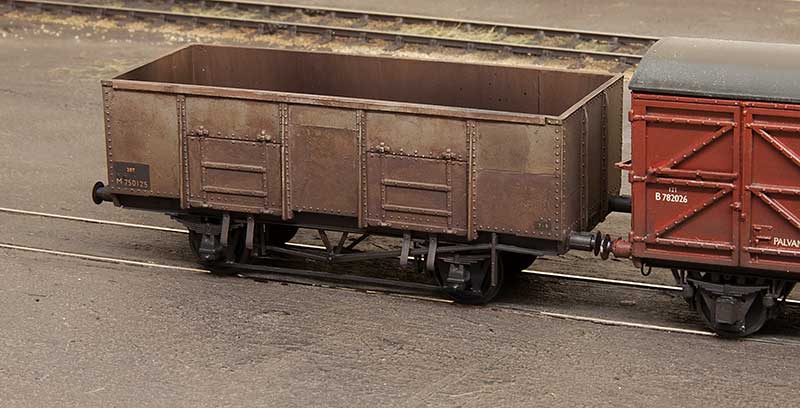 LMS diagram 1973 mineral wagon. These were a little odd as they had no end doors just side ones. The model was created by splicing 2 sections of the Dapol (ex Airfix) mineral wagon body together and mating the result with a Parkside 12 ft wheelbase chassis. The W-irons are Bill Bedford, door springs Rumney models and buffers from Accurascale.
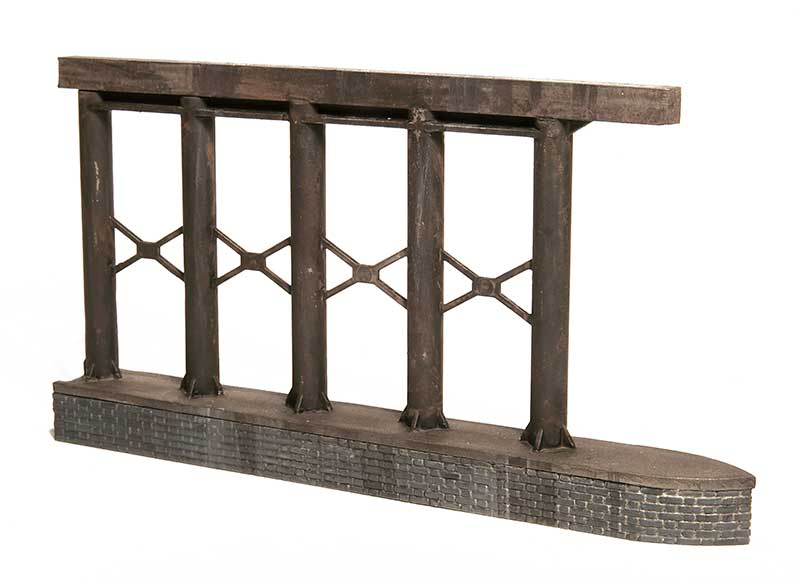 Both the real Brettell Lane and Round Oak stations had central supports under the bridges. As this will be right at the end of the layout, under a bridge and in the dark I didn’t feel I had to go mad as a silhouette is pretty much all thats needed. The main pillars are actually nothing more than a couple of Hornby gradient supports spliced together.
 I mentioned in a recent post that i needed to reverse my signal box so the steps are at the opposite end. Thats ticked off now and the results can be seen above. To see the original build click here.
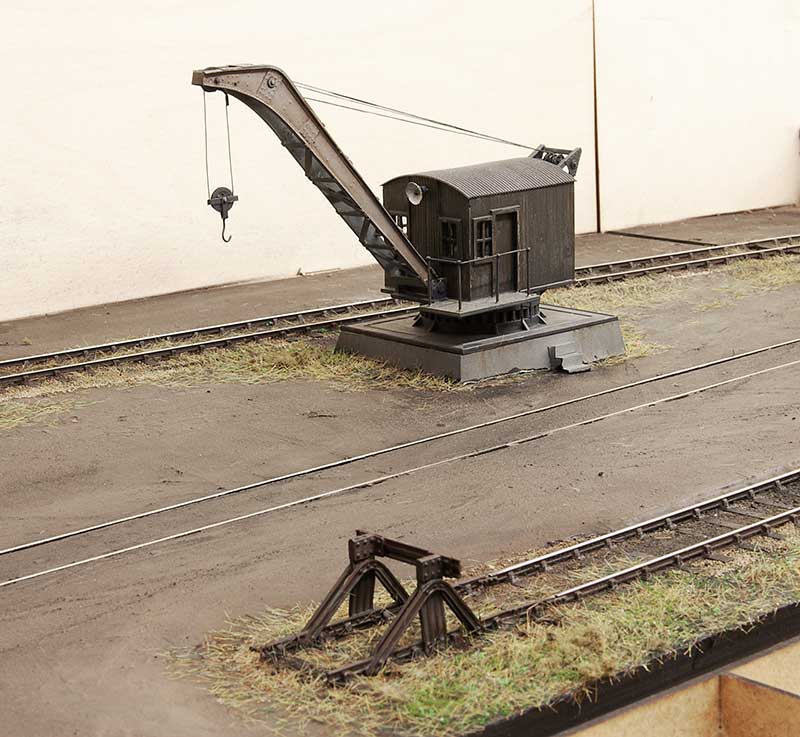 Moving back to the layout itself the much modified Airfix crane has now been planted and the yard track has been ballasted and suitably ‘neglected’.
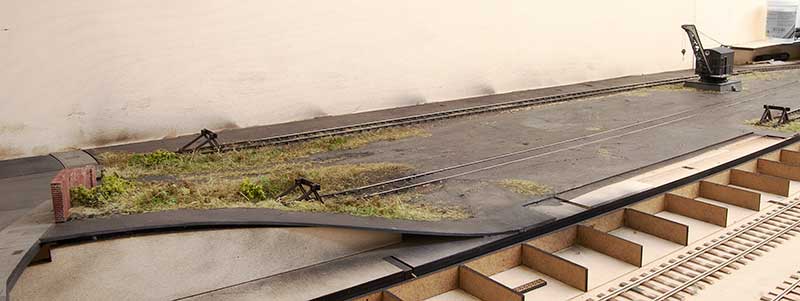 Overall view of the yard so far.
Bogie Ballast hoppers
The plan for New Street has always been to feature a selection of engineers trains. The ones I have had in mind are a rake of loaded mainly 4 wheeled hoppers, a rake of loaded bogie hoppers, a rake of loaded grampus style wagons (partially fitted), a rake of empty salmons and a mixed rake of unfitted oddities(also empty). All of these trains have been started to a degree and most of them many years ago. However I had an urge to get at lease one of these trains finished off and it was the bogie ballast hoppers that appealed the most.
These have been pretty much done for years with most just needing the hand wheels and safety screens finishing off.
 The oldest model is an old Cambrian kit for a Sealion. Because this model does look a little different to all the others it will actually form part of the 4 wheel rake so that it doesn’t stand out.
 Next up a couple of Lima Sealions. An excellent model for its time let down only by the odd bogies. Ive replaced them with Cambrian ones.
 The Lima tooling went to Hornby and rather than just stick it in a ‘railroad’ range box they did actually do some decent upgrades to this model. Mainly the bogies but also adding the safety screens. The rest is as Lima designed it with the exception of Hornby moved the end handrails from the top of the platforms to the buffer beams and replaced the inner original handrails (which were plastic) with better wire ones.
 The above image serves to show the changes made. The hand wheels have been replaced with Stenson Models etched ones and the safety screen, while a commendable effort, wasn’t fine enough in my eyes. I’ve used cut down etches from Extreme etches intended for the class 56 bodyside grills. I also replaced the buffer heads with some from MJT. The livery Hornby applied to these seem to be a hybrid of the earlier light grey version applied in the later dark grey style. I couldn’t find any like this so the lower black band was added.

 Also from Hornby the later welded Seacow. Again the screens were replaced. These too had the lighter grey livery so they were resprayed into the darker grey.
 Bachmann have also done a Sealion and theres not a lot wrong with it as it comes. I still changes the screens and hand wheels for consistency throughout the rake.
 The super easy conversion to a lima Sealion is to remove the vacuum cylinders to turn it into a Seacow. Lima did brand some of their RTR models Seacow but they retained the vacuum gear.
 A more involved conversion is to stretch the lima model to produce the larger 50ton Whale. These were started way before the Cambrian Kit appeared although they do now ride on their bogies. Hand wheels are again from Stenson models.

Although a modest train for New Street its still virtually as long as Brettell Road!
Bit of a mixed bag
Bit of a mixed bag this post, starting with;
A kind gift.
My friend Tom contacted me to say he had an old Millholme models kit for an LMS 30t bogie bolster and did I want it? Of course it would be rude not too!
The kit represents, as best as I can tell, a diagram 1682 45 ft bogie bolster. These were a continuation of a Midland design with the only obvious difference being that the earlier ones had handbrake wheels rather than compound levers. The sides and solebars were, nicely, cast in one piece and being as old kit the bufferbeam and ends where missing. The trussing was also cast in whitemetal and was somewhat optimistic as its a long piece in a not very strong and somewhat bendy material.
 So to work I replaced all the trussing with 1mm L section brass from Eileens. The brake lever castings were OK and they are both mounted at one end. It appears that only the bogie at this end is braked at all.
 The bogies are ratio ones and I ditched the swivelling plate idea as supplied preferring to pack them out and mount them with a screw. The bufferbeams were from my scrap kit parts box and the extra rivet detail from Archers transfers. The buffers were the ones supplied in the kit.
Lampost conundrum
My plan to extend Brettell Road includes completing the road currently on the left of the layout as well as adding a new road. Digging around looking at local pictures in the late 50s the lamposts seem to be mostly the concrete cast type. Theres a couple of options for these. Hornby Scaledale none working ones and woodland scenics working type. I immediately discounted the latter as they are far too chunky and just look awful.
 Not that the Hornby ones look any better. Im not sure why they bothered to produce these as they are basically crude lumps of resin and they don’t even provide a foot for modellers to mount them. The idea of fitting a surface mount LED and hiding the wires on the none viewing side went out of the window! I must be able to do something better than this surely? Especially as, at most I will only need 5 of them.
 So with some K&S metal section (1.5mm square for the top and 2.4mm Hex for the main trunk I made this.
  The base was blended into the main columns and sprayed with Plasticote suede. I also very lighty dusted some grey primer and blank over it to give a more concretey colouring. Below is how it looks in position.
Baby Grampus
Flicking through Simon Bendall’s bookazine ‘Modelling British Railways – Engineers wagons’ I was taken by a wagon I’d not come across before. The GWR designed ling. A 14 ton open wagon that looks like a baby grampus. In the bookazine, Hywel Thomas built one by cutting down a Chivers Tunney but I decided another route would be to stretch a Cambrian starfish instead.  So 2 starfish kits were found and a lot of cutting ensued. The doors on a Ling are shorter than a Starfish so each door had a section cut from the middle with new strapping from microstrip. Buffers are from Lanarkshire models, W irons from Bill Bedford, door bangers and steps from Rumney Models and the test of the underframe from plastic section and the spares box.
 Above is the reason i referred to this wagon as a baby grampus. Along side one it’s considerably smaller. Comparisons between the shortened doors and the starfish originals can also be seen.
Midland brake van evolution – a visual guide.
One thing the Midland did well was use standardised bits and adapted them as they went along. This is quite noticeable in their signal boxes but also in their brake vans and, visually at least, the evolution is pretty obvious and logical. So from left to right…
 So starting with the early midland 10 ton van. This was very much of its time and featured 3ft 6in wheels with a veranda at one end only. The open platform thats so familiar to the idea of a brake van wasn’t something that the Midland really went with and only one lot (D2096) of 4 vehicles would feature this in the future. The rest of standard Midland brake vans would all feature a full length roof.
The later 20 ton van was built to diagram 1659 between 1924 and 1927 and featured a longer 12 ft wheelbase with 3ft wheels and a cabin that was 13ft 4in inside. This would become the standard size cabin for the rest of the midland vans that followed The similarities between the 2 type shown are pretty obvious with vertical planking and basically the same end panels.

Next came diagram 1657 (the diagram numbers don’t seem to follow in a chronological order) built between 1927 and 1931. The obvious change was the duckets on the side. The outer ends also evolved to feature a smaller opening and flush planking but still with the same offset central vertical spar.
 From diagram 1657 to diagram 1940 built in 1933/34. Virtually identical except for an increase in wheelbase of 14ft which resulted in a visually less nicely proportioned vehicle. It’s suggested that the increase was an attempt to improve stability at higher speeds.
 On to diagram 1890 also built in 1933/34. Still 20 tons but with another wheelbase increase to 16ft and an increase on overall length from 20ft to 24ft. The cabin size remained the same but there was a change from vertical to horizontal planking. Note the end central spar now really is central!
 Finally diagram 2036. Basically the same as before but with the door opening moved to the far end. The planking on the ends is now gone as is the central spar as well as the upper part of the opening following the roof line. There were a few slightly different variants of this design such as diagram 2068 (the last being built in 1950) which featured a deeper ballast box between the wheels. Some of this last batch were also fitted although many of the other types were through piped at times in their lives.
Good old fashioned kit bashing (with a spot of RTR bashing too)
 OK this one isn’t a particularly difficult exercise. The Oxford tank wagon re-liveried to Shell/BP livery. On my first Oxford tank I mentioned that the printing came off really easily with white spirit but not this one. This needed IPA and a fair bit of elbow grease! I added a discharge pipe and the logos came from Fox (they are a smidge to big for this little tank to be honest). I noticed, too late, that Oxford have modelled both of the vertical end ribs facing the same way on these tanks.
 Next up, a bit more fitting in with the post title. A diagram 2070 12 ton goods van. When I built my diagram 2108 van from parkside kit I used the ends from a ratio 12 ton van as the Parkside ones are the wrong shape. The rest of the ratio kit sat in it’s box until I recently decided to do something with it. These vans, although looking very LMS were actually built (for the LMS) by the Southern in 1942. I files off the metal framing a the ends and re-scribed the planks. The ends were just scratchbuilt from plasticard using the vent left over from the afore mentioned Parkside kit.
  The finished van. Bufffers are from Accurascale and the old label from Holler.

Next, an Airfix LMS brake van chopped up to be rearranged into a Diagram 1890 version or ‘reverse Stanier’ as they are sometime called.  As can be seen theres not much too this one and it makes quite a good project for those new to chopping stuff up. These models can be found really cheaply so theres not a lot to loose. The ends have been scribed as the upper ‘window’ section squared off with plasticard as filler. A bit of microstrip for the vertical frame and the upper beading on the sides was sanded back.
  The finished Van. Don’t forget to redo the steps on the solebars!
 This is a cheeky little one. Basically the Parkside kit for the diagram 1657 20 ton brake van but with the wheelbase extended from 12 to 14 feet to produce a diagram 1940 version. One of those ones that i’ll be surprised if anyone notices!

 The same cant be said for this though, I think people might notice! Same start point of the parkside kit but rebuilt to a diagram 1799 40 ton bogie brake van. The LMS built 3 of these specifically for the Copley Hill to Armley line and thats where they stayed. I just liked it for its wierdness really!

Old stuff
While I’ve been in a brake van kinda mood I finally got around to improving an old Hornby LMS 20ton version I had and making it a tad more suitable for Brettell Road.
Pretty basic detailing job on this one.  A selection of Midland versions.
 Actually this brake van originally came from the Amlwch layout along with the above 47 and 24. Of the three the class 24 is as it was brought. the 47 having been brought a bit more up to date (well 1987 anyway). I wonder if Amlwch is still around somewhere?

Bit of a different angle. Let’s call this train an internal user?

Haven’t done a rainy pic for a while. NBL class 21 nestles between another pair of type 2s.
Here comes the PR!
A while ago I showed a picture of a Powsides ED 7 plank wagon. ED stands for Earl of Dudley and I said at the time that it was a bit early for the layout and that that PR, Pensnett Railway would be more appropriate. A chance discussion on an industrial railway modellers Facebook group revealed that Planet Industrials actually do a set of transfers for PR wagons so a set was duly ordered.  A couple of existing wagons were repainted into red oxide (the ‘shunters truck’ and a grey 7 plank RCH design) and a couple more RCH wagons were knocked up from good old Parkside kits. I decided to keep the Powsides ED one as it was (although weathered a bit more to make it look more tatty) and do the shunters truck as ED too in a sort of crossover period. Ive never found a photo of ED and PR wagons mixed together mind you.
The above train is all very ‘corporate’ and it wont appear at shows like this. The PR wagons will be jumbled up among other mineral wagons. One thought I have had though is by making Brettell Road 2 tracks the industrials will look too out of place on the mainline so the plan is to extend the siding the train is on to the fiddleyard and have them appear from behind the warehouse, using the yard as a exchange sidings.
 I was intrigued by the recent Oxford rail tank wagons and decided the yellow Carless Petrol version would break up the sea of grey and bauxite wagons on the layout. As with the ED wagons its really a bit to early for Brettell Road so I’ve weathered it up to look pretty tired. Theres a few things worth noting with this model. The first is the axle length is odd. Happily its still 2mm and its not odd in a crazy short, Lima way so you can swap P4 wheels onto it and use the original axles. The second thing is that the lettering and the red stripe don’t react well to white spirit. If you want to remove them then great but if you use enamel washes thinned with white spirit for any of your weathering, as I do, and you want to preserve the livery its best to give it a quick coat of matt varnish first.

Just the simple things.
Sometimes it pays to drop back a gear and just do a few simple things that are not too taxing. Things like a few simple wagon kits or just some pictures.  And what could be more simple than the good old Airfix mineral wagon kit? This ones been converted to a diagram 102 variant and weathered with gouache and a hint of AK interactive weathering pencils for the rust.
  Next up a mix and match of parkside bits to produce a Hybar. The rail itself is a neat little etched kit from Rumney Models.
Below a few pictures.


A somewhat unfocused post.

Something that always bugged me about my Heljan class 27 was the somewhat odd buffers. A long time ago i got a set of replacements from Sutton Loco Works and its just one of those things I never quite got around to. Well now that little job can come off the list.

Finished the roof of my station building – just need a layout to plant it on!

The gutters are a recent introduction from Modelu. I found they don’t like superglue at all but stick very nicely with liquid Poly (in this case Tamiya extra thin).

Popped back to my Kirtley to pick up a few things that irked. The loco to tender gap has been tightened up a bit and the rain cover tidied.

Crew from Modelu

Bit more off a proper project this one. A clasp braked 16 ton mineral from a Parkside kit on a Rumney Models underframe. The only down side to Justin’s stuff is it looks better not painted! A few pics below for history.


Those little Mainline iron ore hoppers.
Anyone modelling in 4mm scale for any length of time has probably come across the Airfix/Mainline/possibly Dapol/ Bachmann 21, 22 or 24 ton Iron ore hoppers. Based on a Charles Roberts version with the standard, at the time, stretched to fit compromises to fit a generic 10ft wagon chassis. They do however make a good little project for ‘tarting up a bit’.
Geoff Kent wrote a great article about just such an exercise in MRJ 182. I have however deviated from his sage advice in a few areas.

The hopper is easy with 3mm cut out center but offset to the side of the bracing to hide the cut. For the chassis I cut it into 3 parts to retain the middle detail. Geoff thinned the base and removed the top of the chassis on his models but I decided to cut the base away around the edge and mount the chassis flush with the top. The chassis being a Parkside 9ft example.
The door closing gear was knocked up from microstrip and a few bits of brass., Shiny bits on the chassis came from Ambis, Mainly Trains and Bill Bedford.

After a light weathering. I still need to add the rain effect yet mind you. The ladders are from Stenson Models.


RTR wagons
I’ve been looking at a few RTR Wagons recently from Bachmann.

Slope sided mineral. I really like the chassis design on this one as the brake gear is separate and for P4 can be moved out to line up with the wheels with just a little bit of trimming. As well as my usual gouache approach for rust I’ve also tried out some weathering pencils from AK interactive. I won’t go into any detail on those as yet as I’m still getting to grips with them.

Bachmann’s presflo’s are a lovely little model with just a change of wheels, couplings and buffers required. The buffers on these were very odd and I’m not really sure what they were supposed to be so I have used Accurascale ones in their place. I’ve also added more weight as they hardly weighed anything as supplied.
Im not a huge fan of textures in weathering as I believe they often look too heavy in 4mm scale but on these wagons the dry concrete could often look really caked on so i used talc in wet paint as part of the process.
What ever happened to…

Way back towards the start of this project I posted the above image. The little black tank wagon at the far end was a Peco wonderful wagon kit and avid follows of this little adventure might notice nothing has really been said of it since.

It was pretty quickly joined with a companion and the pair have been lurking near my workbench ever since. Well now they are finally done and ready to go. Modifications to the original kit were to replace the w-irons with Bill Bedford ones. New ladders from Stenson models and new handbrakes from Ambis. I didn’t really like the mounting rods as supplied so these were replaced with 0.6mm brass tube. The ends being flattened with pliers. The walkways came from my spares box.

The crane has its runner from a Cambrian kit. Its a little freelance is based loosely on an image of a similar but steel wagon I found on Paul Bartletts site at Bescot. The steps are spares from a Bachmann class 25.

Before i settled on the Cambrian route for the crane runner I found an image of a diagram 1/001 lowfit that caught my eye. Built by BR they had a LNER style body on an LMS style chassis. Bachmann do this RTR but the chassis is completely wrong so its been replaced with a Parkside one. The mineral is diagram 1/119 21 tonner from The Chivers kit. (Tim had some lying around when I last went over). This wagon would be very new in the Brettell road period. This is also the upper end of my build it rigid approach to wagon building. Any longer wheelbase than this and I tend to go for springing.

Speaking of Tim we have been working on a curved version of his display shelves with a few design tweaks such as the more solid locking of the ends and little clear ‘buffer stops’ for the ends. The 4mm scale versions are ready to go, see Tims website.

Finally a co-bo on a parcels train for no other reason than why not?
Old ‘uns and a possible change to how the layout is presented

So to draw a line under the last post. The Lima CCT is finished off and ready for service.

So is the crane. It rides very high as supplied so I ground the bearing slots down and removed a bit of material from under the axleboxes (its still a smidge to high). Seems strange that Hornby raised the ride height on all their models to accommodate their tension lock coupling. Why not just make that smaller instead?
The end shackles are from Roxey and the cables are the heavier e-z line. Transfers are from Cambridge Custom Transfers. The single plank wagon is just standing in at the moment.

One of the issues with Brettell road is the height it sits at. The subject of layout height is a thorny one but I take the view that operator comfort trumps everything else. After all we will be working on the layout for a couple of days . Currently its a bit low which I’ve got round by asking show organisers to provide chairs. From a sitting position its just about the right height.
However I’ve been thinking of doing a more traditional style, separate roof and here it is mocked up. Its designed so that it all slots together and no screws or bolts will be required. It will still have a material roof to shield the ambient light but it should make the layout itself a little lighter too. The plan is for the original pelmet to be removed.
A couple of old ‘uns in progress
Recent attention had been on a couple of older RTR efforts. Starting with…

…a Lima CCT. Yes I know there’s a Bachmann one now but the Lima one isn’t all that bad given its age. It suffers from the sometimes common Lima trait of getting most of it about right but then blowing it on something obvious for no apparent reason. In this case the W-irons are just too far from where they should be.
This can be addressed with replacement from ABS (or at least it used to be!). New roof vents and underframe bits and bobs plus filing off the, freelance, window frames and we’re about there.

Next the old Hornby hand crane. This one uses rollers and a counterweight from Jon Hall. I’ve widened the jib and added extra details.
The mopping up of wagons continues
For DEMU I figured that my usual method for the round oak trains appearing on scene – i.e. an open wagon with a shunter look out and an industrial diesel pushing from the back was probably just a bit too archaic. So I figured the guys at Round Oak got themselves and ancient brake van in a somewhat token effort to appear to obey the rules!

So here we have a very tired brake van from the recently re-introduced Slaters kit. I returned to the crackle paints I had used on the signal box for this one.

On the subject of old vehicles, an old ratio kit for a GWR open c. These were a bit odd as they had the sides and underframe as one piece. I separated them and made up new underframes with bits from Bill Bedford, Ambis Engineering and Model Railway developments.

Sticking with the GWR a Mink A to diagram V12. This uses a much more modern kit from Parkside with more Model Railway development parts.
Classes 03 and 30 – done!
Before I get onto those some more wagons are done too.

Another couple of mineral wagons. Airfix and a fitted one from Parkside. Its a bit of a thing to make all mineral wagons rusty so I decided to model the latter in nearly new condition. The SR brake van is an older Cambrian kit and needed a fair bit of modification to look like the real thing. I can take no credit for working out what as its all outlined here.
On to the ‘headline acts’ so to speak. My class 03 and 30 are now done and ready for service. Some pictures follow.


Quietly influential

The two wagons pictured above were the first 2 wagon kits I ever built. The grampus is from the older parkside kit and the turbot from the Cambrian kit. Both have been upgraded since I built them with Rumney models parts and both have seen RTR versions appear in relatively recent years.
When I built these though the options for 4mm scale modern wagons was very limited indeed. Hornby had their range of air braked 4 wheeled wagons on a very generic underframe and Lima had some useful bogie wagons (all with somewhat useless bogies). Bachmann hadn’t really appeared back then so if you wanted the trains you could see at the time you had to build them yourself.
Admittedly the grampus (which was my first kit) was a bit of an odd one out in the Parkside range and it was more the longevity of the prototypes that made this kit suitable. While Cambrian had carved a very nice little corner of the market for themselves with their dual ranges of engineers wagons and airbraked prototypes. Without these who knows where my interest in the making things aspect of the hobby would have gone?
The reason I’m being nostalgic is down to 2 people that the hobby has recently lost and will be sorely missed. Richard Hollingworth was the softly spoken gentleman behind Parkside Dundas while Colin Parks was one of the 2 brothers behind Cambrian models. Rest in peace gentlemen, and thank you.
Some thoughts on wagon loads.
 Ok, it seems a little odd to start a post on wagonloads with a couple of vans but they do give away subtle signs that they are actually earning money and not just trundling around. Chalk markings and labels are the give-away here. The chalk markings are done with a sharp chinagraph pencil which allows you to smudge them and rub them out. Much as could be found on the real thing. The labels are from Hollar Models and can be distressed with a scalpel or fibreglass brush before applying.
  The easiest loads are the loose ones such as coal, ore, ballast etc. This is real coal glued to a foam former (the dark foam in RTR loco packing is ideal). Remember to weather the inside of the wagon first though.
  One loose load I struggled a little with was coke. In the end I used larger lumps of coal but when set sprayed it with gunmetal to give the dull look coke has.
  Sheeted loads tend to come in 2 forms. Above the load is sheeted as a stand alone item. This was a cheap load i found on ebay.
  The second form is that the load is added to the wagon and then the load and the wagon itself is sheeted over. These are more cheap loads from Ebay which were quite crude. The sheeting is black latex cut from a surgical glove.
  Sometimes the load is just open to the elements. This is a drawbar converter from Langley Models.
 Finally, sometimes the load is a wagon itself. An RT Models molten slag wagon loaded onto a Lowmac and ARM-E
More mopping up wagons
As I’ve mentioned in the past I am trying to not add to the wagon roster for Brettell Road, rather just trying to finish off the un-started and partially started kits I already have. Although one or 2 new ones have snuck in to the to-do pile somehow. Heres the latest to find their way off my workbench.

2 such culprits – a Diagram 1828 van from the Cambrian kit and a Bachmann 7 plank wagon. The 7 plank wagon was introduced a few Warley’s ago as the clubs special wagon. Being a Brierley Hill wagon and. according to the info that comes with it, based at Moor lane Wharf (where Brettell Road is very loosely based), it seemed rude not to.

3 Tunnys from the old Colin Ashby Kits with Parkside underframes. I uses some Rumney Models Grampus bits to add the steps and door bangers. The furthest one (in green) is an older model that i built years ago for New Street which I upgraded at the same time.

LMS built (for the LNER) ARM E wagon from the Cambrian Salmon bogies and half of the floor. The rest is plastic strip with some Rumney Models and Colin Criag detailing bits thrown in.

A couple of steel wagons. Bogie bolster E from Lima, Rumney and Cambrian. Made sense to finish this off at the same time as the Turbots (see the New Street workbench). The Plate is from Parkside.
Finally, below, is the completed engineers train.

Ticking off the turbots
A while ago I modified a Cambrian Turbot kit with a Rumney Models bogie bolster E underframe. (see here). Ive finally got around to doing the others too. Here they are on a visit to Brettell Road. 
A post post!
 Originally I wasn’t going to really have ‘through trains’ on Brettell Road – the through line was only going to be used by the industrial shunter but like most of the plans for this layout it all went a bit wrong. So now that the branch is used by BR as well it made sense to have a short parcels train. I had already done a LMS GUV from the Lima model but in another hark back to my childhood train set I always liked my Lima Siphon G as well. I’m not quite sure what happened to the original one I had but I found a bashed up one on Ebay for a few quid and set to work.
  The Lima body has had the lower vents added from the cooper craft (ex blacksmiths) etch. Kindly picked up for me from Scalefour southwest last year by Steve Carter of the Scalefour Society. The bogies are MJT on the brassmasters frames, as are the buffers, with small steps from the Frogmore Confederacy Range (both available from here). The gangway is a Hornby DMU one which I cut into from the bottom and glued back together to give that characteristic drooped look.
  The other side with some of the vents left open.
  In terms of somewhere for the guard to sit, the good old Mainline LMS BG. just new handrails, glazing and underframe bits on this one.
 A couple of RTR wagons from Bachmann. the Grain wagon has had its axleboxes replaces with Parkside spares and the brakes moved to line up with the wheels. Finally below just a few images of my Jinty pottering about.


Hoppers finished off and a few other things.
 I’ve finished off the hoppers I was working on. Here’s the coke hopper in the company of the previous one I had already done. As the older one is an LMS version I revisited the weathering to make it look a little more used.
  The 13ton hopper
  Mackerel with a gannet and herring.
  A few I haven’t mentioned before. The M. E. Evans one is a Bachmann collectors club model in memory of Merl Evans. I spent a very enjoyable day at Tysley with Merl surveying a couple of class 150’s so this little wagon seemed a no brainer to me. Straight wheel and coupling swap with a bit of weathering. The ED wagon is a Powsides kit for one of the Earl of Dudley’s fleet. Another no brainer. Whether either wagon would have lasted to the late 50’s I dont know.
Finally I was directed to this neat little book.  OK it’s not Birmingham and it’s not even West midlands but if you are, like me, a fan of what I call ‘urban grim’ (I guess most people aren’t here because they like pretty layouts) then you might find this right up your street. No text, just a lot of super atmospheric pictures.
A hopper hat-trick.
 3 hoppers via 3 different routes. On the left a coke hopper from the old Three Aitch kit. I’ve already done one of these and this follows the same pattern of using Bill Bedford W irons.
In the center also a kit but a brass one from Dave Bradwell for the BR 13 ton hopper. A fun if not sometimes tricky kit to build. Dave Bradwell kits
On the right a mackerel ballast hopper converted from a Hornby trout, again with Bill Bedford w irons. I make no claims for the idea behind this as I first saw it on Kier Hardy’s EM 70s website. Click here