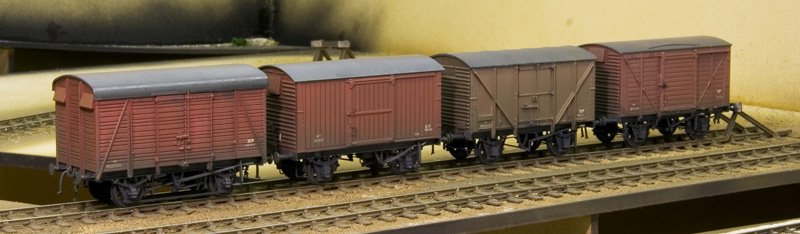
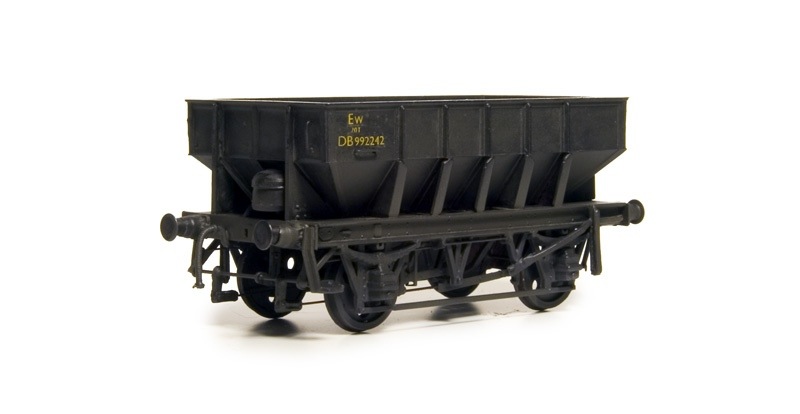
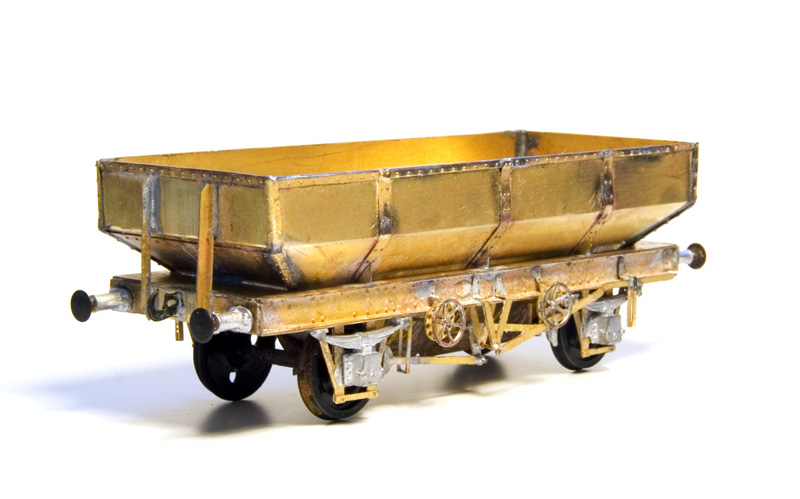
Grampus test etch
A few years ago I was working on a fleet of grampuses (yes that is the plural before anyone asks) for New Street but the project stalled when I decided i wanted to etch new baskets, door bangers and steps for them. This has been on my to do list for a long time but things have changed in that time and when Justin at Rumney models said he was thinking of looking at the same I dropped my plans in favour of just waiting for his. I don’t see a lot of point in duplication in this hobby (although some of the RTR chaps seems a little obsessed with it at the moment) especially when I’m just doing bits I want and someone else is doing bits as part of their business. I’m more than happy to let the guys doing this for a job get on with it basically.
 Justin has kindly sent me a test etch to try out and the results of which can be seen above. There is, of course more detail to add but a this point if what you see is plastic it’s from Parkside. If its metal then its from Rumney models.
  The wagon the right way up (I’ve straightened the bent door banger). Justin is hoping to have these ready for September so keep checking his website. I’m going to need a fair few of these!
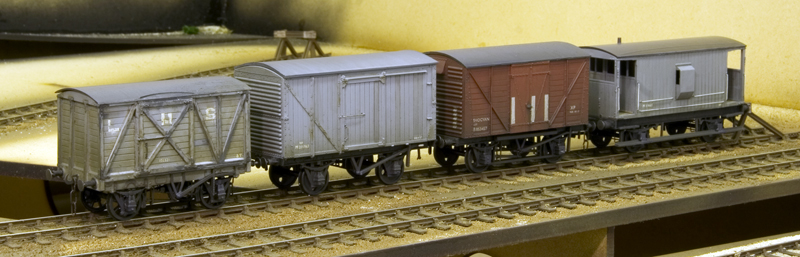
Basically just an excuse for pictures!
Brettel road now has its final front and backscenes added. More work to do on the fronts yet but its starting to look like a proper layout!
 Here is a view of the warehouse with the new backscene in the distance. Ive decided to take some pictures of trains too. (sorry this post isn’t a bit more, erm, informative!)
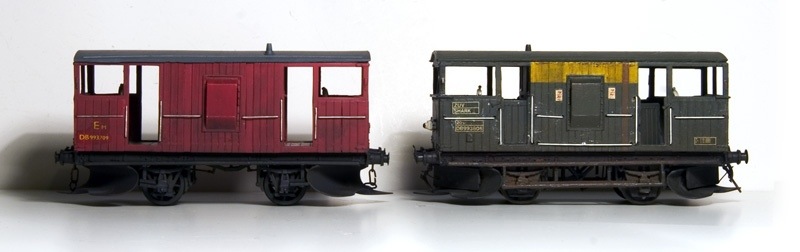
  Railcar 22 trundles past towards Dudley
 Pannier tank arrives with the sausage train.
  Kirtley shuffles some ballast wagons around
 Class 20 descends the bank.
 Jinty waits for something to do.
  Deeley takes its turn at some wagon worrying.
  The railcar climbs back up the back towards Stourbridge.
 Yeah I know this looks a bit wierd but there is a prototype practice for it.
Haven’t had a loads of finished things post for a while.
So lets start with a buildings and a request, When I posted the image of the pub at night I was asked for a picture of the area in the light so here it is This also shows the water tower I was working on too, speaking of which…
 Remember the lower part of the Hornby water tower I was fiddling with and how I didn’t worry too much about details? This is the reason why – you can just about see it, if you know where to look!
  Moving on to some wagons. This is the Chivers kit for a Dia1674 LMS Bolster wagon. A nice simple kit to build although given the long wheelbase I did opt for Bill Bedford springing.
 This was supposed to be a quick win. I liked the local livery and thought that it would break up the sea of grey and bauxite wagons. Its a Bachmann product but an older one that was stretched to fit their 10ft wheelbase steel chassis. Some careful cutting in 4 places lost some of the extra length and while it is still too long it does now fit the longer Cambrian wooden chassis.
  I’ve finished off the vans I was working on too. Not a lot more to add about them really but here’s the pictures. LMS 6 wheel fish van – Chivers Kit.
 LMS GUV
  Palethorpes 6 wheel van
 And the larger bogie version – Transfers are from Cambridge custom transfers. Sheet BL153 covers the 6 wheel vans while sheet BL154 covers the bogie vans.
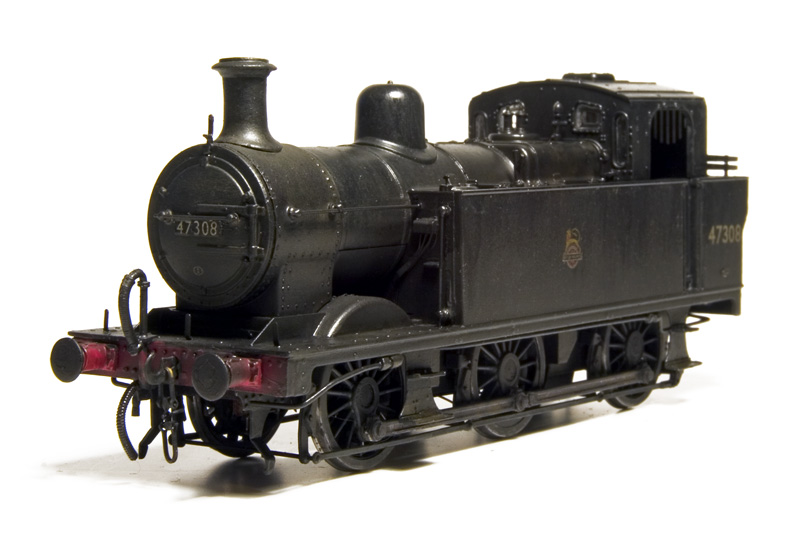
Finally aside from the crew and some coal (plus a slight warping of the footplate) the 94xx tank is done too. Here’s a few images.


One thing leads to another
On a couple of forums people asked for more details on the Lowmac compensation shown last time so…
 This is the underside. It’s best to set everything up with normal bearings first so that the rise height is correct. Then a simple case of adding a bit of scrap etch for the axle to rest on.
 Once happy you can replace the bearing with ones that have been filed into a slot. This means the ends of the axle can move up and down, it really is that simple! On the subject of track holding…
 This is the Chivers kit for the LMS fish van (diagram 2115) of course ive done plenty of 6 wheeled bogies before but never a 6 wheeled wagon. Brassmasters do a clemenson chassis for 6 wheeled vehicles but as the fish van has stretcher bars I didn’t think it would work. To the right of the picture is a Bill Bedford pedestal suspension unit converted to inside bearings, the outer axles use normal suspension units. The plan is to join them all with wire so that the center axle can slide side to side. Speaking of 6 wheeled vans and clemenson chassis…
 A black country icon, the Palethorpes sausage van. this uses the ancient Hornby model (well 2 of them) and chivers sideframes. You can see from the picture where the 2 vans have been cut up to correct the length of the van as supplied. Note also the strange backwards brake lever.
 Where the fish van is quite open underneath these vans are not. They were fitted with onboard lighting and internal fans thus the dynamo and battery boxes. It’s all a bit cramped really!! Speaking of palethorpes…
 The 6 wheeled vans bigger brother. Surprisingly you only need 2 vans to do one of these too! the underframe is from the comet kit. And finally on the subject of bogie vans…
 the good old Lima GUV, fitted with new bogies and underframe details.
Kirtley finished (well nearly)
First up a short video of the inside motion doing its thing.
There’s still a bit of work to do on the Kirtley – add a crew and the weather sheet, some coal and the wet weather effect but its pretty much done. Below are a few pictures. 

 I have been doing a few wagons as an aside to the soldering iron.
  Another lowfit from Red Panda. This one has a Parkside chassis and buffers from my supply. I don’t know who made them or what type they are but they matched some of the pictures on Paul Bartletts wagon site Thanks to my friend Brendan for the lowfit transfers.
  The Dapol lowmac kit. Reworked with Lanarkshire models buffers, archers rivets and new axleboxes from the spares box. The brake lever is an etch and the ratchetey looking guide is from a piercing saw blade. This wagon is really too long to be rigid and there’s not a lot of room for any sort of springing or compensation units so the solution here (which I remember from a P4 society digest sheet years ago) is to file the bearings into a slot and use a bit of scrap etch in the centre of the axle to allow it to rock.
Containers and other things
I picked up a few Parkside container wagon kits at Scaleforum and over the last week or 2 I have been putting them together. Along the way a Bachmann example was added too as it was cheap and had the smaller container that I was after.
 Above are the Conflats themselves, the 2 on the left being the Parkside ones and the 3rd the Bachmann one. The first one is built as intended with the usual additions of buffers and brake pipes from Lanarkshire models, safety loops from Bill Bedford and tie bar from Eileens emporium. (I’ll come back to the chains in a moment). The second one uses the Red Panda underframes as a lot of those pictured on Paul Bartletts site (link here) seemed to match this configuration. For the Bachmann one it looked a bit of a faff to sort out the underframe as the brakes were set for 00. Strangely Bachmann had the wrong brake levers on either side meaning that the brakes wouldn’t actually work anyway as lowering the lever would pull the shoes even further away from the wheels! A Parkside chassis is the easy option and I had a spare from the second wagon.
  Above is a view of the different underframes. You could go much further than this if you wanted too but this is a representation of what I feel you can see in all the gloom. If you did want to go further then the obvious start point would be one of Justin Newett’s excellent etched chassis but even if you didn’t he puts his instruction on his site anyway and there’s some good references and info on how it should all look. Well worth clicking here! The wagon at the front is the BR clasp underframe.
  I mentioned earlier that I would come back to the chains and to my eye Parkside have been too delicate in the details on this kit. There’s a tendency to think that finer is better but I don’t think it works here. The chain I used is 23 links per inch from Langley models Which as supplied has quite round links with a twist to them. You can see the original shape on the container on the right. To get them to the more lozenge shape it’s simply a case of putting one end of a length of chain in a vice and pulling the other to stretch it. Nothing cleverer than that! The lifting shackles on the roof were also too fine and were replaced with spared from Justin’s Bogie Bolster E underframe detailing kit. In case you are wondering the wagon on the right was destined for the smaller container which is why the raised links are towards the middle.
  The finished wagons – Both large containers were sprayed with Halfords Rover damask red. The apparent difference being due to the weathering. I might be stating the obvious here but it pays to weather the wagons and containers separately meaning the weathering process is earlier in the build than normal.
  The shackles are from Roxey models and use the same Langley chain links. While a little fiddly it does mean that they can be assembled without resorting to the soldering iron! I didn’t use the supplied eyelets for the containers as I felt they didn’t really look much like the prototype pictures I was using so I just used a bit of fine wire instead. Once the chains are in place it worth treating them to a thin coat of ZAP thin CA (the pink bottle) to set everything solid.
 I’ve been doing other wagons too. Above a Dia 1/002 Lowfit from the Red Panda kit.

D2109 LMS 16t mineral wagon from the Cambrian kit A couple of Banana vans – Wrenn bodies on Red Panda underframes with additional details.
  And finally a couple of brake vans – on the left the Airfix kit with Bill Bedford springing and extra details. On the right Hornby RTR.
Some handy links
Parkside Dundas (also for Red Panda)
Eileens Emporium (also for Bill Bedford)
A modern takeover
If you can call diesels modelled as they appeared 30 years ago modern, a few have escaped from New Street and ventured to Brettell Road. They have since been rounded up and shepherded back to their own world! 


One of those finished things posts.
The advantages of working on more than one project at once is that, firstly, I don’t get bored and secondly every so often you seem to finish a lot of things together. This is one of those instances with several things that have featured recently have reached the finish line sort of together.
 My loading gauge has been painted for a while but now its been planted too. I love stuff like this as its one of those things that I hope disappears into the scene and becomes unremarkable. Perhaps once in a blue moon someone will notice it but, much like the real thing I like stuff like this just to be ‘there’. It’s not supposed to get people’s attention. (don’t worry about the big gap under the wall – that’s not been permanently attached yet)
 My Ford Thames and Austin A40. The colours of the Austin have a somewhat obvious Birmingham influence. Cartwrights was a furniture store in Brierley Hill but I have no idea if they used Austin vans or even if they had any road vehicles at all.
  This was a quick win project – Started life as a Bachmann Coke wagon which I imagined was sold to Round Oak and had the coke rails removed. I just liked it because it had a local livery and i’ve never done a distressed private owner before. The lettering was attacked with one of those brass brush wheels in a mini-drill and then the wagon was weathered. The w-irons needed a but more work with the mini-drill and a burr to get the wheels in but this was really minimal effort modelling!
  And so to the big project of the last few weeks – the DE2 shunter. I have to admit I didn’t relish the thought of painting its striped livery but by using some 4mm making tape from a company called Jammy Dog it wasn’t too bad at all. (click here for their website) A few more pictures below.

 This is the sort of train I had in mind for the loco – Pushed up the hill with the loco at the rear and no brake van. I will need to add a shunter to the front wagon at some point.
 Finally another moody shot of the Jinty heading out of the yard on a train of vans.
Going about it all backwards
One of the first kit wagons I built was the Cambrian Turbot. Back then it had super fragile bogies but was, and still is, a decent kit. The current version comes with one piece bogies so they don’t tend to disintegrate as soon as you look at them anymore.
A while ago Justin Newett of Rumney models produced an upgrade kit for the Lima bogie bolster E and since that where the Turbots came from it seemed sensible to use one of these to update my ancient and small fleet of Turbots. (Kind of the reverse of what BR did.) Above is a comparison of the new underframe and the old. Because of the good design of he kit its dead easy to build although I did have to cut the baseplate in half as my solebars were closer together than the Lima model’s.
 The view no one will ever see! These are the newer type of one piece bogie which Cambrian do as a spare.
Variations on a theme
I must admit I’ve never paid that much attention to the humble 12 ton goods van, mainly because I’ve never needed to before. However once you get into them they are quite addictive little so and so’s! After a good read of Ian Flemings blog and consulting books I now find myself with quite a few of them.  First up some Cambrian kits. The first 2 were built as per the kit (Although I replaced the roof with 20 thou plasticard) while the third one (far right) was converted to a 10 ft wheelbase diagram 1812 example by carving off the metalwork on the left hand end and, modifying the door mechanisms and replacing the chassis with a Parkside one (code PA16). When it comes to the brake gear you can get etched or white metal replacements for much of the parts but I’m happy to use the supplied ones. I do however replace the safety loops with Bill Bedford etches.
 Next the ever so handy Ratio kit for the LMS 12 ton van. The one on the left is built as supplied (but with MJT roof vents) and the one on the right has a modified door , simply using the Mainly Trains etched rivet strips. Buffers are from Lanarkshire Models.
 Vacuum braked versions with more rivet strips, spare vac cylinders from the scrap box and (in 2 cases) tie bars from 0.8mm L section from Eileens. The example on the right has a vertically planked door.
  Lot 929 on the left with Parkside underframe bits and on the right the BR build of the same design. The body for this one isn’t a ratio kit but the old Airfix body. It rides on another Parkside PA16 chassis.
 A couple of Shocvans. Plywood one on the left from the recently returned Red Panda kit and planked on the right from Parkside.
  I include this one as its a variation on what the kit was supposed to be. Starting life as the Parkside PC42 kit for the BR fruit van I replaced the ends with more Ratio ones and filed off the diagonal strapping and other details to depict a Diagram 2097 goods van. The chassis was replaces with a PA09 chassis. The roof has slightly lifted so I’ll need to fix that.
Some handy links: Ian Flemimgs Windcutter blog, Cambrian Kits, Parkside kits, Ratio kits, Lanarkshire Models and Eileens Emporium (Also for Bill Bedford parts)
More wagons
 What you see above is a variation on a theme, both started out as Parkside kits for the same wagon (although different generations of the same kit) and both have been built to represent something slightly different to what was intended. On the Left a clasped brake version achieved by substituting the supplied chassis for a PA16 chassis kit from the same supplier. On the right the supplied chassis modified with vac cylinder and tie bars (0.7mm L section from Eileens).
 A selection of steel opens built pretty much as intended. The far left is a Red Panda kit the others are Parkside with the usual extra detailing. It’s good to see that the Red Panda kits have reappeared from Parkside although the example shown here remained available continuously.
 I decided I quite likes the idea that when the building shown in the last update was abandoned an unfortunate lorry was left behind too. Perhaps it wouldn’t start or its been dumped there? Having mooched around for a suitable victim I quite fancied a kit rather than ready to plonk and I havent built a vehicle kit for a while. I settled on a Coopercraft Bedford ML and set to work.
The kit is quite poor if i am honest. There’s loads of flash and the fit of the parts isn’t great. I also decided that the windscreens were far too small but being all plastic it’s not too much hassle to fashion something presentable and as I’ve mentioned before I find poor kits strangely rewarding. I attacked the bed with a circular saw in a mini drill to gouge out some of the planks and simlulate rot. The above is the more presentable side!
 On this side I cut off a wing and cut down the tires to simulate flats. The rubber at the bottom was added with filler. The lorry was first weathered with a light blue to simulate fading, varnished and then gouache was used for the rust. another coat of varnish and washes of enamels were added to simulate dirt and grime. Finally the whole thing was dry brushed with Klear to make it look wet.
On the subject of road vehicles I will be doing a demo at Scaleforum this month so please stop by for a chat if you are going.
A technological rethink
A while ago I wrote about the benefits of using modern techniques and processes, specifically laser cutters. However I have sort of come to change my view on this a little recently. You see, if you are doing more than 1 thing that is the same then laser cutting can offer a distinct time-saving. If however what you are doing is pretty much bespoke then the extra effort is, I have concluded, not really worth it. Take my retaining walls for Brettell Road. I did draw up the larger one but it took for ever. It turned out to be much quicker and easier to just get some sheets of embossed plasticard and get stuck in! I have to admit those that protest on forums that laser cutting is cheating really don’t have a clue what they are talking about because it’s a lot, lot harder than the old way. 

These walls use Slaters bricks and I have done the top row by cutting individual blocks from evergreen strip and gluing them in place. Even taking the time to do this (Which isn’t exactly taxing but is long-winded) these walls didn’t take all that long to do.

Wagon building continues and I have amassed a fair few now (probably enough for Brettell Road if I am honest). This is a diagram 1/019 BR medium goods wagon from the Parkside kit which, as is customary for their stuff, pretty much falls together out of the packet. The usual extra bits and bobs have been added to the underframe. 
On the left a BR 13 ton steel open again from Parkside while on the right a 13 ton sand tippler from Red Panda. I originally built this for Amlwch but never actually ran it on that layout so it can go here instead. It’s good to see that the small but useful range of Red Panda kits have recently resurfaced from Parkside. 
Finally this is pretty much what I hope Brettell Road will be all about, dark and wet! It’s always been my intention to depict a rainy night somewhere in the Black Country and this is the first time I’ve really been able to get an image that illustrates what I am looking for.
Just a few more wagons
Been building a few more wagons for Brettell Road.
Starting with some RTR offering, from left to right, Dia 2078 van from the Bachmann van. I’ve converted it to a fitted van and repainted it. Next an eastern region van of some descriptions again from Bachmann. My local model shop had these in their bargain bin so I picked 3 up thinking it would be a quick win. In reality it was a bit more involved as due to the chassis design p4 wheels don’t fit. The backs of the W-irons were slimmed down and the brakes removed and replaced along with some extra details. Then we have a Hornby Dublo banana van mounted on a red panda chassis kit. Not much more to say about this really other than to direct you to Ian Flemming’s blog (click here). Likewise the last van, an Airfix body on a Parkside chassis.
More vans starting with the Slaters 8 ton van kit. In reality it’s too old for the layout but I liked its antiquated look and have assumed that it’s an internal user for the steel works. Next along a 12 ton van from the Cambrian kit followed by a shock an and LMS brake van both from Parkside kits.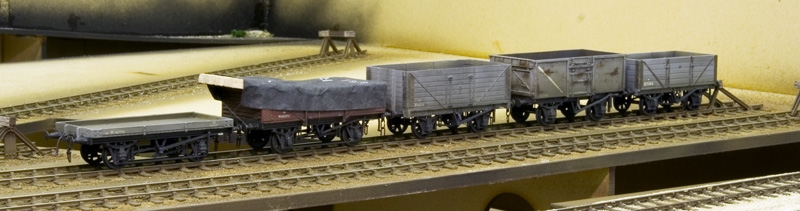
Finally a Cambrian single plank wagon (left) and an older Parkside open. The load is based on a picture I found in a book or magazine somewhere. I wanted a tarpaulin covered load as being an older kit there was no interior detail at all. Quite why the end of the wooden beams weren’t covered over is a mystery. Next to that is another Parkside kit for a wooden open and the famous Airfix 16 ton mineral. Surprising to think I’ve been into model railways for my whole life and never actually built one before. Finally a Ratio 5 plank open which I’ve depicted as sold off to the steel works due to its age.
A little engineers train
I’ve always liked engineers trains (what do you mean, we know?) so a short one for Brettell Road was always going to be on the cards. I’ve shown you my build of a gannet before but now it’s painted.
Shown here with a Cambrian starfish ballast open.
From one of thier old kits to one of thier newest, the recently released herring ballast hopper. There were 2 very different designs of ballast hopper given the herring title. One of them was closely related to the mackerel and of the catfish ilk (walkway one end, single hand wheel).
The Cambrian kit is for the GWR design and it suffers from the same problem the gannet had, that being to discharge the ballast a track worker had to stand by the side of the wagon, right next to where the falling ballast is going to be. It’s a diminutive little wagon and features a one piece hopper and a one piece chassis, the latter being a big improvement on the catfish and dogfish kits. For such a small wagon there’s a lot of details to be added and the underside shows a nicely pleasing complicated look. Of course most people probably won’t notice so if you wanted a rake you could probably miss a lot of this stuff off but having said there nothing that’s really tricky if you take your time.
I swapped the buffer heads for MJT ones and drilling the shanks for these proved a bit tricky with the sides ending up really thin. I didn’t spring them (never do) but think the metal heads are a worthwhile improvement.
Some of the smaller parts had quite a bit of flash on them which was a bit of a surprise as most Cambrian kits I have built recently didn’t have any. That’s the only negative of what is a nice little kit.
I have a couple of Tunnys still to do and I might throw in a catfish too but that’s for another day.
The origin of species.
Whilst Charles Darwin might have thought he was on to something BR had a slightly different idea on the subject. For those new to all this engineers wagons are generally named after things that live in the sea and some of those names are quite inspired! Whale for the largest of all the ballast hoppers and shark for a ballast plough which does kind of look like one, or at least the ploughs do. This is where BR and Mr Darwin deviate a somewhat as to BR the shark was an evolution of the…erm…Oyster! It’s obvious now I’ve said it isnt it? (what do you mean no?)
Sharks and oysters look very similar and the main difference is that sharks are vac fitted and oysters are unfitted (although some were later vac piped). Wanting something a bit different for Brettell Road and given that the oyster was an LMS design anyway I tracked down a cheap Cambrian shark kit and set to work.
Starting with the body the verandas are 1 plank shorter each end and the van body is 2 planks longer per side. So the side was cut into 5 parts with a scalpel (don’t use a razor saw as you will loose the width from the planks), a plank removed from each end and 2 pieces of 80×60 thou evergreen added in. The handrails were removed as was the extra detail around the doors and the brackets from the ends under the opening. (Use a masking tape mask to protect the planks you need to keep.)

Turning to the chassis the oysters had different w-irons and no full length lower step. I used some MJT w-irons I had lying around and given the short wheelbase (only 9ft) I just used them rigid. The springs and axle boxes are also from MJT. The plough’s edges were thinned down as supplied they look quite thick. The rest of the van was built up pretty much as per the instructions with the usual extra brake gear gubbins.
After paint and still not with the roof finally fitted. My last stage of Brettell Road weathering is still to be added, that being to make the model look wet. Below compared with a ‘normal’ shark
The oysters lasted quite late and some were rebodied with shark style bodies. The only real difference visually would be the w-irons and brake gear if you fancied an easier version.
First stock for Brettell Road, finished
I’ve been busy finishing off some stock for Brettell Road. Starting with some wooden opens.
The Tube is an old Colin Ashby kit and is sprung with Bill Bedford springing units. I think you can get a kit for these wagons from Chivers now. These wagons have been weathered to look wet but you cant see it in the picture.
Back to the loco that started the whole project my GBL Jinty. I’ll let the pictures speak for themselves.

Look mum, no glue!
Dear Customer (the letter reads). We are aware then many Falcon Brassworks kits have a reputation for being difficult to build or simply ‘aids to scratchbuilding’…
…If you feel this kit is not what you had expected or you are not confident about completing it please return it to us in its original condition and we will be happy to offer a full refund.
You cant say fairer than that really and given my liking of ballast wagons and the way I get a lot of enjoyment out of making things that are difficult I have been building the Falcon Brassworks Kit for the LMS 25T Ballast hopper or Gannet as they became under BR.
108 of these wagons were built to Diagram 1804 in 1932 by Metropolitan Cammell, and further wagons of the same design (with slight detail differences) were built by BR to lot 1/518 in 1949. Usually branded as Gannet under BR some were also branded Trout and they lasted till at least 1976. Apparently they were unpopular with workers as you basically had to stand next to the falling ballast to operate the handwheels.
The kit wasn’t too bad, some of the parts were not etched cleanly and there were no tabs to help with assembly but it all went together reasonably well. The W irons were replaced with Bill Bedford sprung ones and other parts such as handwheels, brake hangers and lever guides were replaced with better parts from other suppliers. The Brakes themselves had no detail on at all so these were given a bit of a work over with bits of brass.
Other than that quite an enjoyable little project. I don’t know if id want to do a rake of them and its worth pointing out that the clearances between the hopper doors and the wheels is very very small. Some modification would have to be done for EM and i’m not all that convinced it could actually be built in 00!
RJ Essery’s book on LMS wagons shows one in 1965 with a caption saying that it is in BR Livery. As the image is black and white i am guessing that means black but if anyone knows for sure I would be grateful to hear from you.
For some pictures of BR ones see http://paulbartlett.zenfolio.com/brgannet/h58ef291#h15e03d3e

The image above shows progress on the embankment section. I can’t claim any expertise in modelling nature as it’s not something I’ve come across much before however a while spent looking at local plant life for the “what” and Gordon Gravetts book on the subject for the “how” has produced something I’m quite happy with although I am undecided if the nettles are a bit bright. I drew a quick fencemade from sleepers and Tim kindly laser cut it for me for the top of the bank. I guess it does mean that Brettell road will be set in early October mind you. If you haven’t got Gordon’s book yet then its well worth finding a copy.


I’ve made a start on some wagons. From the left are a Cambrian 5 plank open for which I found you need to remove a bit of material from the base of the w-irons for P4 wheels. Then there’s a Ratio Van and open (I’ve never built Ratio kits before) The open is really too old but I have a plan for an off scene steelworks (sort of Round Oaks ish ) so I will use this as an internal user. Followed next is a Parkside 7 plank open, simplicity itself and a Bachmann RTR van- this was supposed to be a quick win picked up from the bargain bin at Modellers Mecca but conversion to p4 was a bit more than just sticking wheels in with material needing to be removed and new brakes added from MJT. Right at the end is a Peco wonderful wagon tank. Quite advanced for their time with working buffers and springing. In reality the springing is a bit too hard to be of any real effect so I will fit some Bill Bedford sprung W-irons.

Finally back to where it all started , the GBL Jinty. The body has been detailed with bits from the Brassmasters kit, some parts from Markits (and London Road Models as well as some home brew parts such as lamp irons from brass strip. I haven’t done any work under the footplate yet as I need to look at the High Level chassis next.
Filling the stock box.
Perhaps its a bit of OCD but I find if there’s a gap in a stock box I have an urge to fill it with something. In this case I have a gap next to my TTA’s and the easy option would be to buy a Bachmann one, fit springs and a new walkway and bobs your lazy uncle! However things don’t work like that and while browsing Paul Bartletts wagon site I came across these!
Something a bit different and yet not in a stand out “look at me” way. A couple of cheap Hornby TTA’s were found and cut in uneven halves to make the barrel 3mm longer. I know I have gone on about the Lima Mk2′ s being too short and how I’m not all that bothered and yes the difference is about the same but it pays to think of these things in terms of context and percentages. Context , I need a lot of Mk2s and I don’t see a huge gain for the effort in a large fleet, where as I’m only doing one of these. Percentages – 3mm over a coach is a lot smaller percentage error than 3mm over a wagon that’s less than half its length.

The chassis is scratchbuilt (it’s not exactly complicated) from evergreen section with suspension from Wizard models, Buffers are from the Southern modellers group.
Also in progress is another Mk2 transit van. I’ve been meaning to do a LWB high roof bus for a while in BTP livery to park outside the station (that’s where the BTP offices were and there were always police vehicles parked there). However an out of the blue request* has led me to a short version instead . The ingredients are the usual mix of Corgi Mk1 van and ABS fronts with a hefty bit of drilling and filing.

*More about that in a later update.
25th July 2014

Not had an update in a while but I have been busy working on a few more wagons. Click here to go to the wagon section.
Back to the PGA
Regular visitors will remember a while ago I looked at springing a Lima PGA. Since these wagons tend to operate in bulk trains I had no intention of doing another 30 or so. However the covered bulk salt version seemed to crop up in WCML speedlink trains so one of those is ideal. First impression is that they look the same as the Lima one however they are longer so after picking up a cheap one on EBay a start was made using Phil Eames article on PGA’s in DEMU Update as a guide.
 The 2 wagons were cut into unequal halves before gluing them back together. Extra details were added to the under frame and the ribbing added to the hopper sides using plastruct strip. The end platforms were made from a combination of wire, some scrap walkways from an old A1 models TTA walkway kit and ladders from Colin Craig. The internal formers were kindly cut for me by Tim.
 After paint, the tarpaulin was just baking foil sprayed blue. The transfers are a mix of fox ones I already had and some home brew ones drawn up in Illustrator and printed on Crafty waterslide transfer paper.
Some more wagons
Despite not really getting caught up in the rush for the latest thing when it comes to RTR I do find that the new wagon announcements have an effect on what I’m up to. It’s because most of the new stuff actually isn’t. It’s been available before as a kit and if it suits what I’m doing there’s a good chance there’s an example or two in either my unbuilt kit pile or half started in a box somewhere. I’ve had to admit I’ve never really understood the clamour for new stuff we already have especially if the example is something simple like a 4 wheel open wagon. I mean you will see comments on forums that it’s the greatest thing ever, that someone has wanted one of these for years etc etc. I just think they can’t have wanted one that badly or they would have built the kit! Don’t dare suggest it though as such people seem to rejoice in explaining that they are so inept that they can’t stick 2 sides and 2 ends to a floor, or even better puff their chest out with pride when they tell you they have never even tried! And yet after all this time waiting they will absolutely buy 3 dozen of them just on a written specification, yeah right!
Getting back to the point, this time it’s Bachmanns tube wagon which so far does look nice. If starting from scratch I’d probably buy a couple but I’ve had the Parkside kits half done for many years. Having said that I would be surprised if Bachmann manage to match Parkside’s lovely thin sides.
 Here is one of them after changing the w-irons for Bill Bedford ones, adding brakes from MSE and a few bits of wire for linkages and safety loops.
 Above is a Bachmann VGA also done with Bill Bedford w-irons. The original axle boxes look nothing like those on a VGA so it’s worth changing them for slightly cut down hooded roller bearings, again from MSE. the break gear is from microstrip and wire but you can’t see the wire when the wagon is the right way up. The end steps are from DEMU member Martyn Normanton. I thought they were a bit too long so moved the top fold along by 1mm to reduce the height. Martyn also does steps for BAA and BBAs.
 One little tool I’ve had for years but never really used is this, which is like a temperature controlled hot glue gun designed for sticking etched details to plastic. It’s kind of like a soldering iron for plastic because if you get it wrong you can over heat the part and the glue breaks down and just rubs off. More faff than using superglue but the joint appears to be stronger.
10th April 2014

Those who follow the workbench section of the site will know that I have been converting a Hornby class 110 into a class 114. Well its nearly done now (just a few tweaks to do) and a new page has been set up for it in the units section.
There are also new pictures in the coaches section and a new page for steel wagons (admittedly with only two to look at so far).
Welcome to spring
If you listen to some forum ‘experts’ if you are going to model in P4 everything has to be compensated or sprung or it will all fall off and everyone will point at you and laugh! Of course the closest that these people get to regarding springs are the ones in their oh so comfy armchairs that they never seem to get out of.
The reality is somewhat different but before I go into that it’s probably best that I share my finding of how model railway vehicles run. Of the three options Sprung vehicles do run best, then compensated and finally rigid when it comes to trackholding. Visually though the order is a little different as while sprung still looks best, I find rigid vehicles look smoother than compensated ones where due to a single solid axle all the track imperfections are transmitted to the body.
It seems then that Compensation is perhaps outdated and I certainly wouldn’t bother with compensating a wagon these days. Leaving sprung and rigid as 2 viable options. Sprung being best but not always necessary. I have a theory that any form of flexible chassis is primarily there to compensate for us not building things square in the first place and when it comes to machine produced RTR wagons most of the time you can just pop some new wheels in and they will work as can be seen here –
So before we fix anything we should really see if it needs fixing at all, however some RTR is a bit more tricky and the prime culprit here is Lima with their underlength axles. So using a lima PGA as a victim here’s what to do.
First thing is P4 wheels just wont fit. However Lima did mold a boss on the back of the axle guards so one option is to carefully cut this away with a circular saw in a minidrill and deepen the axle holes with a special tool such as Ed’s tool. However Lima also modelled a lot of their wagons too high so in an attempt to kill 2 birds with one stone the original axleguards were removed completely.
 I tend to use the Bill Bedford springing units but if mounted to the floor they wont fix the ride height problem. The trick is to mount them to the top side of the floor not the bottom and cut holes for them to poke though. The angled shapes are there so that the wheel doesn’t hit the floor. This mounting to the wrong side of the chassis idea also works for Bachmann TTA’s too.
  You shouldn’t expect springing to sort out sloppy workmanship because it wont. Getting the axles parallel in all 3 dimensions is still important and a handy tool to help with this is the Brassmasters axle spacing gauge as seen above.
 I always solder the bearing in to its carrier and file it down a bit for clearance. The original Lima suspension moulding was distorted to adjust the height so I decided to replace them with spares from a Cambrian SSA kit that I had. These are very thin, plastic mouldings, so a few strips of square 40 though strip were glued in place to act as spacers. It goes without saying – dont bung the springs up!

The finished (ish) chassis. The SSA kit also yields the rather heafty brake gear brackets too. Obviously the body needs work but that’s for another day.