One of those finished things posts.
The advantages of working on more than one project at once is that, firstly, I don’t get bored and secondly every so often you seem to finish a lot of things together. This is one of those instances with several things that have featured recently have reached the finish line sort of together.
 My loading gauge has been painted for a while but now its been planted too. I love stuff like this as its one of those things that I hope disappears into the scene and becomes unremarkable. Perhaps once in a blue moon someone will notice it but, much like the real thing I like stuff like this just to be ‘there’. It’s not supposed to get people’s attention. (don’t worry about the big gap under the wall – that’s not been permanently attached yet)
 My Ford Thames and Austin A40. The colours of the Austin have a somewhat obvious Birmingham influence. Cartwrights was a furniture store in Brierley Hill but I have no idea if they used Austin vans or even if they had any road vehicles at all.
  This was a quick win project – Started life as a Bachmann Coke wagon which I imagined was sold to Round Oak and had the coke rails removed. I just liked it because it had a local livery and i’ve never done a distressed private owner before. The lettering was attacked with one of those brass brush wheels in a mini-drill and then the wagon was weathered. The w-irons needed a but more work with the mini-drill and a burr to get the wheels in but this was really minimal effort modelling!
  And so to the big project of the last few weeks – the DE2 shunter. I have to admit I didn’t relish the thought of painting its striped livery but by using some 4mm making tape from a company called Jammy Dog it wasn’t too bad at all. (click here for their website) A few more pictures below.

 This is the sort of train I had in mind for the loco – Pushed up the hill with the loco at the rear and no brake van. I will need to add a shunter to the front wagon at some point.
 Finally another moody shot of the Jinty heading out of the yard on a train of vans.
Yorkshire Engine DE2 part 2
 I can call the build stage of this project complete. The chassis is all wired up and runs and all the little fiddly bits are in place.
Yorkshire Engine DE2 part 1
Part of the plan for Brettell Road is to have an off scene steel works, the real Round Oak was (is) just down the line from the sidings at Moor Street. I plan to use the sidings at Brettell Road as an exchange sidings for this and I like the way that a lot of the uphill workings on the old Earl of Dudley’s railway had the loco pushing trains up from the bottom of the hill so I want to replicate this on the model. My choice of motive power for these workings is the Yorkshire Engine company DE2 0-4-0 diesel shunter, of which Round Oak had a fleet and would be pretty new at the time of the model. Not that the loco’s in such an environment stayed new for very long mind you. Luckily Judith Edge do a kit and this week I set to work. The kit breaks down into 3 sub assemblies. The chassis, the footplate and the body. It all goes together pretty easily due to the good design of the kit. It has a simple rocking compensation built in and I decided to use it as supplied. The above picture shows the main soldering work complete with the fiddly details stage to come next.
  Losely assembled but not bolted together, I will be getting the chassis running with a high level gearbox and Mashima motor.
  Rear view. The kit provides a resin bonnet top and sandboxes along with a little cover for the handbrake which is mounted on the rear of the cab on the right hand side under the window. I cant find any evidence for this being on the Round Oak examples so I filled the recess for it with a bit of scrap etch and filed it smooth. You can just make it out in the picture.
There was a suggestion that these loco’s first appeared at Round Oak in a plain Yellow livery but I cant find any evidence for this being the case. If anyone has any it would be much appreciated.
Going about it all backwards
One of the first kit wagons I built was the Cambrian Turbot. Back then it had super fragile bogies but was, and still is, a decent kit. The current version comes with one piece bogies so they don’t tend to disintegrate as soon as you look at them anymore.
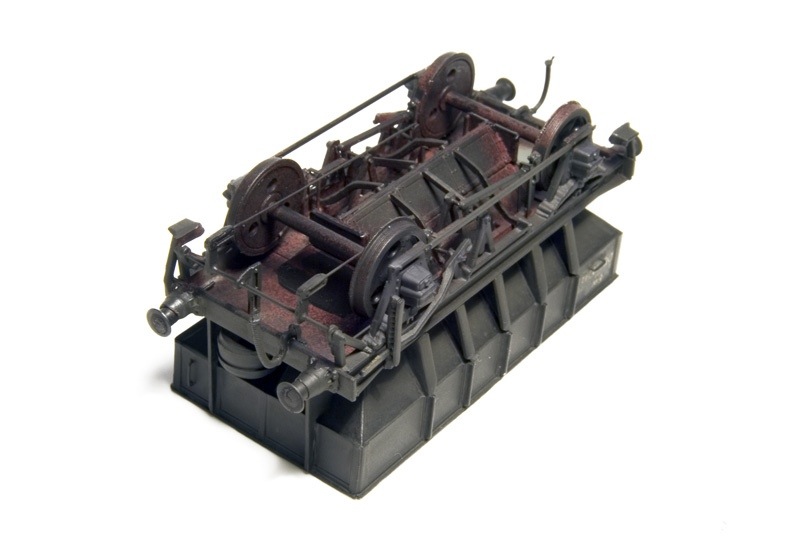
A while ago Justin Newett of Rumney models produced an upgrade kit for the Lima bogie bolster E and since that where the Turbots came from it seemed sensible to use one of these to update my ancient and small fleet of Turbots. (Kind of the reverse of what BR did.) Above is a comparison of the new underframe and the old. Because of the good design of he kit its dead easy to build although I did have to cut the baseplate in half as my solebars were closer together than the Lima model’s.
 The view no one will ever see! These are the newer type of one piece bogie which Cambrian do as a spare.
Variations on a theme
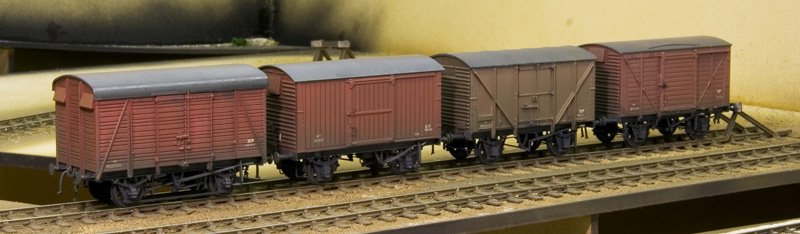
I must admit I’ve never paid that much attention to the humble 12 ton goods van, mainly because I’ve never needed to before. However once you get into them they are quite addictive little so and so’s! After a good read of Ian Flemings blog and consulting books I now find myself with quite a few of them.  First up some Cambrian kits. The first 2 were built as per the kit (Although I replaced the roof with 20 thou plasticard) while the third one (far right) was converted to a 10 ft wheelbase diagram 1812 example by carving off the metalwork on the left hand end and, modifying the door mechanisms and replacing the chassis with a Parkside one (code PA16). When it comes to the brake gear you can get etched or white metal replacements for much of the parts but I’m happy to use the supplied ones. I do however replace the safety loops with Bill Bedford etches.
 Next the ever so handy Ratio kit for the LMS 12 ton van. The one on the left is built as supplied (but with MJT roof vents) and the one on the right has a modified door , simply using the Mainly Trains etched rivet strips. Buffers are from Lanarkshire Models.
 Vacuum braked versions with more rivet strips, spare vac cylinders from the scrap box and (in 2 cases) tie bars from 0.8mm L section from Eileens. The example on the right has a vertically planked door.
  Lot 929 on the left with Parkside underframe bits and on the right the BR build of the same design. The body for this one isn’t a ratio kit but the old Airfix body. It rides on another Parkside PA16 chassis.
 A couple of Shocvans. Plywood one on the left from the recently returned Red Panda kit and planked on the right from Parkside.
  I include this one as its a variation on what the kit was supposed to be. Starting life as the Parkside PC42 kit for the BR fruit van I replaced the ends with more Ratio ones and filed off the diagonal strapping and other details to depict a Diagram 2097 goods van. The chassis was replaces with a PA09 chassis. The roof has slightly lifted so I’ll need to fix that.
Some handy links: Ian Flemimgs Windcutter blog, Cambrian Kits, Parkside kits, Ratio kits, Lanarkshire Models and Eileens Emporium (Also for Bill Bedford parts)
More vehicles, greenery and a first for me.
 The above 2 vehicles represent a return for me in a small way in that both come from manufacturers I have used before and in both cases I was a little bit disappointed previously . On the left an Austin A40 from Road transport images who I used before for a dodge cab on New Street. In the case of the dodge cab I felt it was a bit too rounded and didn’t really capture the look of the real thing all that well but I must say I’m much happier with this little van which was an impulse buy at this years Scaleforum. This is one of their all in one kits which is unusual for them as they usually sell all their bits separately so you can build the vehicle you want. Road Transport Images
The Lorry is a Ford Thames from John Day models. In this case my previous experience was with a diesel-powered Transit bus and again I wasn’t all that impressed. This model couldn’t be further from the transit though as its much better cast with very little work to do. I swapped the supports in the bed for wire as they were a tad scruffy and the bed and cab both needed a little bit of evergreen 40thou section to make them fit a little better but I like it! John Day Models
 I decided that the track in my little yard looked too neat so I have attacked it with some powder paint (rubbed in with a finger then sealed with Klear) and some weeds. I’m much happier with how it looks now.
 Although I don’t have a goods shed I do need a loading gauge. I’m reliably informed that these were used to ensure that wagons leaving the yard were within gauge and not as some sort of protection for goods sheds. The above example is a typical midlands one and started out from the Smiths kit, I filed off the moulded lifting gear and replaced it with some spare handwheels (from Brassmasters) and bits of wire and brass.
 I mentioned in the title a first for me and this is it. Not that i’ve never built a weighbridge before (Although I haven’t) but i’ve never actually built a kit building before. When I was a kid my dad built some for me, usually Airfix kits and Linka, but all my buildings have been scratchbuilt up to now. So in the interests of breaking new ground this is a Wills kit. I turned the door over as hinges on the outside indicated it opened outwards which seemed a bit odd to me. I also filed off the panels on the end and rescribed the bricks and fancied a brick-built chimney but it is still a kit building. Oh and the guttering is bits of brass from Eileens!
Finally, you may have spotted earlier that Ive bedded in (most of) the abandoned warehouse, a few pictures follow:

Just a few more wagons
Been building a few more wagons for Brettell Road.
Starting with some RTR offering, from left to right, Dia 2078 van from the Bachmann van. I’ve converted it to a fitted van and repainted it. Next an eastern region van of some descriptions again from Bachmann. My local model shop had these in their bargain bin so I picked 3 up thinking it would be a quick win. In reality it was a bit more involved as due to the chassis design p4 wheels don’t fit. The backs of the W-irons were slimmed down and the brakes removed and replaced along with some extra details. Then we have a Hornby Dublo banana van mounted on a red panda chassis kit. Not much more to say about this really other than to direct you to Ian Flemming’s blog (click here). Likewise the last van, an Airfix body on a Parkside chassis.
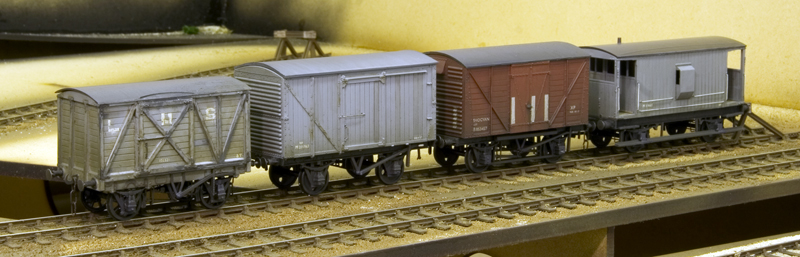
More vans starting with the Slaters 8 ton van kit. In reality it’s too old for the layout but I liked its antiquated look and have assumed that it’s an internal user for the steel works. Next along a 12 ton van from the Cambrian kit followed by a shock an and LMS brake van both from Parkside kits.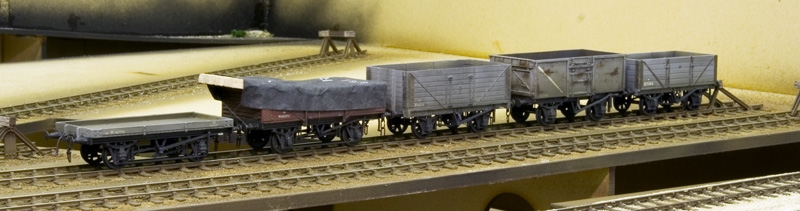
Finally a Cambrian single plank wagon (left) and an older Parkside open. The load is based on a picture I found in a book or magazine somewhere. I wanted a tarpaulin covered load as being an older kit there was no interior detail at all. Quite why the end of the wooden beams weren’t covered over is a mystery. Next to that is another Parkside kit for a wooden open and the famous Airfix 16 ton mineral. Surprising to think I’ve been into model railways for my whole life and never actually built one before. Finally a Ratio 5 plank open which I’ve depicted as sold off to the steel works due to its age.
A little engineers train
I’ve always liked engineers trains (what do you mean, we know?) so a short one for Brettell Road was always going to be on the cards. I’ve shown you my build of a gannet before but now it’s painted.
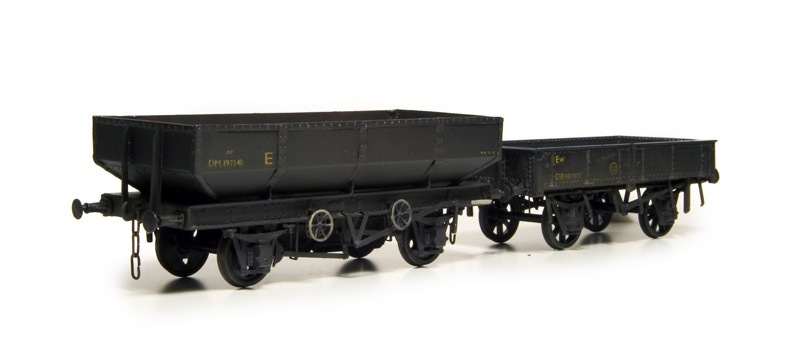
Shown here with a Cambrian starfish ballast open.
From one of thier old kits to one of thier newest, the recently released herring ballast hopper. There were 2 very different designs of ballast hopper given the herring title. One of them was closely related to the mackerel and of the catfish ilk (walkway one end, single hand wheel).
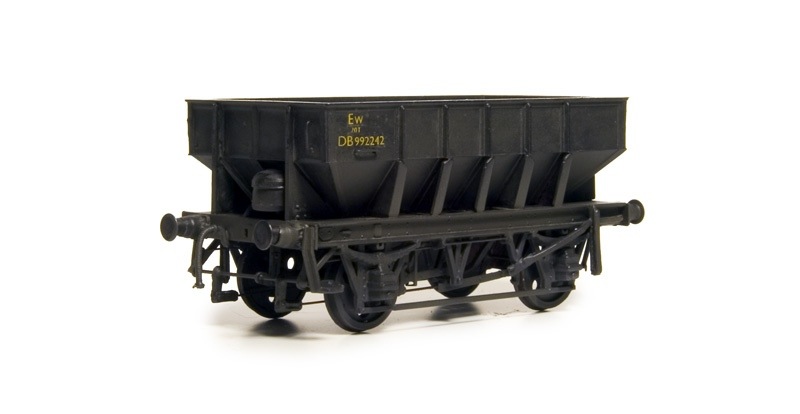
The Cambrian kit is for the GWR design and it suffers from the same problem the gannet had, that being to discharge the ballast a track worker had to stand by the side of the wagon, right next to where the falling ballast is going to be. It’s a diminutive little wagon and features a one piece hopper and a one piece chassis, the latter being a big improvement on the catfish and dogfish kits. For such a small wagon there’s a lot of details to be added and the underside shows a nicely pleasing complicated look. Of course most people probably won’t notice so if you wanted a rake you could probably miss a lot of this stuff off but having said there nothing that’s really tricky if you take your time.
I swapped the buffer heads for MJT ones and drilling the shanks for these proved a bit tricky with the sides ending up really thin. I didn’t spring them (never do) but think the metal heads are a worthwhile improvement.
Some of the smaller parts had quite a bit of flash on them which was a bit of a surprise as most Cambrian kits I have built recently didn’t have any. That’s the only negative of what is a nice little kit.
I have a couple of Tunnys still to do and I might throw in a catfish too but that’s for another day.
The origin of species.
Whilst Charles Darwin might have thought he was on to something BR had a slightly different idea on the subject. For those new to all this engineers wagons are generally named after things that live in the sea and some of those names are quite inspired! Whale for the largest of all the ballast hoppers and shark for a ballast plough which does kind of look like one, or at least the ploughs do. This is where BR and Mr Darwin deviate a somewhat as to BR the shark was an evolution of the…erm…Oyster! It’s obvious now I’ve said it isnt it? (what do you mean no?)
Sharks and oysters look very similar and the main difference is that sharks are vac fitted and oysters are unfitted (although some were later vac piped). Wanting something a bit different for Brettell Road and given that the oyster was an LMS design anyway I tracked down a cheap Cambrian shark kit and set to work.
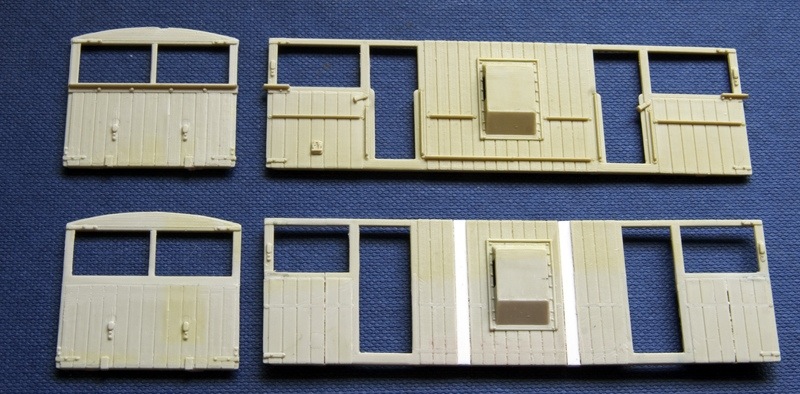
Starting with the body the verandas are 1 plank shorter each end and the van body is 2 planks longer per side. So the side was cut into 5 parts with a scalpel (don’t use a razor saw as you will loose the width from the planks), a plank removed from each end and 2 pieces of 80×60 thou evergreen added in. The handrails were removed as was the extra detail around the doors and the brackets from the ends under the opening. (Use a masking tape mask to protect the planks you need to keep.)

Turning to the chassis the oysters had different w-irons and no full length lower step. I used some MJT w-irons I had lying around and given the short wheelbase (only 9ft) I just used them rigid. The springs and axle boxes are also from MJT. The plough’s edges were thinned down as supplied they look quite thick. The rest of the van was built up pretty much as per the instructions with the usual extra brake gear gubbins.
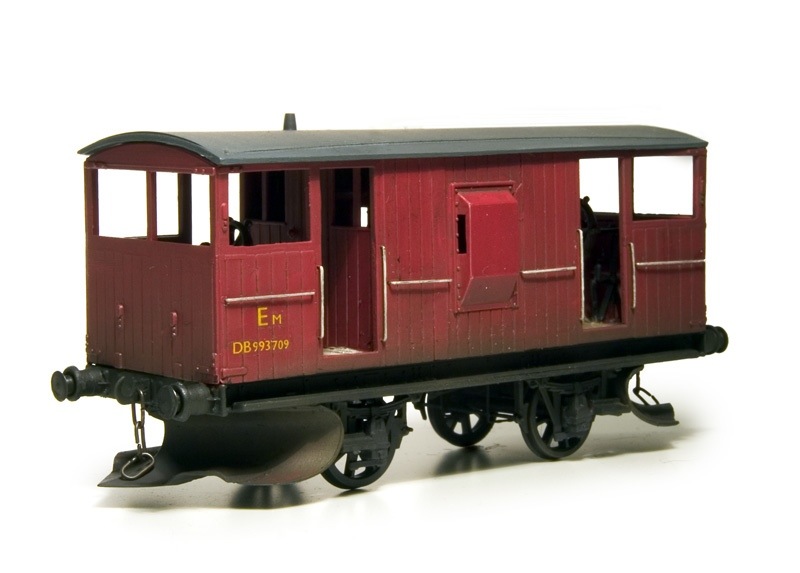
After paint and still not with the roof finally fitted. My last stage of Brettell Road weathering is still to be added, that being to make the model look wet. Below compared with a ‘normal’ shark
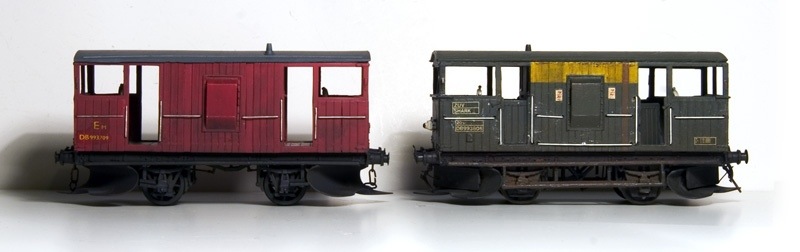
The oysters lasted quite late and some were rebodied with shark style bodies. The only real difference visually would be the w-irons and brake gear if you fancied an easier version.
Volvo FL6 part 3

Well that’s another lorry all but finished. I was quite pleased with how this turned out considering the castings that greeted me when I opened the box. You sometimes get a better sence of achievement building a poor kit than one that just falls together. Still to add are the windscreen discs, a driver, number plates and the mirrors.
Volvo FL6 part 2
I have to admit I’ve quite enjoyed getting to grips with this. The beauty of a white metal kit is that you can tweak it with low melt solder used as a filler. You don’t have to wait for it to dry and it doesn’t break away when you attack it with files and filler. I decided to do a solid sided box and do away with the windbreak in the end. I also replaced the marker/indicator lights and added the rainstrips from wire. The front panel, below the windscreen was filled with solder, sanded smooth and the panel re-scribed so that it was the same height at both ends! Below is where it is now.
