A slight diversion

One thing that’s always bugged me a little about the above image is the coupling rods on the class 11 (left). I cant remember why but I used the Brassmasters standard rods rather than their finescale ones. Well I finally got around to swapping them over.


Another little distraction is this Bachmann anchor tank wagon.

A simple wheel swap with a new etched discharge wheel and new ladders from Stenson models.

A bit more of a ‘proper’ project was this diagram 1/163 iron ore hopper from Wizard models. Quite a neat little project this one.

Finally, i don’t want to remind anyone but the nights are drawing in again!

Class 120 revisited.
One of my earlier DMU conversions was a class 120. Built from Craftsman overlays on a Lima 117 it’s done many shows on Moor Street and was probably due a bit of an overhaul.
I had already rebuilt the underframe to better match the prototype and a few years ago I swapped the bogie side frames for Dapol ones* as they better matched the Swindon design the class ran on.
*the older ones from their trans pennine mode not the newer ones from their bubblecars

The big thing I wanted to address was the inner ends. When I built the model the inner ends were void of detail and the instructions just said to stick the Lima gangways and exhausts back on. However the class 120 exhausts are somewhat distinctive and look nothing like what Lima supplied. So the ends have been detailed up to better match the real thing.

As mentioned before I am a fan of the Masokits gangways for DMU’s however I don’t see a lot of point using them if they are hidden behind the exhausts. So for this model i have use paper bellows and moulded gangways I had in my spares box.


A somewhat unfocused post.

Something that always bugged me about my Heljan class 27 was the somewhat odd buffers. A long time ago i got a set of replacements from Sutton Loco Works and its just one of those things I never quite got around to. Well now that little job can come off the list.

Finished the roof of my station building – just need a layout to plant it on!

The gutters are a recent introduction from Modelu. I found they don’t like superglue at all but stick very nicely with liquid Poly (in this case Tamiya extra thin).

Popped back to my Kirtley to pick up a few things that irked. The loco to tender gap has been tightened up a bit and the rain cover tidied.

Crew from Modelu

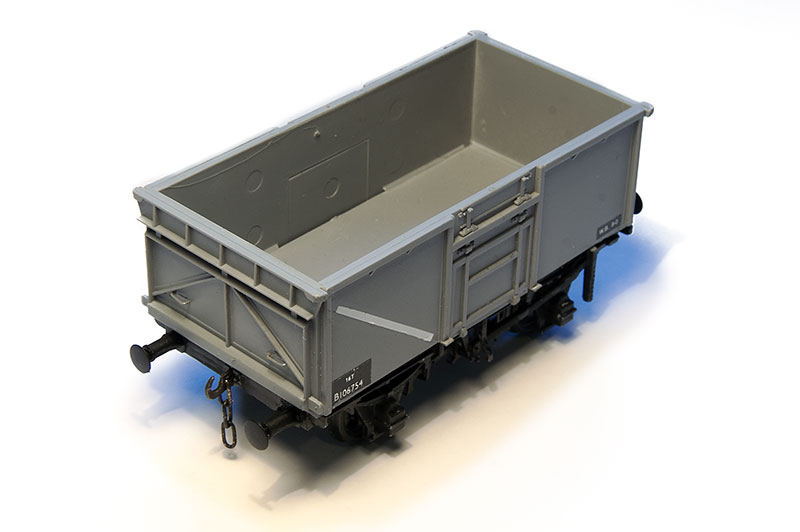
Bit more off a proper project this one. A clasp braked 16 ton mineral from a Parkside kit on a Rumney Models underframe. The only down side to Justin’s stuff is it looks better not painted! A few pics below for history.


Project Coronation – Tender part 4

Progress on my tender build continues. This is the front end with some of the detail started.

And the rear end.

Inside showing the fire iron tunnel and and the coal pusher which is a 3d print.
Below are the some images of the tender in its nearly complete state. There’s still a few bits I need such as the ladder etc but focus will now shift back to the loco.


Some Steel wagons.

The diesels have escaped to Brettell Road again. Actually its just a convenient photo background but there you go.
New Street isn’t known for its freight operations but there were some services booked through the station on a fairly regular basis. Normally late at night and of those steel traffic was quite common. To that end I have recently finished off a few old Cambrian bogie wagons that have been lurking in my half started box for a while now.

First up a BDA. When I started this model there was no Stenson Models so sometimes, letting a model live in the half started area for too many years works out as a positive. The little kit for the braking gear lifts the model. I’ve used Jon Hall etched bogie inserts with the cambrian bogie sides but if you want better, sprung bogies with nicer sideframes then Stenson models do those too.

I replaced the supplied bolsters (when i say replaced I actually mean lost!) with microstrip which better suited the wooden ones fitted to the earlier conversions anyway!

In a not entirely unrealistic scenario, a class 56 heads towards Round Oak.

BAA also from a Cambrian kit.

… and a BBA.


Although my Yorkshire DE02 is part of the Brettell Road fleet they were still very much around in the late 1980s and still in their original wasp livery so this scene isn’t implausible either!

25th of April 2020

Long time followers may remember my project to build a 15xx tank loco. This is as far as I got but this may hopefully change as Warren shepherd who does a kit in 7mm scale is considering a 4mm scale version. http://www.warrenshephard.com/gwr.htm
He needs at least 24 firm sales to make it viable and expressions of interest are being collected on the GWR modellers Facebook group https://www.facebook.com/groups/921387308231483/?ref=share
Project Coronation – Tender part 3
Moving on to the tender body…

Brassmasters supply a basic sub structure with different overlays for the 3 main types of tender found behind a Duchess.


This is the coal shute and front bulkhead assembly.

The 2 sub assemblies test fitted together.
Bashing Buildings
When it comes to building I admit I tend to just get on and scratchbuild them. Part of this is due to ignorance of whats actually out there but recently I picked up a couple of Wills kits and have had a go at these instead.

First up is the kit for a lamp store. You actually get 2 in the kit and these are for the slightly different GWR design but can be adapted to something more ‘midland’ pretty easily by shortening the sides to form a 6ft square structure. I cut out the door and remounted it flush as well as replacing the roof with thinner plasticard. On the other end I added a few extra window bars (see below).


The other kit was for the ‘station garage’ which i have chopped about to give a industrial looking wooden building. The roof again is plasticard (the wills stuff is quite thick) and the vents are from unit models.
A quick win, relatively speaking.
With my ongoing Duchess build my thoughts turned to a little quick win project (also with Scalefour North coming up at the end of March). I said relatively speaking in the title because a few years ago I would have likely considered this quick win as a bit of an undertaking but there you go. When we were at the Wakefield show with Moor Street, my attention was drawn to a cheap Lima GWR small prairie tank loco. They were not common at all on the Stourbridge to Wolverhampton line but their larger sisters, the Large prairie were somewhat a mainstay of the line.
I know Hornby are doing a new model but a dirt cheap Airfix example was found (none runner) along with a comet chassis and I set to work.

Stage one – body detailed and the chassis built. I modified the pony trucks a little and sprung them using a method outlined by Dave Holt (see here). The original smokebox door was too small and a few extra details were added to the body. After this picture was taken I also reduced the height of the safety valve bonnet.

A quick blast of grey primer and a liberal(ish) dose of archers rivet transfers and the body was read for the paint shop. A few images of the finished result follow.


Project Coronation – Tender part 2
The tender chassis is now effectively done – Not a lot else to say really so here’s some pictures.

Right hand side

Rear end

Front, or loco end.
Project Coronation – Tender part 1
I’ve moved away from the loco for a while as the next stage of the build is the cylinders and I don’t have the castings i will need for them just yet. So attention has shifted to the tender.

The first stage is the outside sub frames – a simple box really. The kit allows for springing or internal compensation. I’ve opted for springing.


Underside of the tender showing the sub frame, brake gear and water scoop gear. A little fiddly but its been fun to build so far.

Project Coronation – loco chassis, part 2
So progress continues on my Coronation build.

The front frame is as far as I can go for the moment. (I don’t have the cast bits for the loco yet. If you are wondering about the cylinders they are a separate sub assembly.

No problems with the pony truck so far. The kit provides for both the earlier and later types. This is the later one.

The bogie is compensated. As the bogie is the only part of the loco that traps the wheels in place I have used some old/rejected wagon wheels for the moment. I ideally only want to put wheels onto the axle once if I can.

Without the wheels in the way.

I couldn’t resist a temporary mock up to see get a better feel for the loco. I’ve used a High Level Road runner + gearbox. The main drivers don’t have their springs in place yet so its sitting a little off at the moment.

Project Coronation – loco chassis, part 1
I am currently embarked on building a test build of the forthcoming Brassmasters Coronation or Duchess kit. Way before I got distracted with Brettell Road I always thought that if Brassmasters ever did a Duchess i would have a go at building one as 46235 ‘City of Birmingham’. Well now they are and so I am!
Of course its a personal opinion thing but I never really liked streamlined steam locos. While the Duchesses were a little more thoughtfully designed than the god awful GWR efforts I always thought they looked a bit like an upturned bath tub and have to admit the A4’s did look a fair bit better. However with the streamlining taken off the Duchesses were ‘it’. The steam locomotive version of the Concorde moment. To my eyes, at least, the pinnacle of steam loco perfection.
Anyway enough hero worship and on to the model. Starting with…

The main sub-frames. The loco frames come in 3 sub sections related to the wheels. A driving wheel section, a pony truck section and a bogie section.

The chassis upside down, test fitting the main coupling rods.

The main frame with the brass overlays fitted.

The front or bogie area sub-frame.
More to follow.
Local Flavour
This post can best be described as a taste of local flavour if not the full meal itself.

Anyone familiar with railways in the Stourbridge area will be aware of the Parry People Movers that operate between Stourbridge Junction and Stourbridge Town. Little 4 wheeled railbuses that spend their days shuffling along the UK’s shortest passenger branch line. The line itself is still jointed track meaning the ride is somewhat best described as lively! While famous now for these little vehicles Stourbridge didn’t really embrace the railbus idea the first time around, The line begin operated by autotrains and GWR design railcars at the time railbuses were being tried elsewhere.

However as Brettell Road is a loose interpretation I have gotten hold of a Heljan one as a nod to the little people movers. This was always going to be a nice to have rather than a need so having kept my eye on eBay for a cheap one, just on the off chance, this AC version popped up as a non runner with a dodgy motor for less than half the price the runners were going for.

The motor was replaced with a small Mashima I already had. One of the drive shafts was bent out of shape too but as these little models are very heavy for their size I binned that and now its just powered on one axle. For what it needs to do that seems absolutely fine.

I’ve fitted a Zimo MX634D decoder in the space in the roof linked to a TCS KA2 stay alive hidden behind the door and weathered it, The wheels are Branchlines 3ft using the original gears and bushes. You do need to grind a little bit of the chassis away to get them to fit. A couple of passengers and its good to go.


Same idea – different generations!

Another bit of local flavour. The yard crane at the real Brettell Lane was a bit of a chunky affair. In line with my upcoming demo at Scaleforum on making the most out of older models, I’ve come up with this representation using the Airfix dockside crane as a start point. The jib is scratchbuilt from plasticard. I’ve only seen a few distant pictures of the real thing so this is very much a loose interpretation.
J94 Project – Done!
When I picked up my nearly finished J94 kit it came with an already assembled Branchlines Gearbox. Try as I might I just couldn’t get on with it. For some reason it seemed to have very little torque but this wasn’t sacrificed for speed as it didn’t really have much of that either (perhaps the energy was being used up by the noise it generated?). So admitting defeat I swapped it for a High Level Road Runner +. What a difference that made!
Another little problem I came across was the lack of space between the inside motion and the springs I fitted on the front 2 axles. I had used a short handrail knob in the same way that the advocates of CSB systems use but it was all just a little bit too tight for comfort. So I ditched that and just soldered a couple of springs to the inside of the chassis – Number 10 guitar springs for the center axle and number 12 for the front bearing on the top of the axles. Anyone with any kind of knowledge of how things should be done are probably reading the rest of this post from behind a sofa but it works so that’s fine in my eyes!
Anyway its done so here’s a few pictures.


Here’s a very short video of the inside motion at work
Below are a few evening images.


Another little video – this time a spot of shunting. There’s a few stutters which I am hoping a little more running in will iron out.
Finally one of those unplanned shots you sometimes get when you are focussing on something else and they just catch your eye. A simple line up of coal wagons.

J94 project – something a little different.
Several years ago now DJ models appeared with much fanfare (Although only in one place if we are being completely honest) and announced a brand new J94 model. This was of interest to me as 2 of them were used by the NCB in the local area. While it would have been a nice to have I was never going to go for the RTR effort but i did hope that if it was good enough it might see a few unstarted Brassmasters kits appear which would be a little more up my street.
In the end this didn’t really happen so the idea was kind of abandoned until the good folk at Brassmasters mentioned they had a unfinished test build of their kit somewhere. Money changed hands and a slightly different style of project was formed to what I’ve done in the past.

So this is what i was presented with (albeit with a Giesel chimney that i replaces with a RT models casting) and a little box of spare parts. I’ve never finished a half started loco kit before and with no instructions and not knowing what bits I didn’t have it was going to be a bit of an adventure.
The easy route would be to just add the body detailing and finished what I had but the chassis was missing most of its representation of valve gear and I didn’t have any of these bits in my little box of spares.

The chassis as supplied.
My friend Les supplied me with a copy of the original instructions (which sort of helped a little) and members of the Scalefour Society forum kindly provided pictures of the etches, some finished models and some prototype pictures so I set to work.

The detailed up body, using prototype pictures as a guide.

The Chassis. I used a Brassmasters inside motion kit, shortened by 3mm and simplified. The prototype locos seeming to have a much more rudimentary arrangement than the LMS locos the Brassmasters kit is intended for. I also couldn’t use the original central pivoted rocking beam compensation so I have sprung the front two axles from a central pivot on either side instead.
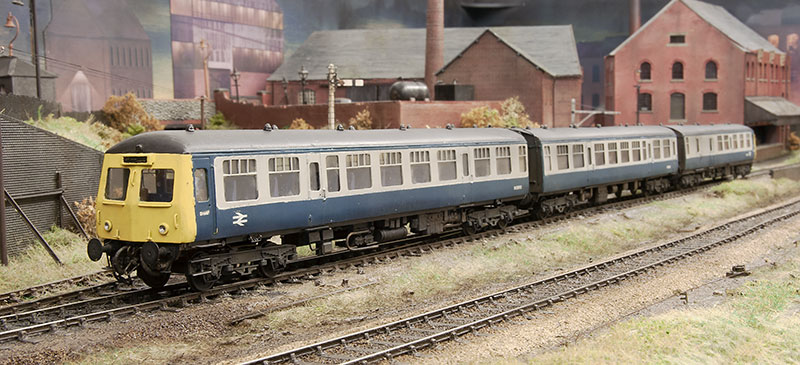
What ever happened to…

Way back towards the start of this project I posted the above image. The little black tank wagon at the far end was a Peco wonderful wagon kit and avid follows of this little adventure might notice nothing has really been said of it since.

It was pretty quickly joined with a companion and the pair have been lurking near my workbench ever since. Well now they are finally done and ready to go. Modifications to the original kit were to replace the w-irons with Bill Bedford ones. New ladders from Stenson models and new handbrakes from Ambis. I didn’t really like the mounting rods as supplied so these were replaced with 0.6mm brass tube. The ends being flattened with pliers. The walkways came from my spares box.

The crane has its runner from a Cambrian kit. Its a little freelance is based loosely on an image of a similar but steel wagon I found on Paul Bartletts site at Bescot. The steps are spares from a Bachmann class 25.

Before i settled on the Cambrian route for the crane runner I found an image of a diagram 1/001 lowfit that caught my eye. Built by BR they had a LNER style body on an LMS style chassis. Bachmann do this RTR but the chassis is completely wrong so its been replaced with a Parkside one. The mineral is diagram 1/119 21 tonner from The Chivers kit. (Tim had some lying around when I last went over). This wagon would be very new in the Brettell road period. This is also the upper end of my build it rigid approach to wagon building. Any longer wheelbase than this and I tend to go for springing.

Speaking of Tim we have been working on a curved version of his display shelves with a few design tweaks such as the more solid locking of the ends and little clear ‘buffer stops’ for the ends. The 4mm scale versions are ready to go, see Tims website.

Finally a co-bo on a parcels train for no other reason than why not?
All 3’s and 0’s
This post has a bit of a common theme about it. Its all about 3’s and 0’s! With DEMU show coming up at the start of June I plan to show Brettell road with a bit more of a diesel bias than usual. While I have a lot of blue stock I could use I want ot keep it late 50’s very early 60’s so my blue stuff is a none starter (although I might consider a fully blue show one day). Figuring that a few more green diesels wouldn’t go amis I’ve been busy.

New Street has a lot of class 31’s and I’ve always liked them. In the early days (when they were class 30’s) they weren’t all that common in the midlands being more of an eastern region machine. However a cheap Lima one was found in green and I set to work on a quickie conversion. As the longest train on Brettell road is less than 4 feet there was really no reason to abandon the lima pancake motor for this one so i just fitted extra pickups and more weight. Incidentally the builders plaque is one of the Railtec 3D transfers and very nice they are too! Just a bit of weathering required.

Funny how doing something subtly different leads to moments of realisation! I’ve never quite thought that the Lima none plated headcode class 31’s looked quite right somehow. It wasn’t until i looked at the green one that I realised it because its too small. Someone in lima must have realised this as well as the printing for the headcode box is much bigger than the molding. So while i was fixing the headcode on the green one I did the 2 blue ones i have as well (using a rudimentary jig). The original size is on the left and the revised one on the right.

Switching the 3 and 0 around I’ve also been working on a class 03 shunter using an old mainline body and a high level chassis. As with all High level chassis kits I’ve tried so far they just work from the box. Everything is worked out already and its all just a bit, well. easy!
This one is going to be D2387 which is one of, I believe, 3 that were allocated to Monument Lane shed and worked as station pilot for New Street as well as occasional forays further afield (Harbourne branch being an example). It was a doncaster example and didn.t last long enough to receive a tops number, being stored in 1972 and scrapped the following year.

Getting the most from older models.
In September I will be doing a demo at Scaleforum entitled getting the most from older models. Regular readers will know I have a bit of a thing for starting with old models that many will have long ago consigned to the bin. To this end I thought id look at a couple of old building kits too. Namely Airfix.

The Airfix Signal box is based on the one at Oakham which is a Midland Railway type 2a box from the early 1900’s I liked the look of the platform mounted version at Kings Heath (which is a type 3a) so set to work
The kit as supplied is too wide. I used some etched windows from Phoenix models and reduced the ends to fit. I binned the roof and knocked up a new end platform from microstrip. I wanted to use this model to try out a few new (to me) painting ideas.
First step was to paint it in an aged wood colour. The wood effect is pretty easy and quick if you work more like a painter and less like a modeller

I use these 4 Revell enamel colours as they are nice and matt. They are numbers 47 (mouse grey), 88 (ochre brown) , 84 (leather brown) and 9 (anthracite grey). The actual colours aren’t that critical. I use a dunk and dip technique and work on a base of Halfords grey primer. I dunk the brush into the mouse grey and ochre brown and lightly dip the tip into the leather and anthracite. All at the same time so that the brush is loaded with layers of colours. Then is just a simple case of drawing the brush across the model and letting the colours mix themselves. You don’t want them to mix too well so try and do one stroke per plank and work in the direction of the wood. The trick is to let the brush do the random work for you and not to fight it too much. My end result was a smidge dark so when dry, i drybrushed more mouse grey lightly over the model.

This is what ended up with. I then gave it a couple of coats of matt varnish.

This is the bit that’s new to me. Ranger distress paints. The large scale guys have been using these for a while with good results but the method for smaller scales seems a bit different. The pain is intended to be dabbed on quite think and left so that it starts to crackle and flake on it own. For our scale i found it better to brush it on on 2 coats. This doesn’t do any ‘magic though so the next stage is with a fine sanding stick to give it a little help. Again working in the direction of the wood.

Here’s the result. Distressed but not weathered. Another coat of Matt varnish and then back to enamels, used this time as a thin wash. I added an interior from Ratio and a signaller from Modelu. The finished result can be seen below


Accurascale Buffers
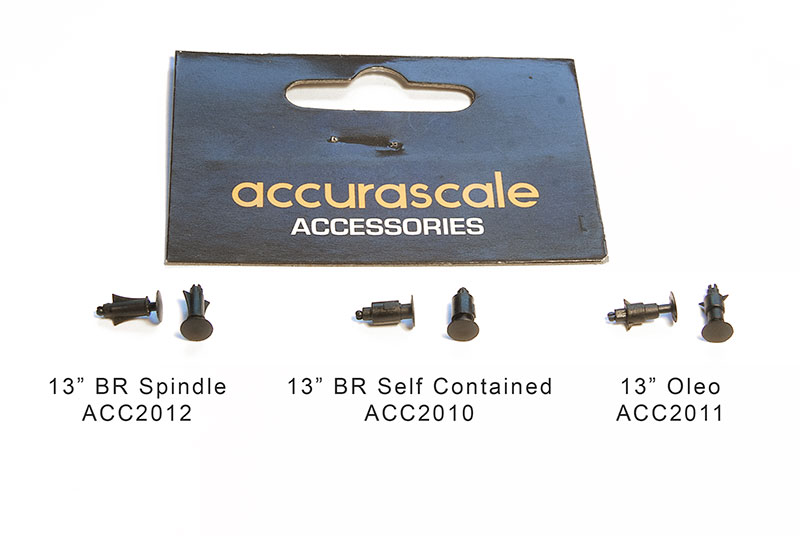
Last year Accurascale turned their attention from the railways of Ireland to British rail. While people got very excited about their first wagon (not that the excitement wasn’t well deserved) i was more taken with their decision to sell the buffers separately. 3 types are available and come in packs of 8 for just £2.95. they come ready assembled and are sprung with plastic bodies and metal heads. The lack of a baseplate makes them ideal for the older style of wagon kits from Airfix (see below) and Cambrian and the older Parkside wagons where this detail is moulded on to the bufferbeams. Theres a smidge more work to use them on newer style kits that have the buffer bodies moulded on and you will need to source a baseplate from another source if your intended bufferbeam is completely flat. I like them and i really hope Accurascale continue with this modeller friendly approach.
Project 1F Part 1
 So, I found a pretty cheap Bachmann 1f on Ebay and as usual, attracted to its somewhat out of proportion looks I snapped it up. First stage was to see just how easy the Brassmasters Easychas actually was. Ive used one of these before on my Kirtley but i didn’t use it as intended so this time I decided to do things properly.
For those that don’t know the easychas is designed to fit around the RTR chassis and provide springing. Its designed to be used in 2 distinct ways. The super easy way that uses the original Bachmann coupling rods and brake rigging and the not quite as easy etched version. Naturally I went for the latter. If you decide to go for the former however you can get a sprung P4 (or EM) loco without even having to fire up the soldering iron! As it was the full monty approach only took an enjoyable afternoon to put together anyway. To coin an advertising slogan it does indeed do exactly what it says on the tin!

A hopper hat-trick.
 3 hoppers via 3 different routes. On the left a coke hopper from the old Three Aitch kit. I’ve already done one of these and this follows the same pattern of using Bill Bedford W irons.
In the center also a kit but a brass one from Dave Bradwell for the BR 13 ton hopper. A fun if not sometimes tricky kit to build. Dave Bradwell kits
On the right a mackerel ballast hopper converted from a Hornby trout, again with Bill Bedford w irons. I make no claims for the idea behind this as I first saw it on Kier Hardy’s EM 70s website. Click here
End of the year – end of a sub project
With 2017 drawing to a close I have also (nearly) finished off the road vehicles I will need for Brettell Road. Despite having 5 bridges over the railway I’ve resisted the urge to do any buses to put on them and I also haven’t done any cars either. Above is the latest and last batch.
 Starting with some kits. On the left a resin Ford Thames 400E from Road Transport Images and on the right a white metal ex military Austin 3 ton dropside from MMS. Unfortunately MMS have now closed so this kit is no longer available.
 I found this part built Langley models kit on eBay for next to no money. Its a 45cD tractor unit from the very late 30’s and once disassembling the more sketchily assembled bits I decided that it once belonged to one of the business owners. Some sort of engine fire meant it got dumped but with the intention to restore it to its former glory. However it ended up forgotten and is now rotting away. The tarp is from a black latex glove and I attacked the inside of the front mud guard with a burr in a minidrill to depict the rust working its way through. The rear mud guard is hanging on for dear life as well and some parts have now long gone.
  Finally a Leyland Steer from a combination of base toys bits. I find these lorries quite intriguing with their (to my mind) odd wheel arrangement. The base toys Steer has a different cab to this so I swapped it from an ‘8 legger’ box van. If you look at the inset picture you can see that I’ve widened the wheel arches and reprofiled the front windows to get something looking more like the pictures I found of the real vehicles. I could have done more with the chassis but where its going you wont see it. Wheels are from Road transport images.
Return to the 94xx
A while ago I started work on a Lima 94xx tank I’ve had from my childhood. The idea was to match it to a high level pannier or Collett chassis as a quick project. However after speaking to Chris at High Level he decided that the 94xx wasn’t really like either and said he would be interested in doing a specific kit for the loco – the , at the time, recent announcement from Bachmann that they intend to look at the class too might have helped. Top view of the chassis before fitting the wheels – at this stage I decided to give it a basic coat of paint. Below is the underside.
  High Level Kits website