Bit of pick ‘n’ mix
Bit of a pick ‘n’ mix post this one.
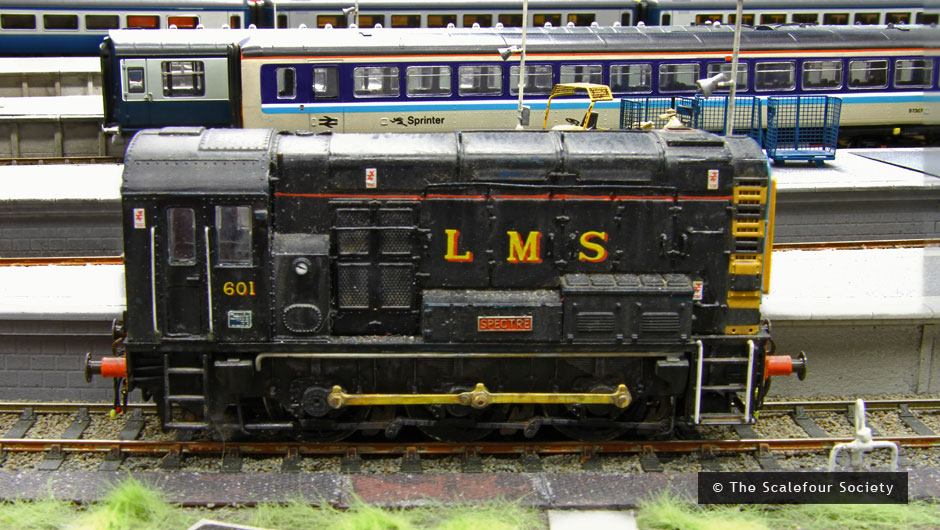
 Lady Margaret now has her identity thanks to some custom nameplates from Narrow Planet
Finding your own compromise
When it comes to plastic kit building it helps if you think of a line. At one end of the line you have the kit as supplied, built as per the instructions with no attention or research what so ever on the prototype itself. At the other end you have the kit, researched, wrong parts replaced or corrected and superior parts substituted, as much extra detail as you can manage. Rumney chassis kind of thing. Inevitably we all need to find our place somewhere along the line that we feel comfortable.
This place can be influenced by several factors.
Cost – adding a lot of extra parts can mount up to quite an expensive model.
Expediency – high end models take a lot longer to build. Do we have the time
Reliability – no point adding every little detail if in use you’re going to knock it all off again.
Usage – if you wagon is part of a train of 30 that are only ever going to trundle past at a scale 40mph are you going to have the opportunity to notice the extra work?
Consistency – no point mixing highly detailed and basic kit builds together really.
Volume – how many models are we going to need?
 Heres my pretty much standard position along that line. The base model is a parkside kit. As mentioned elsewhere I’m not particularly worried about compensation or springing on a 10ft wheelbase wagon but i do use it for vehicles longer than 12ft wb.
A – brass tie bars. I use 0.8mm L section. the real things aren’t L section but i use this for strength and you cant tell unless you turn the model upside down. In plastic kits the tie bars are a real weakness ad they are either bendy, get broken or to avoid those 2 things, massively thick.
B – break hangers from Bill Bedford – It doesnt take much to add a little finesse to the brake gear and trick the mind into thinking its all a bit more refined that it actually is.
C – metal buffers, or in this case metal buffer heads. Unless your kit comes with metal buffers already lets be honest here, the plastic ones are going to be awful. These are MJT buffer heads.
D – couplings. A whole discussion on compromises in itself. In my case I use Smiths which i know are overscale but they are (quite) easy to use in operation.
E – brake pipe from Lanarkshire models.
Glue
 Ive recently been trying this stuff. Ultra Glue from MIG for etched and clear parts. Its water based so can be thinned if required and so far it seems to do the job at least as well as superglue. Its especially good for fitting name plates as while it has good grab it takes a few hours to fully harden and being water base any that creeps out can be lifted off with a wet paintbrush.
Reading
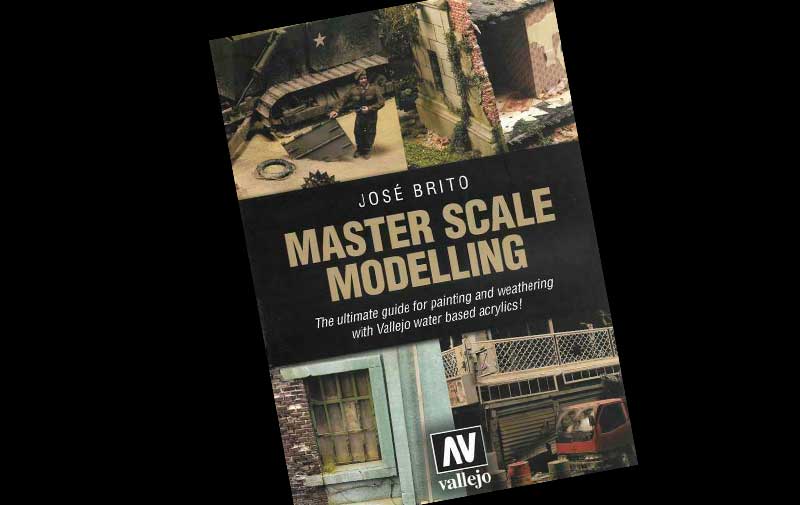
It’s been an awful long time since Martin Welch treated us to his ‘bible’ the art of weathering. And while still essential reading things have moved on a bit, especially so in the last few years or so. Some of the paints Martin used are no longer available (Humbrol tarmac for example) but theres a whole market now of weathering paints and materials. This (rather large at over 500 pages) book is an excellent window outside of our sometimes a little comfortable railway world.
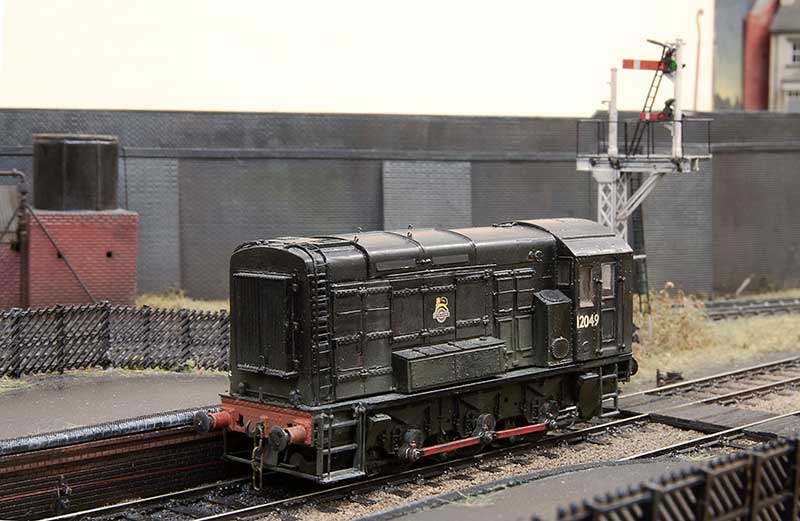
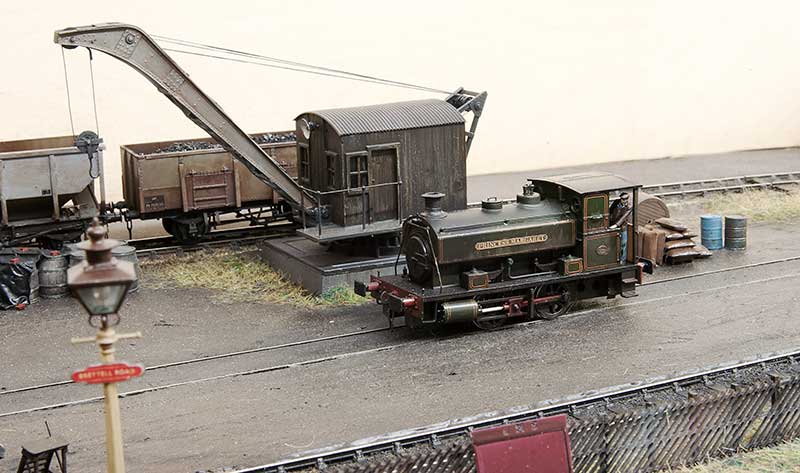
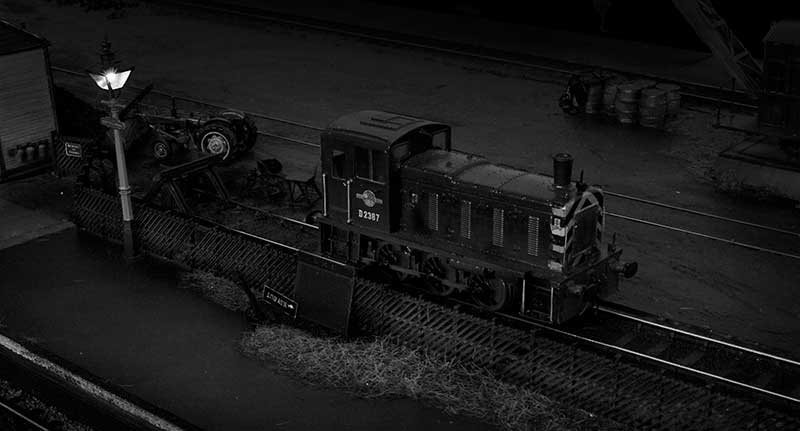
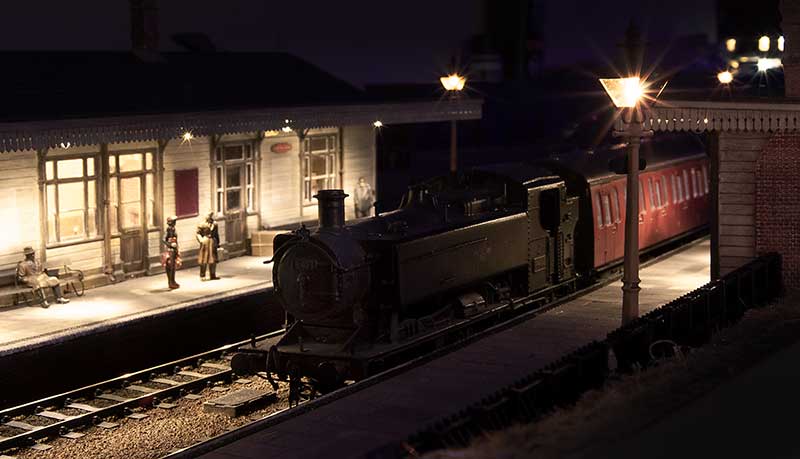
Having had a little trundle to Stourbridge shed and back for some Diesel, Class 11 shunter 12049 waits for the nod back into the yard at Brettell Road.
4th February 2021
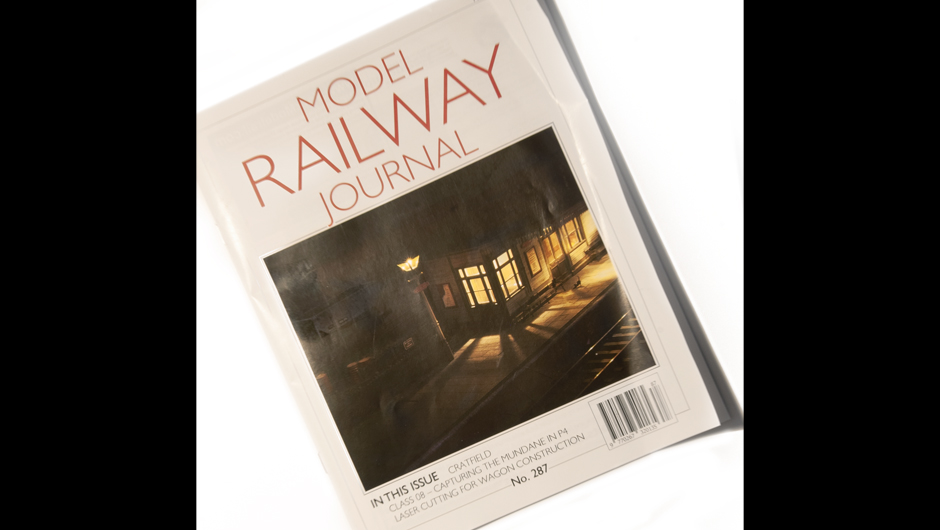
For the first time in a few years Brettell Road features in the current issue of MRJ as a pictorial. I must get around to writing the proper article one day.
Years end – more fiddly bits
As 2021 draws to an end I’ve been doing some of those fiddly little jobs that I kind of hope always get lost into the scene but I know they are there. 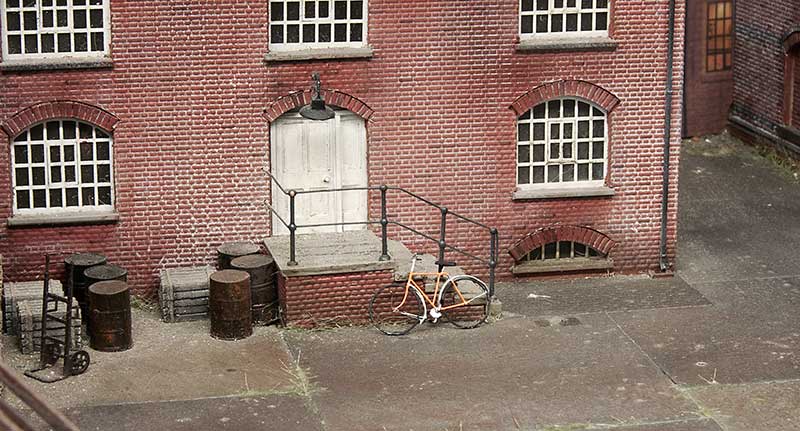 Starting with a pushbike from the Southwark Bridge Models Kit. The kit is for a late 19th century bike so I modernised it a little. I think these may be reduced from 7mm scale model as some of the parts are at the very limit of what will etch and gives you a decent idea of what it must be like to try and solder a spiders web together!
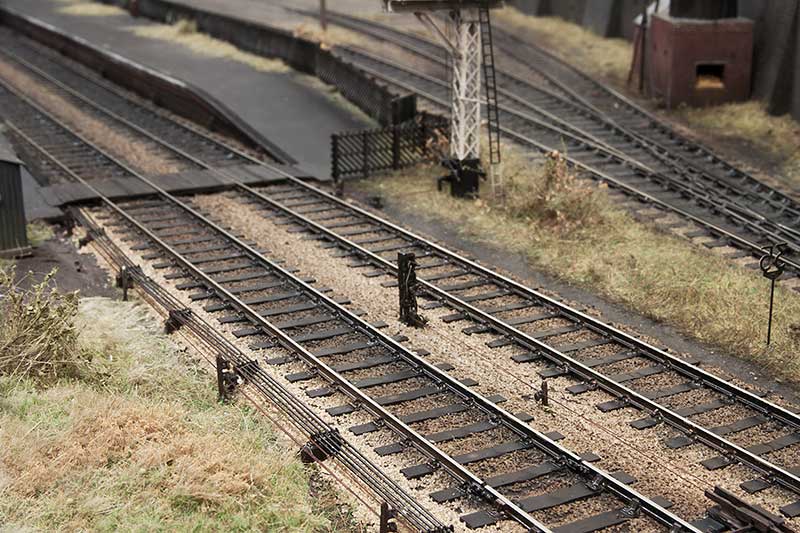 I’ve finished off the signal wires using MSE posts and easyline.
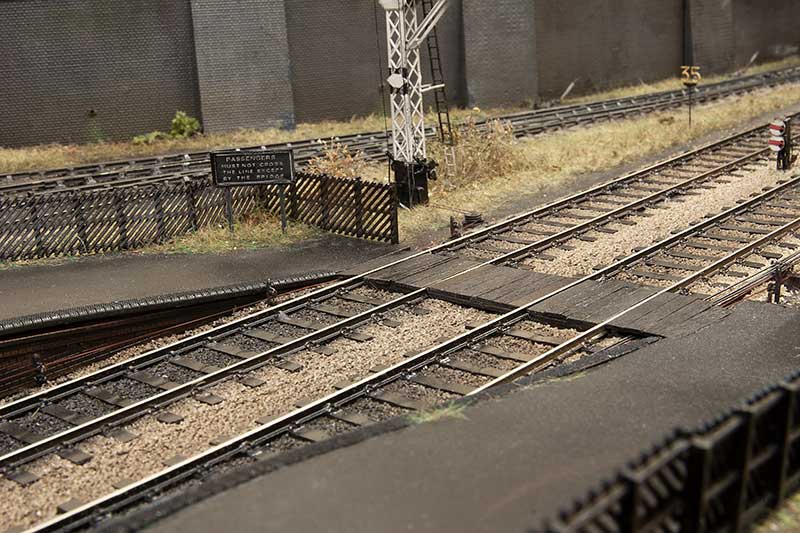 This meant I could finally get the barrow crossing finished too.
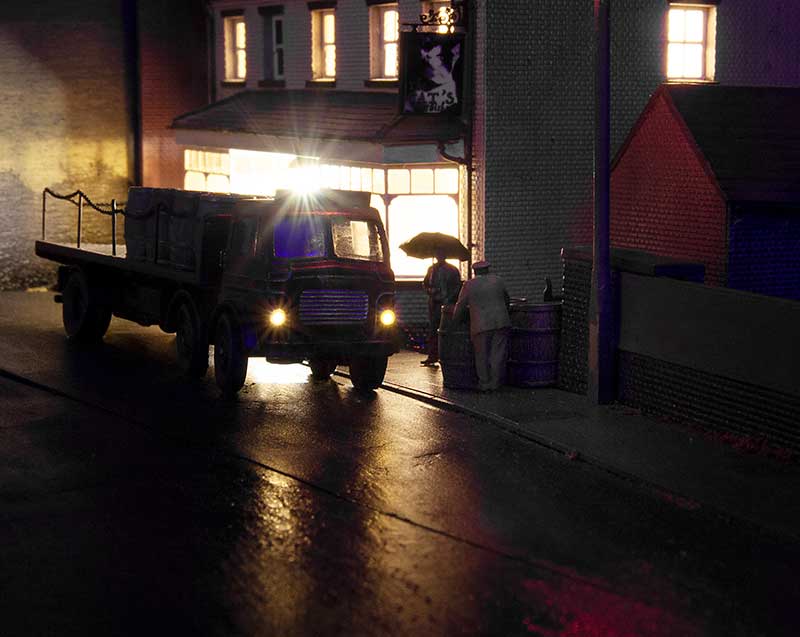
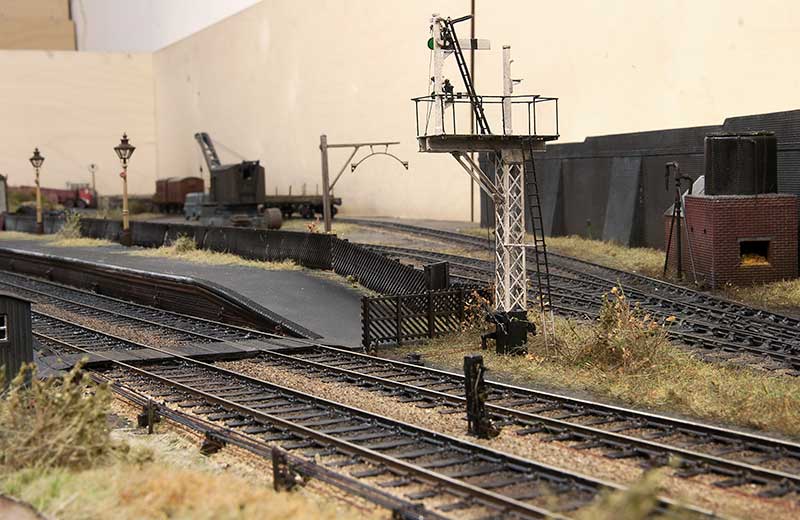 Below are a few evening shots of various comings and goings.
Hattons Barclay Tank Part 2
One change since the last post on this little tank is I’ve replaced the tantalum capacitors with a Lais stay alive unit on the recommendation of Nigel Cliffe. With this little motor I’ve now got about 4-5 seconds of off the juice running which is a big improvement.
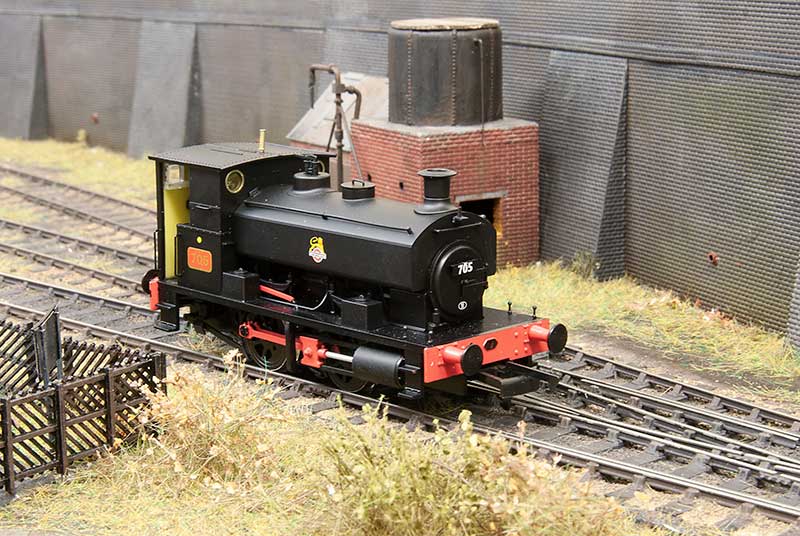
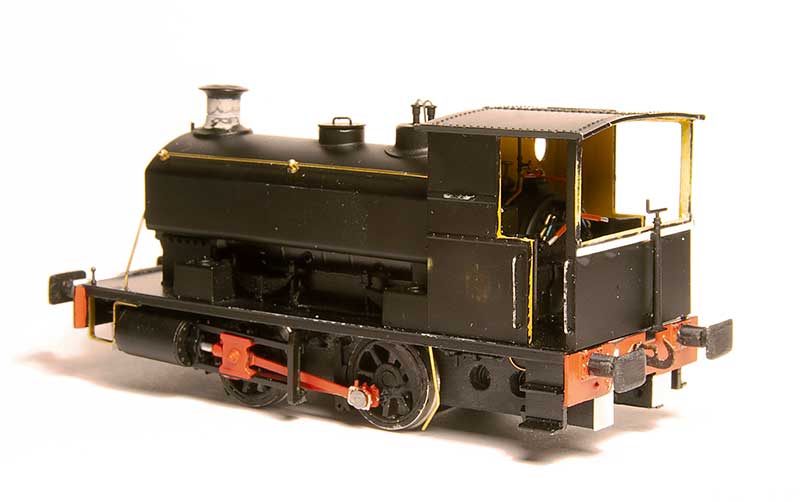
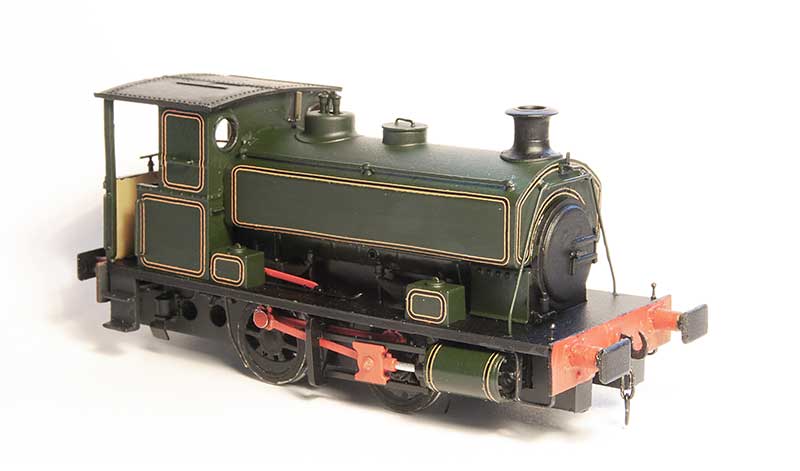 The model has been finished and lined with Fox transfers lining. I just need the number plate and name which is on order with Narrow Planet. I decided to take a quick shot of it for prosperity before i covered it all in goo!
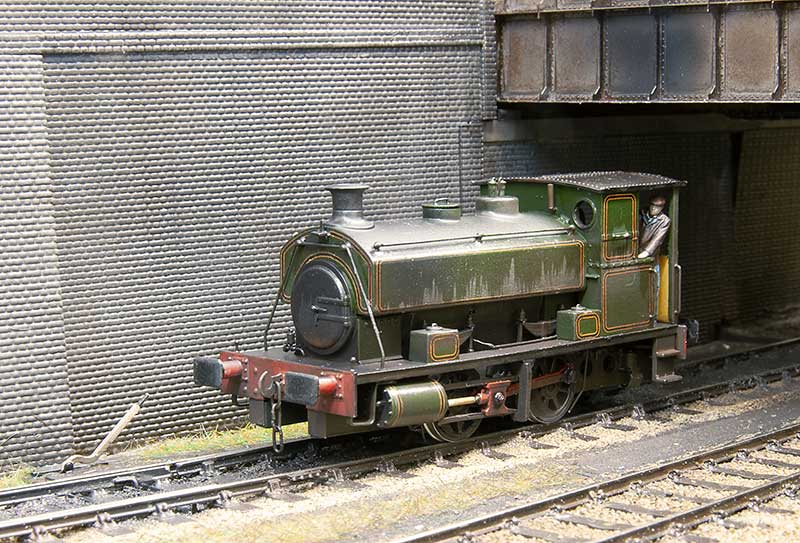 And post goo!
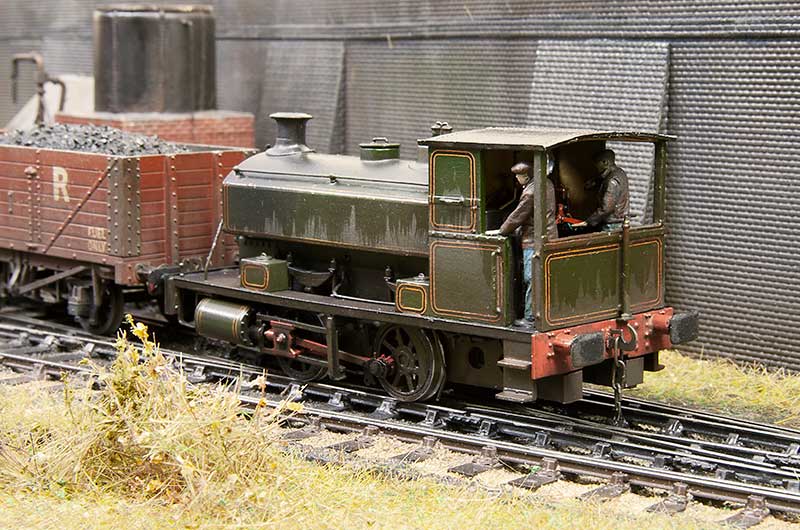 The crew are, the almost customary now, Modelu Figures
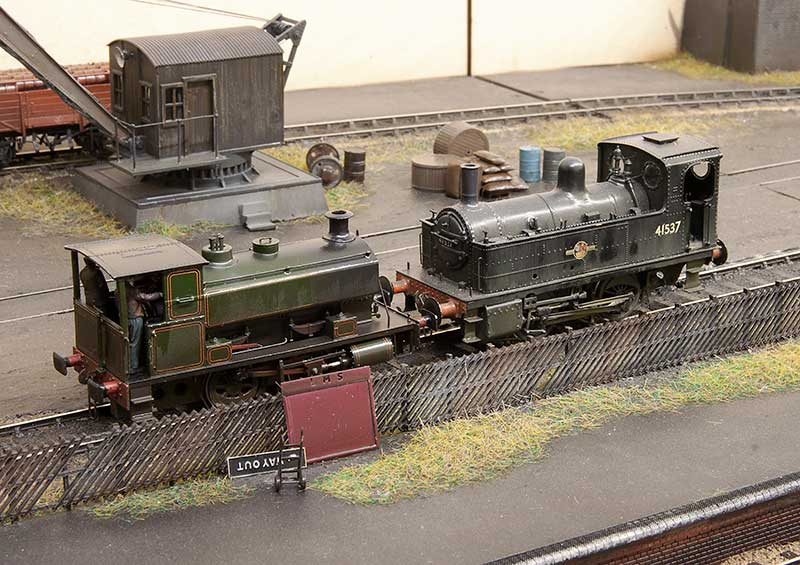 I used to think my Deeley was tiny!
Epiloge to the last post
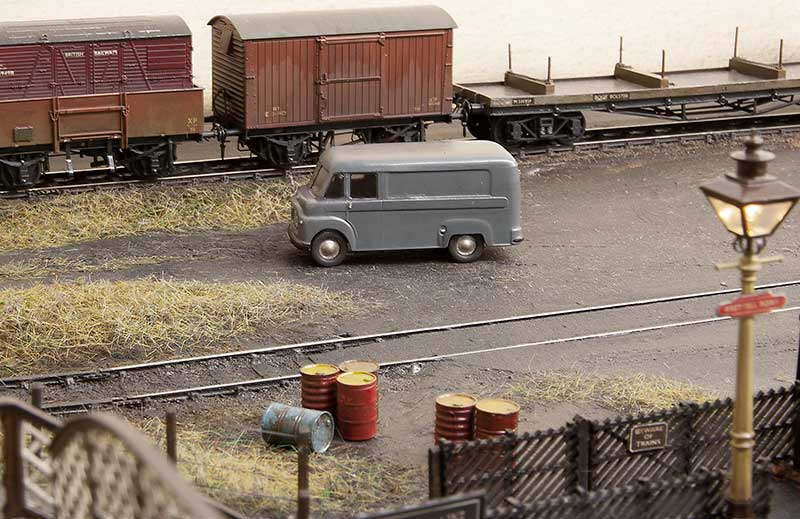
Just a couple of pictures of the 2 older vehicles in the last post making themselves at home on Brettell Road.

Bit of a mixed bag
Bit of a mixed bag this time, Ive been raiding the toy box again!
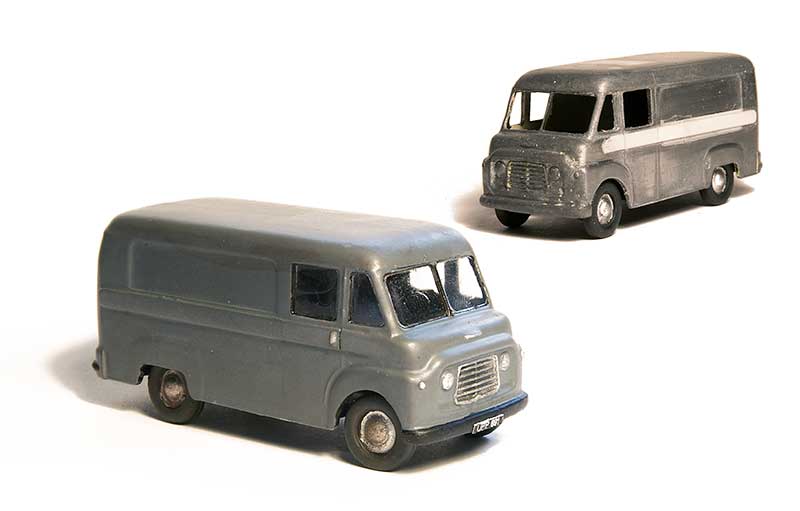 Starting with the Commer BF. Available as an ancient Lesney toy it came in 2 types, a TV repair van and a food truck with open sides. The wheels were replaced with RTI ones and the central pillar in the windscreen filed down as far as I dared. I increased the width of the door window and added the bodyside detail from 10 thou microstrip.
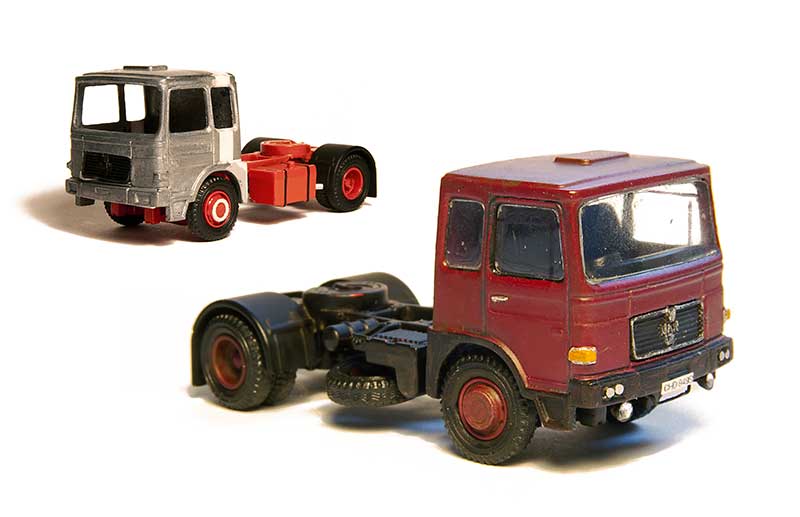 Next up the good old Corgi MAN cab. I fancied something a little different so I converted it to the longer cab version. It sits on an Oxford diecast chassis.
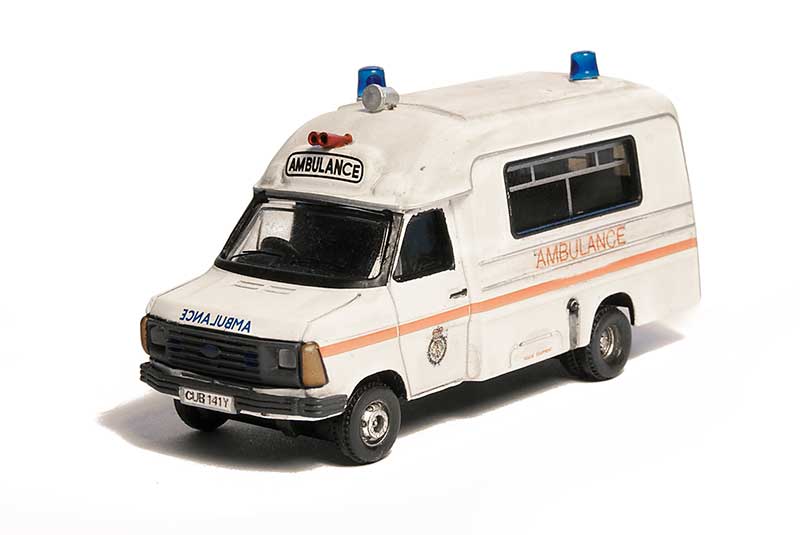 Remember the Tiny City police van I did? At the time I mentioned they also did a decent looking ambulance and this is it. I removed the Hong Kong markings. Painted the window frames black and the blue lights were given a coat of Tamiya clear blue (as supplied they were clear). I figured since I work for the ambulance service I probably should have one somewhere. Don’t worry I’m not planning any car crash cliché scenes!
 Finally the little Langley models Dodge tipper. As suggested I swapped the lights for some smaller ones (again RTI)
Hattons Barclay tank – part 1
 I never really intended to go for the little Hatton’s Barclay tank despite the Earl of Dudley’s railway having quite a few of them. But one popped up for a reasonable sum on ebay with a best offer option. As it would be a nice to have I put in a cheeky offer and the seller accepted it!
Hattons have done several versions of this diminutive little tank but the main differences are the cylinder sizes. To make a somewhat complicated story very basic theres a 14 inch and a 16 inch version. My model is the 14 inch but the EoD had both types. The other main differences to the cylinders are the wheel size and wheelbase, the 14in version having 3’4″ wheels set at 5’6″ centres and the 16in version having 3’8.5″ wheels at 6′ centres. The tank on the 16′ version was also taller. I don’t know if Hattons have accounted for the wheel sizes and wheelbase in their models but the smaller loco checks out with the known dimensions. One little feature I liked was the pick up arrangement. The bottom keeper plate has traditional wipers bearing on the backs of the wheels but the chassis has sprung plungers that bear on the keeper plate. This means the keeper plate can be removed completely with out any wires to faff about with. A neat little bit of thinking.
Converting to p4
First up, no one does the right wheels. So fancying a bit of a challenge I brought a cheap as chips lathe from Amazon and had a go at turning the RTR wheels down. I had in my wheel stash some old Sharman wheels of the right diameter and salvaged the tyres. I haven’t done anything with a lathe since I was in school and I have to admit I did quite enjoy doing this. Ive always found those ‘someone makes something from rubbish’ DIY engineering videos that pop up in youtube strangely therapeutic. Im just worried now that I want a much better lathe and I’m going to get sucked into turning things next! The axles are a little odd being 2mm but stepped down at the ends for the wheels. A couple of 2mm axles were turned down to match and the wheel sets reassembled with suitable washers. I didn’t secure the drive gear in place at this point.
The clearance between the top of the tyre and the metal chassis was very tight so some time was spent shunting the loco around (without rods and powered by a class 20) to see if it would short and cause any problems. No problems showed themselves.
Despite the rods being too thin (as seems to be the way with RTR steam locos) things wouldn’t fit now the wheels were p4. Handily the cylinders are a separate moulding so they were removed, cut in half and refitted with a 20 thou plasticard spacer either side. The front coupling rod was mounted with the crank pin backwards so that the screw is on the outside of the wheel. This enables the screw head to be flush with the face of the coupling rod. The rear of the coupling rod and the connecting rod were opened up so that a Gibson crank pin nut could be use the wrong way round in fit inside the rods. Both rods were secured with their own nut and the reason for his is thats how they looked on my prototype pictures. More shunting test were carried out and once happy the finals drive gear was secured and the model tested on its own.
DCC
The model accepts a 6 pin decoder and you could simply bung one in and off you go. However with a 0-4-0 a little extra help is never going to hurt. My usual small model arrangement of a Zimo mx633 decoder and a TCS KA1 was not going to fit. I’d seen mention of swapping the motor for something smaller so a little 12volt motor was ordered from Nigel lawton along with an adapter for the worm. For some degree of stay alive 4 Zimo Tantalum capacitors were wired in parallel and everything shoe horned back into the tiny body. It doesn’t give the ‘pick it up and it keeps going for 10 seconds+’ effect that a TCS Kam 4 does but it seems to make a noticeable enough difference to make it worth doing. 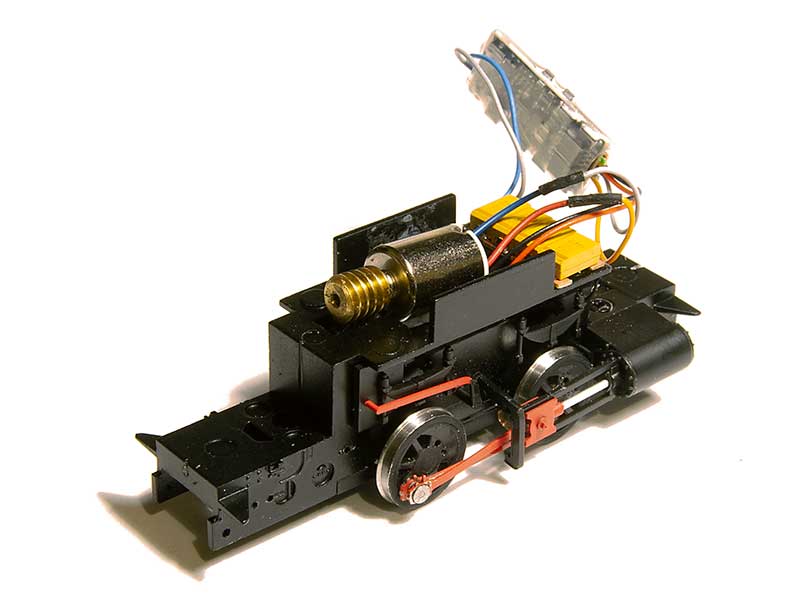
Detailing the chassis.
 As can be seen in the previous picture there’s quite a noticeable gap between the chassis and the wheels. Of the limited detail on the chassis a lot of it pugs in as separate bits so its a relatively easy job to make some new overlays from 60thou plasticard and plug the bits back in.
 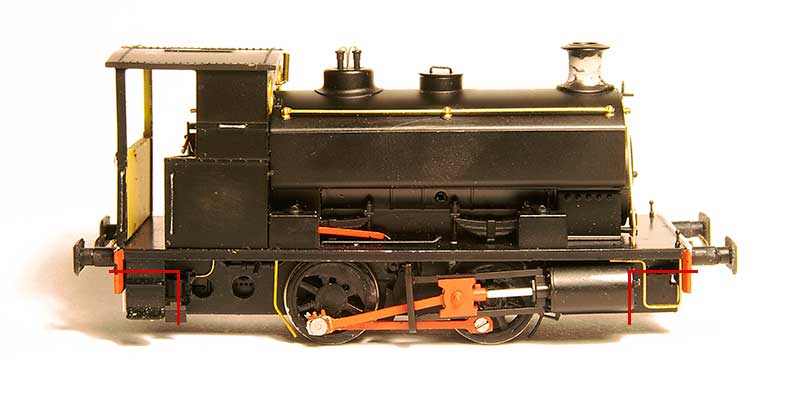 One thing I would advise though is to cut away the original chassis at the points shown (where the NEM coupling pocket is) as you will end up with very chunky and visible frames at the ends of the loco. Might be better to do 20 thou overlays and space them out so they are nice and thin. The arrangement of the brake shoes on the EoD locos seems the opposite way round to the way Hattons had modelled them with the shoes in front of the wheels not behind them and the linkages not visible at all. so these were rearranged. You can see the front crank pin screw in this picture. I also changed the front step to match prototype photos.
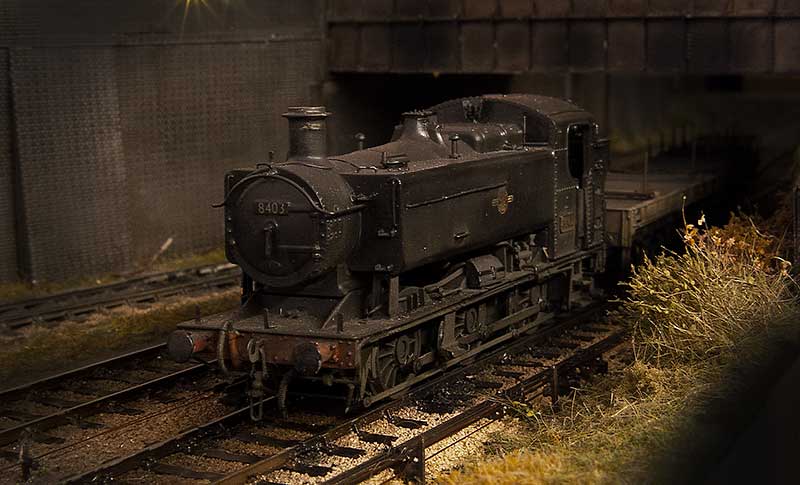
The Body
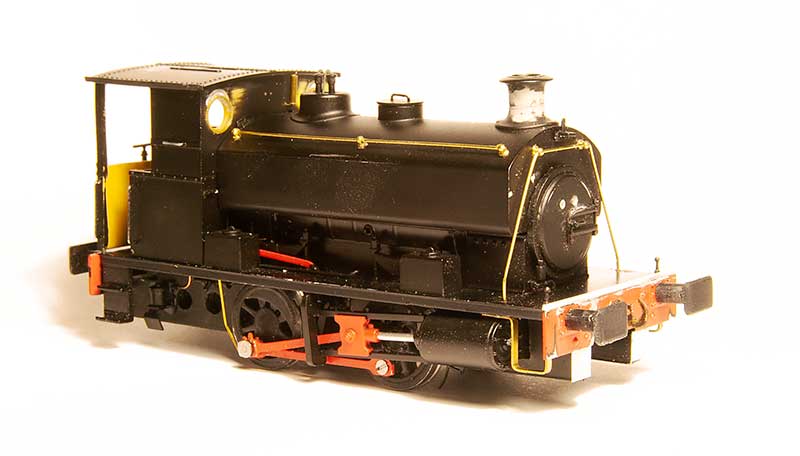
The boiler handrails are separate as supplied but they are plastic, a little wibbly and in a vulnerable place so I swapped them for brass. The weird shaped front handrail was copied from photos. Buffers are Roco HO ones reduced in size. The EoD locos seemed to be set up for lower clearance than the version Hattons supplied so the chimney was reduced in height as were the safety valves while the whistle was relocated from the cab roof to the cab front. The original cab front windows were filled then re-drilled lower down. Some of the EoD locos had a big coupling on the front under the bufferbeam. I suspect this was some sort of auto coupling for when they were working inside the Round Oak steel works. It seems that when some of them lost this they retained the mounting plates which conveniently meant I didn’t have to cut the chassis away as mentioned earlier.
 The rear of the cab. EoD locos had 2 types of cab, an enclosed one with 3 windows and this open version. The enclosed one is available from Planet industrials as a detailing kit. Given the layout is set in the rain my mini driver and fireman must be cussing me for not going for that one! My first thought was to scratchbuild a new rear cab from brass for strength but I decided to cut away the RTR one first to see if that would work instead, as can be seen it did. The handbrake is the supplied RTR one
Planet Industrials detailing kit.
A dash of autumnal weather.
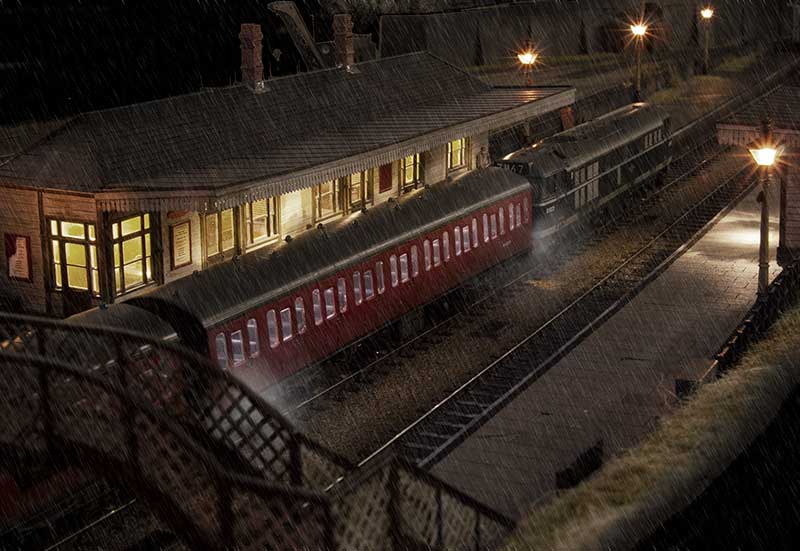
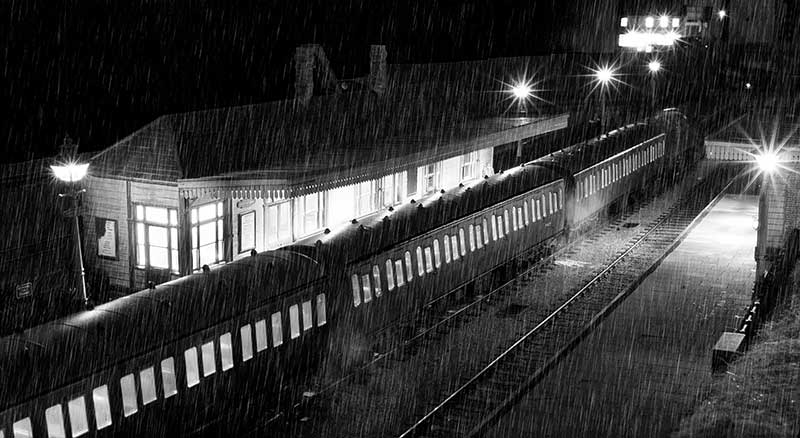
After much experimentation on Brettell Road part 1 and coming up with a working formula. Adding rain to part 2 was a much simpler process (although still a bugger to photograph mind you!)
 View from the middle looking towards Stourbridge. The method I have settled on is to spray everything that needs to be wet with a fine coat of Tamiya smoke. When dry a coat of AK interactive wet effect is added and thats really it. Simple enough now but it took an awful lot of faffing about to get here!
 View towards Dudley
 This is the view from the old layout to the new one . While its not something I intended to capture when I took the picture it does show the elevation changes quite well.
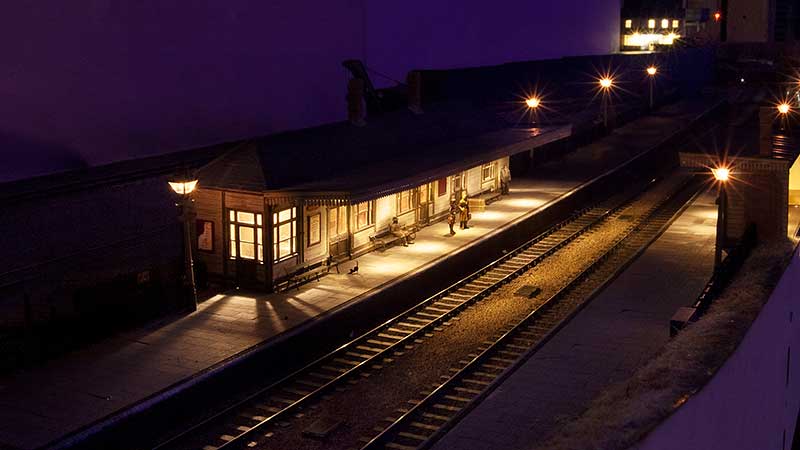
Below a few evening pictures
Signals
I think I may have mentioned before but one of my favourite things on Moor Street is the mechanical signals. Obviously on New Street there was never going to be an opportunity to do any but on Brettell Road things were different. I had already built a few ground signals on part 1 and an abandoned one but part 2 has given me the opportunity to do some proper, working ones.
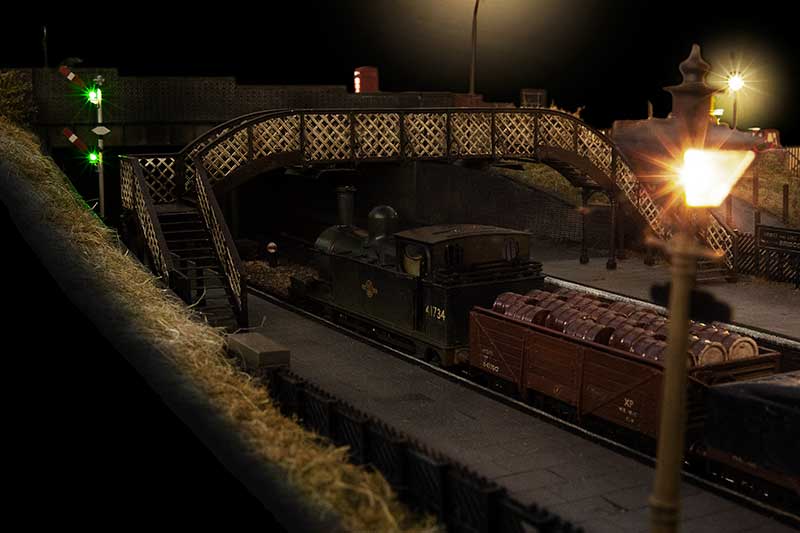
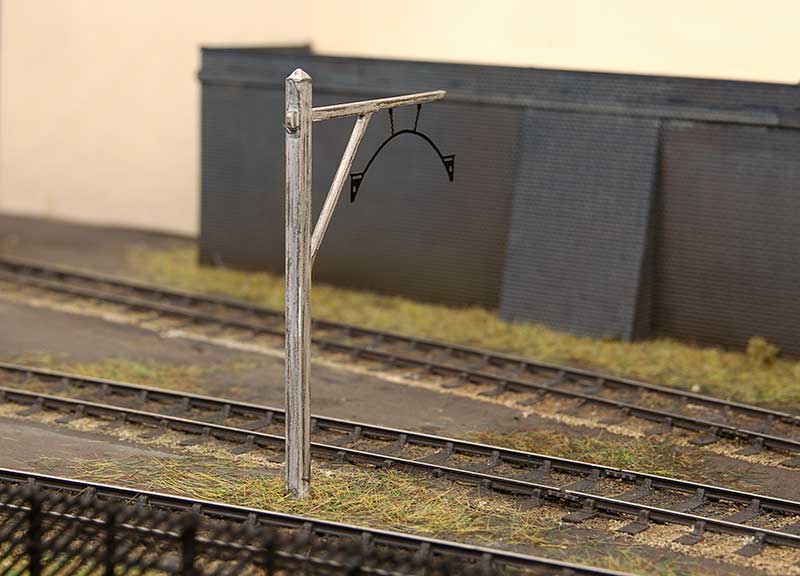
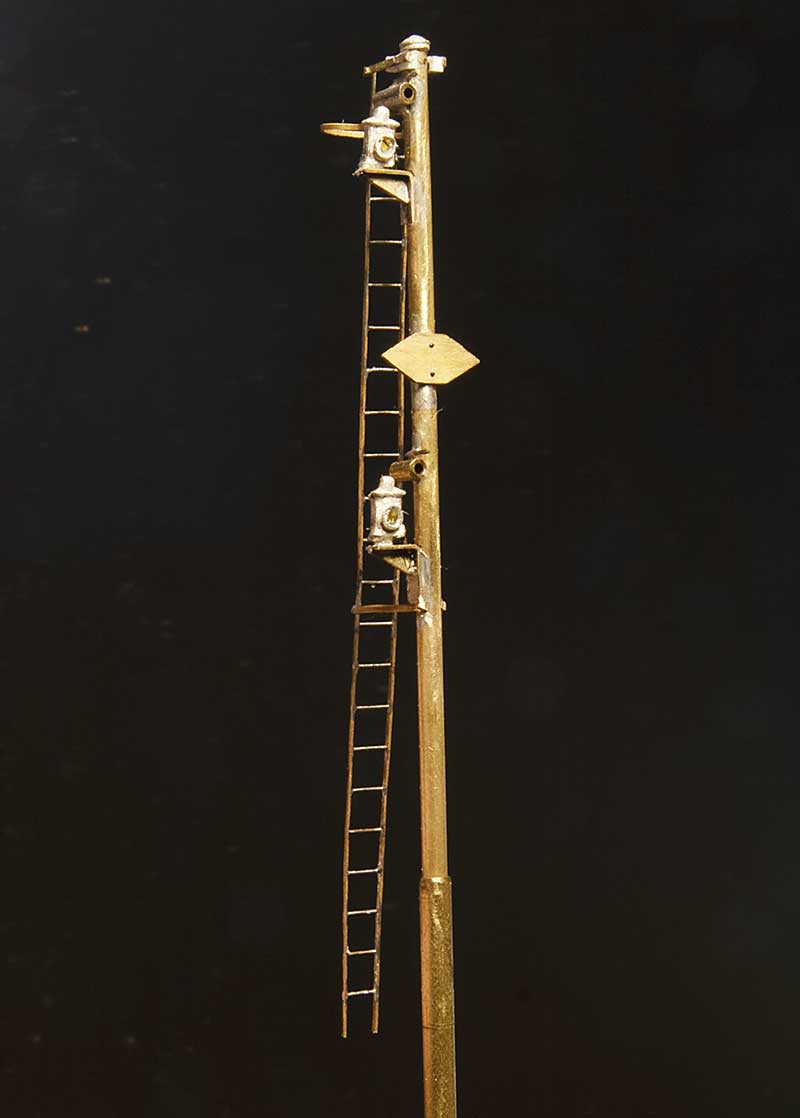 So starting with the post for the simple one. Basically a bog standard upper quadrant affair only complicated by the need to have a co-acting signal due to where the signal stands in relation to the footbridge. The balance weights are below the platforms surface. The parts used are the MSE upper quadrant signal parts (S0012/1), LMS/LNER tubular post caps (SC0019) and LMS Adlake signal lamps (SC0011). The Ladder is from Stenson models and various diameters of tube, sized from the left overs from the signal I built before. This will sit at the Stourbridge end of the platform.
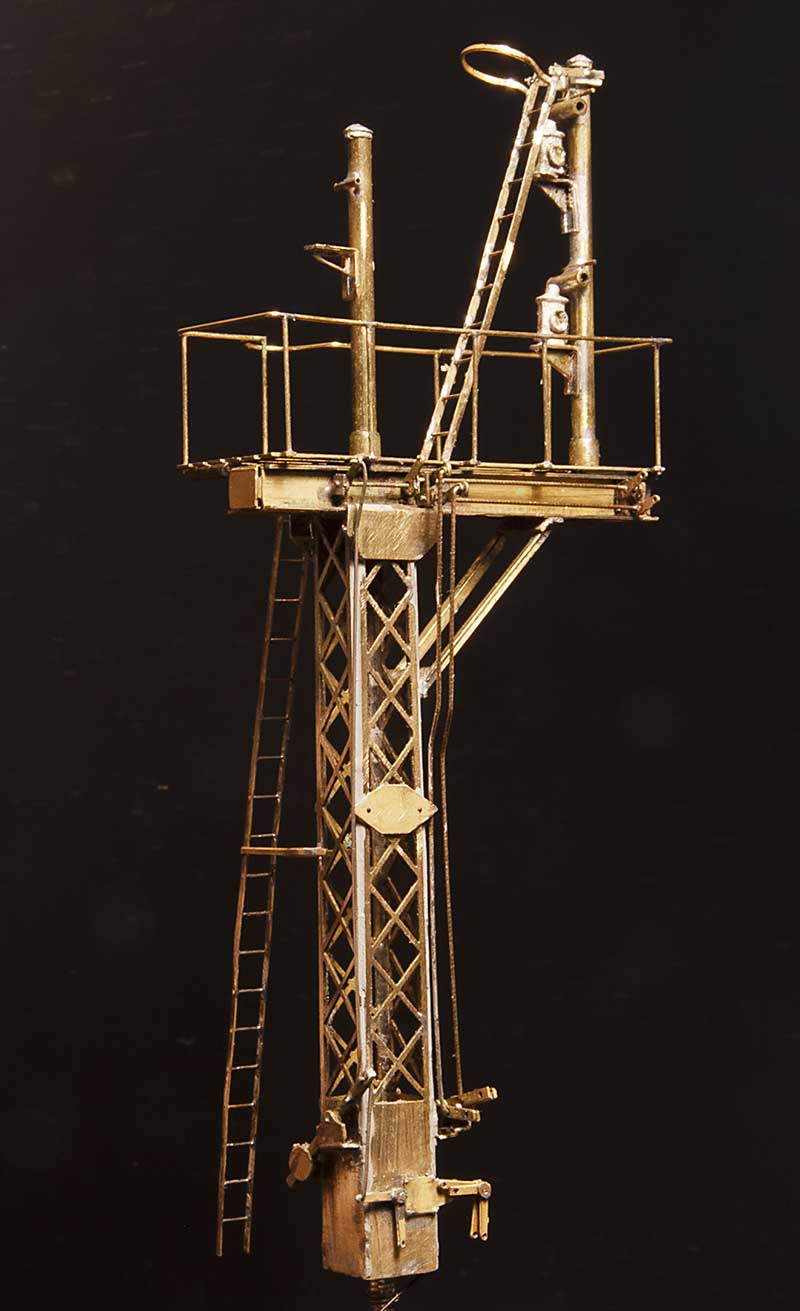 At the Dudley end things are a little more entertaining. So having found a suitable victim (which turned out to be a bit of a mongrel) I set to work emulating what I could see. More MSE bits such as Heavy Lattice Bracket Signal Base Post (S0010) and LMS welded stem bracket (50029) for the platform. The rockers came from the Brassmasters point rodding etch. After I took this photo I decided that the operating ‘wires’ were too big so they have been replaced with no8 guitar strings.
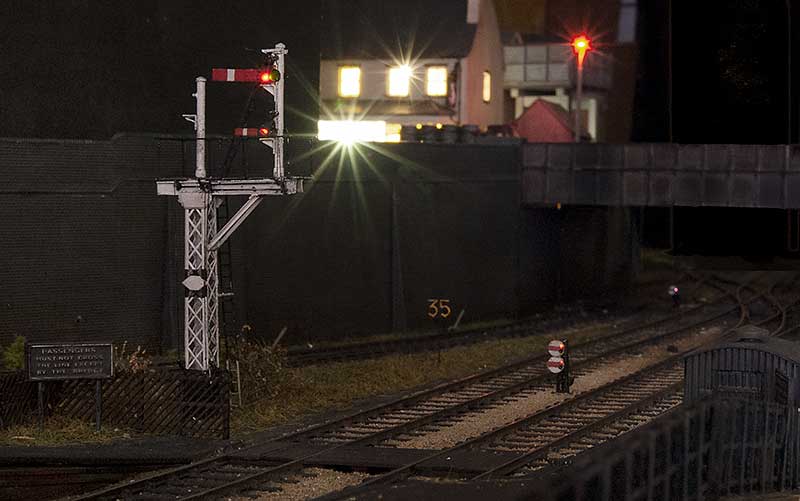
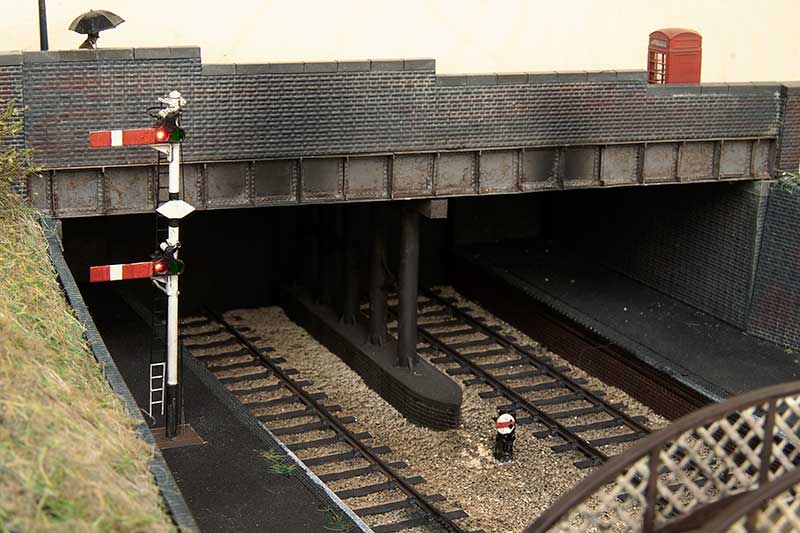 Platform starter in position.
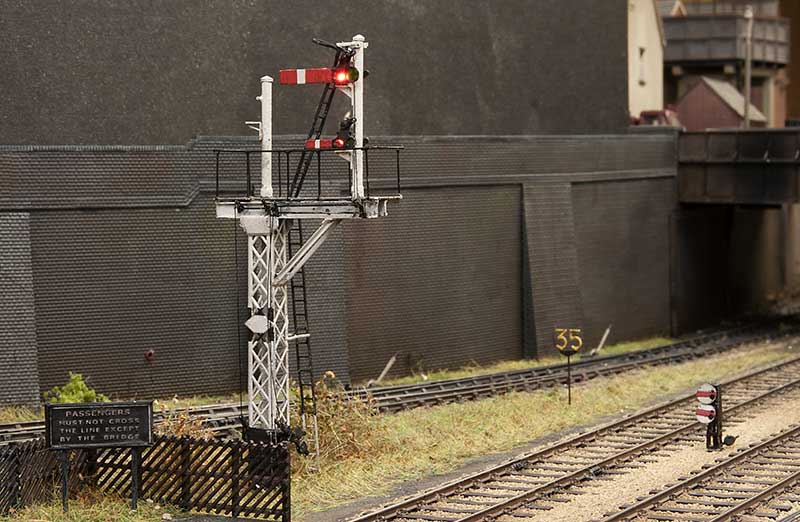
Gantry in position. The left arm was used for the Kingswinford branch (now disconnected)
Ticking more things off.
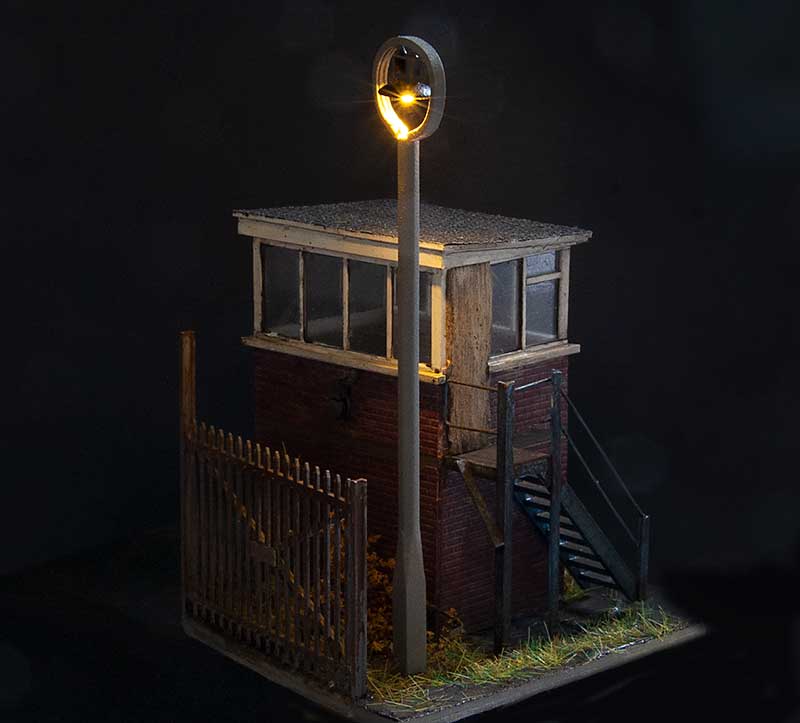 In order to ‘plant’ my abandoned crossing box I needed a base so opportunity was taken to do a micro diorama and take a piccie first. This is the side no one will ever see so it was worth recording for posterity.
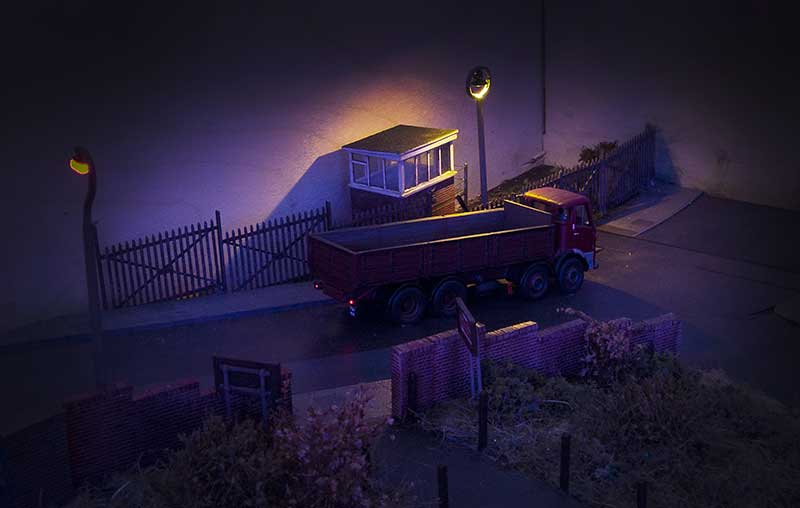
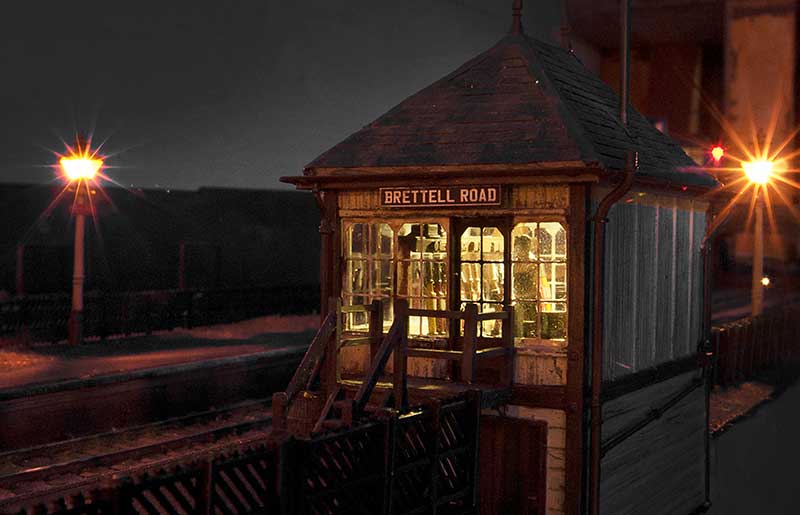
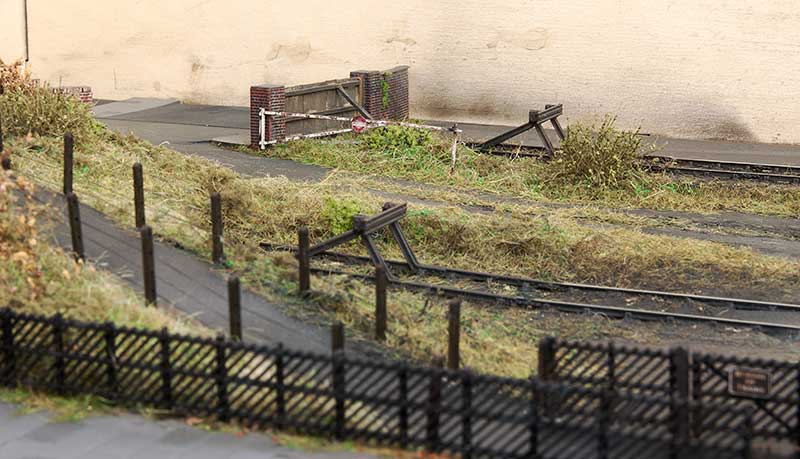
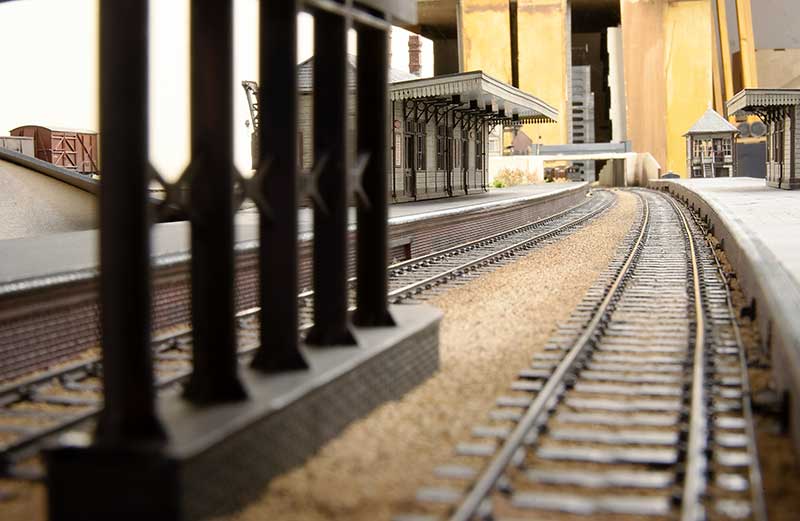
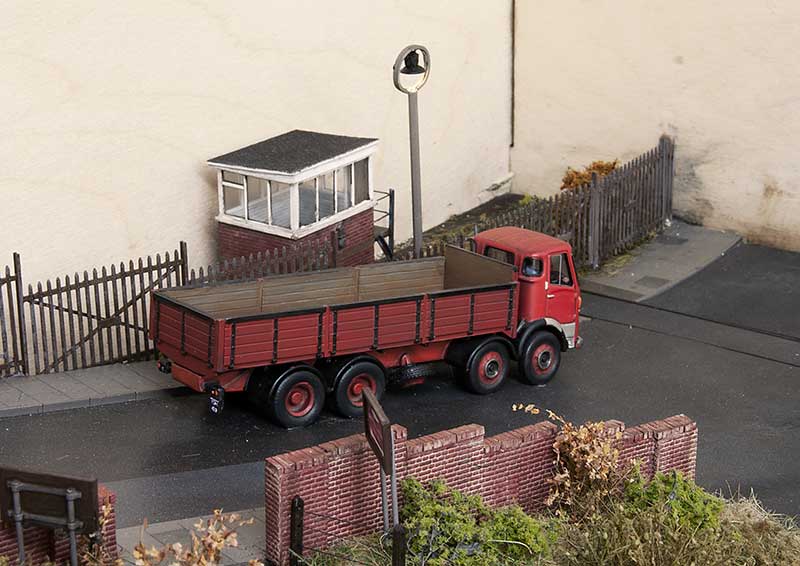 Here’s were it goes on the layout. One of those little out of the way areas that viewers will need to search out a little. The fence is Knightwing modified to resemble pictures of the real place in the late 50s. Below is the low light version.
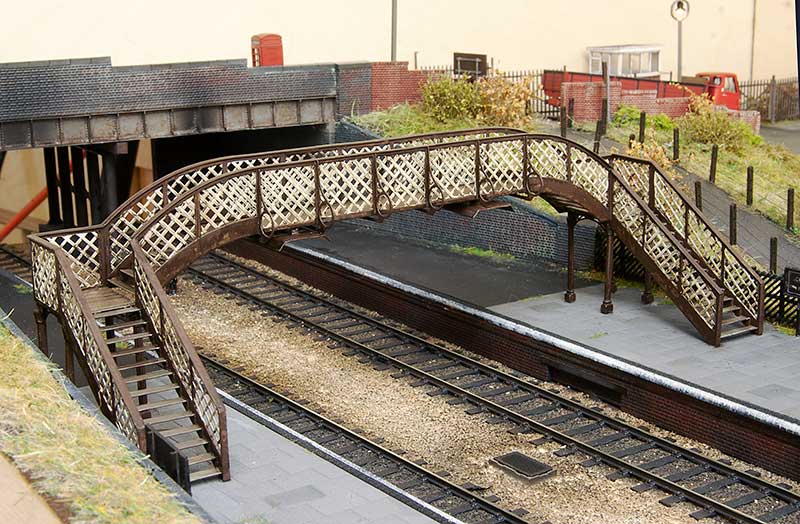 Ive also finished off my footbridge. In keeping with the rest of the layout (in fact in keeping with everything I do!) it’s modelled to look tired.
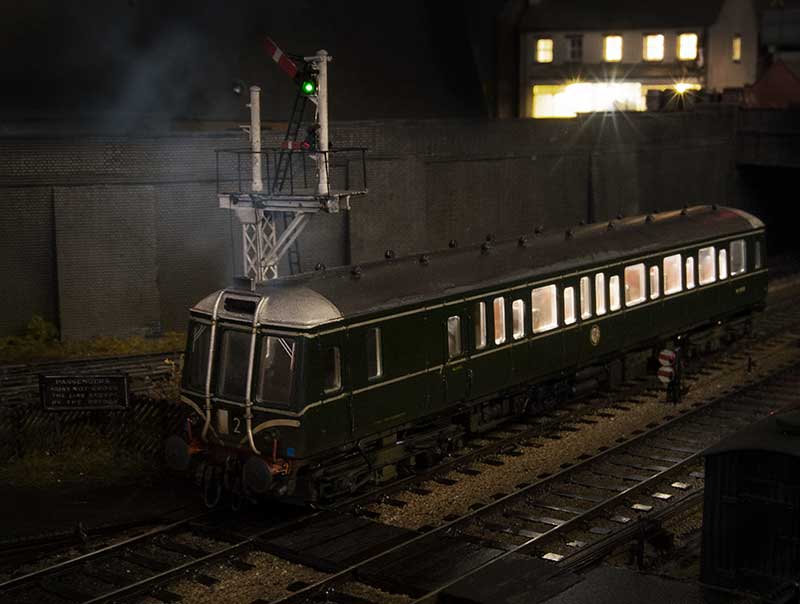
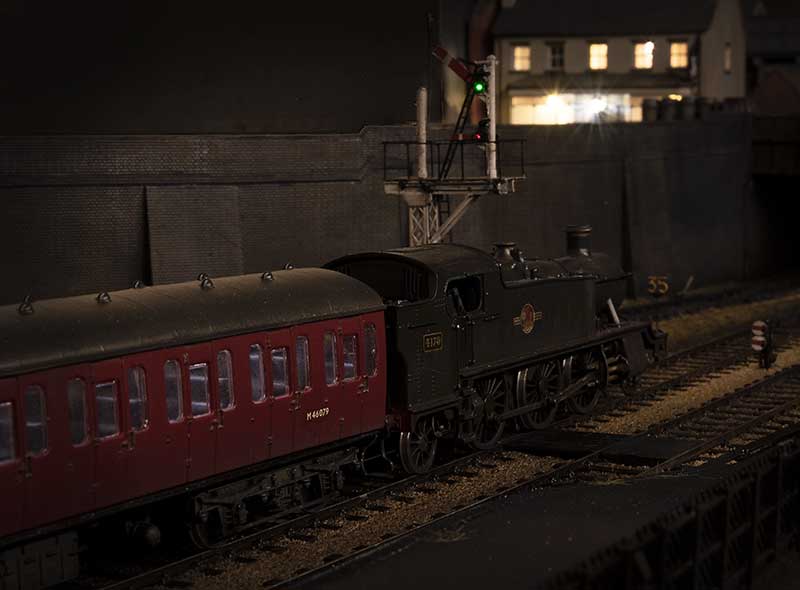
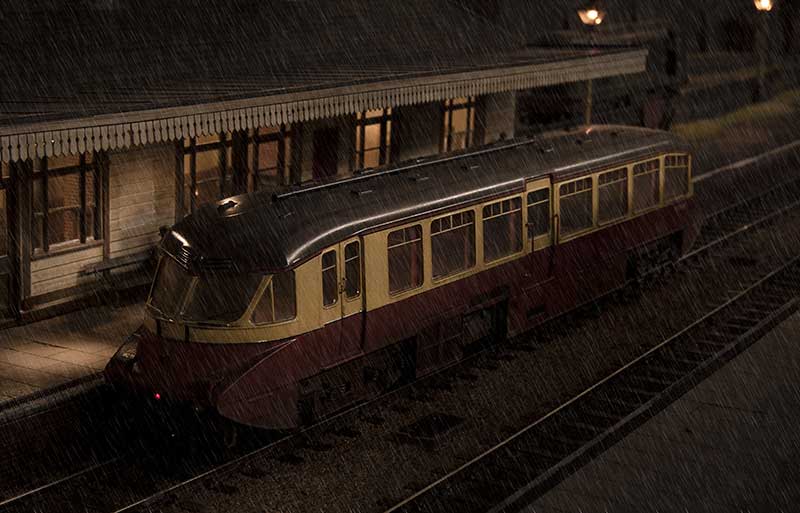
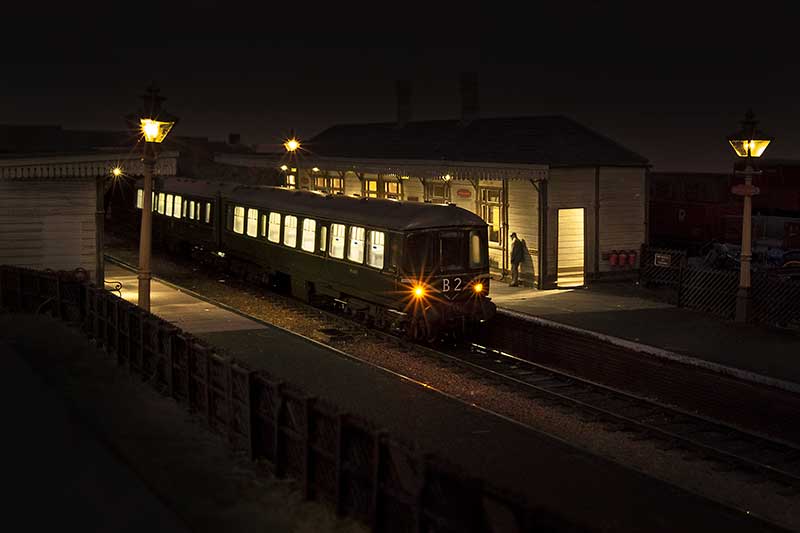
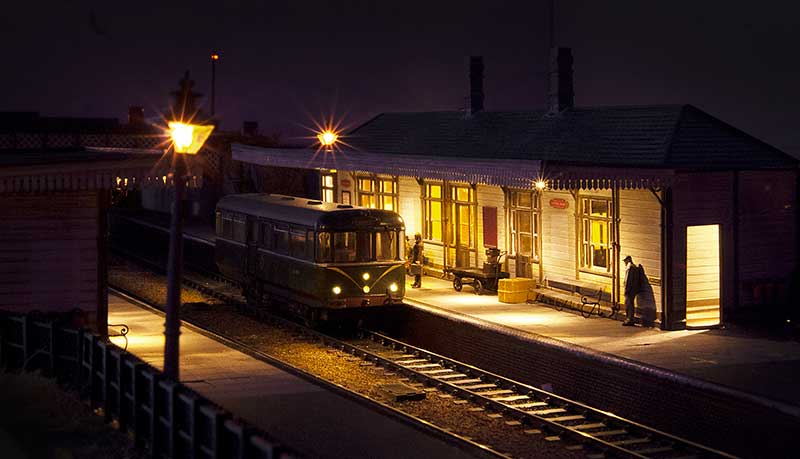 In an effort to keep the line open to passengers a 4 new fangled 4 wheel railbus was tried on the route. The experiment didn’t work out and the station would be closed a few weeks later.
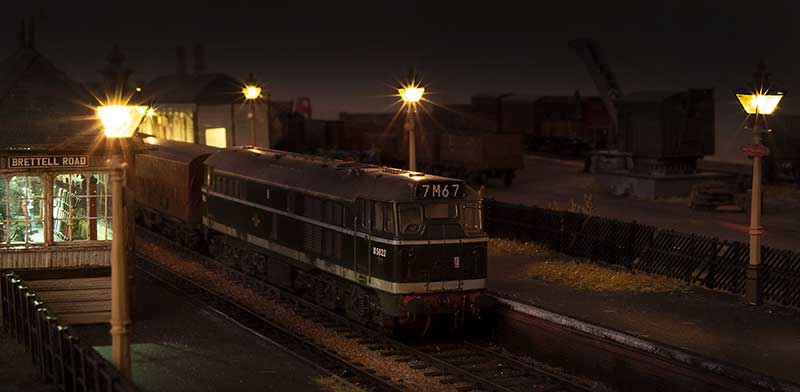
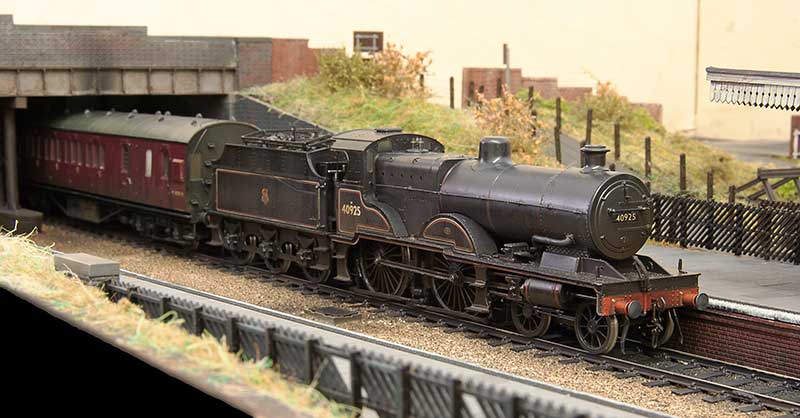
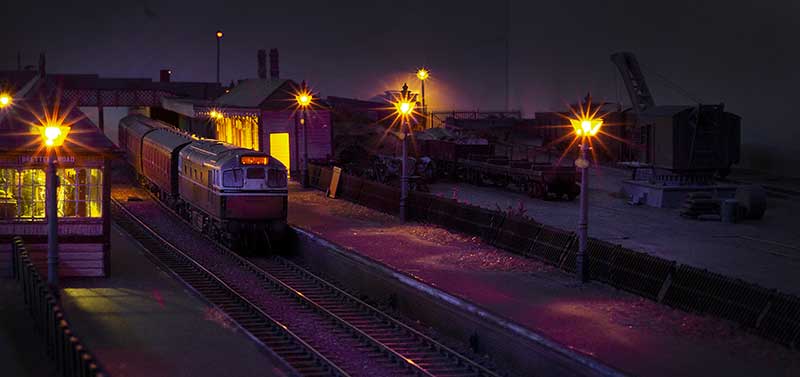 I’ve mentioned before my preference for long platforms and short trains. A BRCW type 2 and its 3 coaches demonstrates the effect I was after.
Little bits of abandonment
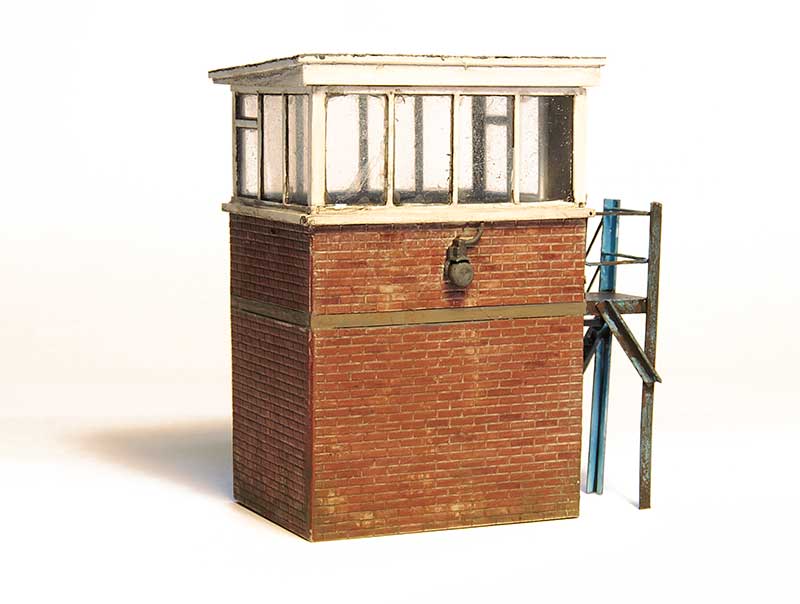 This is a little model of the crossing box from Level Street, modelled in its abandoned state. Ive taken a bit of artistic licence with this as the real building appeared after the layout is set and lasted into the early 1980s. Round oak did tend to move and rebuild things a lot though so a building that became redundant whilst still relatively new wouldn’t have been that unusual for the area. Plus as anyone who’s ever researched a real place will know, not everything at a location will always make a lot of sense. The model is scratch-built with the nifty alarm bell a 3d print kindly supplied by Richard of Mudmagnet Models.
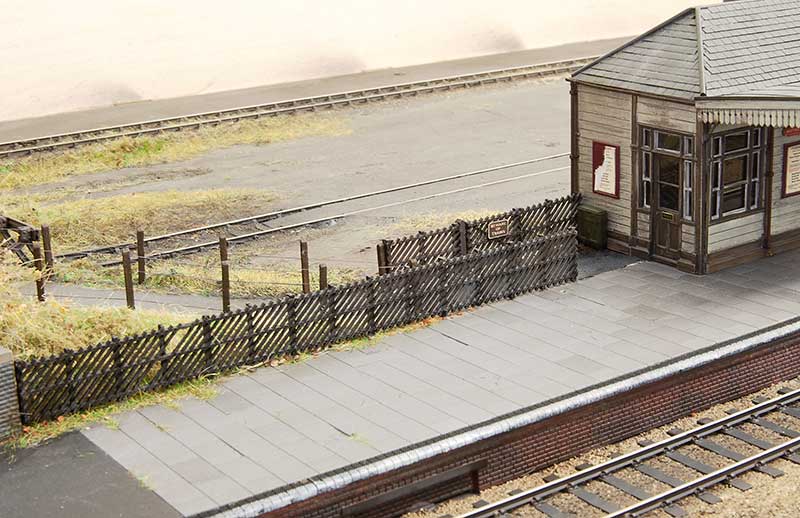
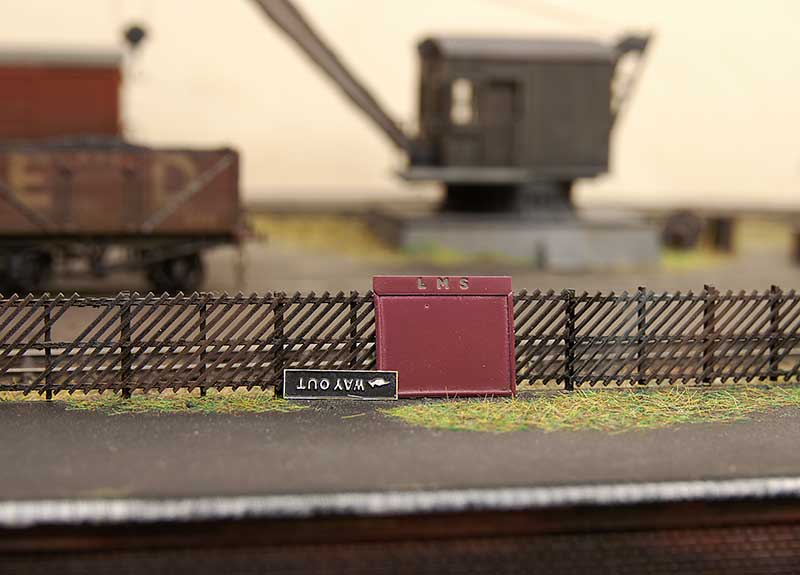 A few bits dumped agains the platform fence give just a hint that the station doesn’t have long left.
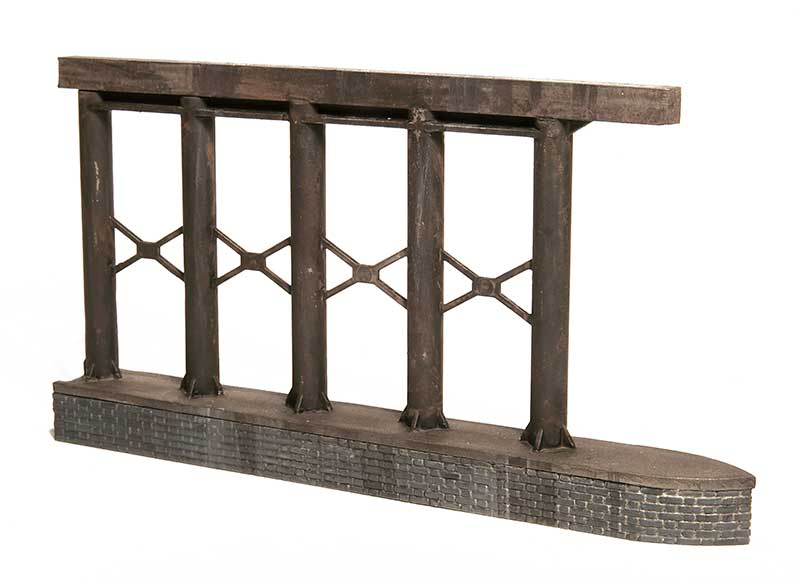
 When I rebuilt my loading gauge (a while ago now) I actually built another one at the same time. The frame is scratch-built from brass sections and the bow from Smiths. This actually serves a purpose as provided the layout is properly levelled this is the point where a free rolling wagon will start to move as the siding descends to the same level as the mainline.
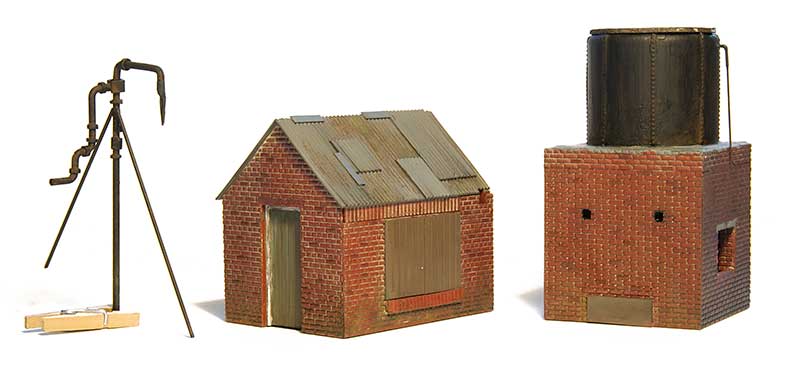 Elements of a rudimentary water tower. The prototype for this stood on the Earl of Dudley’s railway at the link between Oak Lane and Stallings Lane, Near to Himley’s No.8 pit. It survived until 1950. Its Heath Robinson look appealed to me.
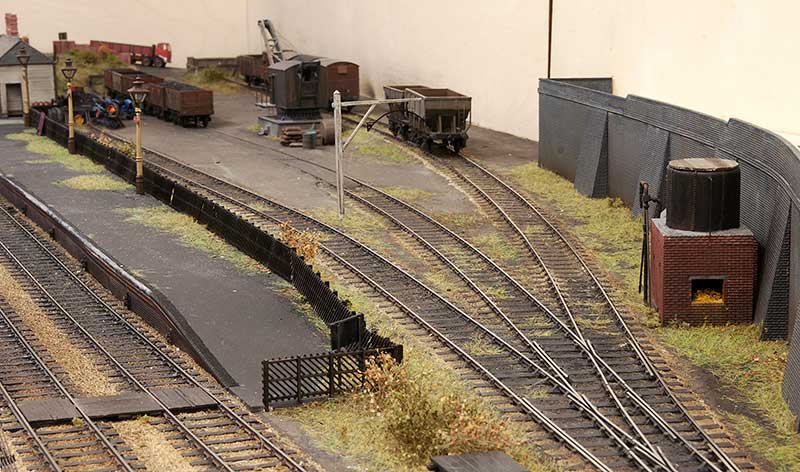
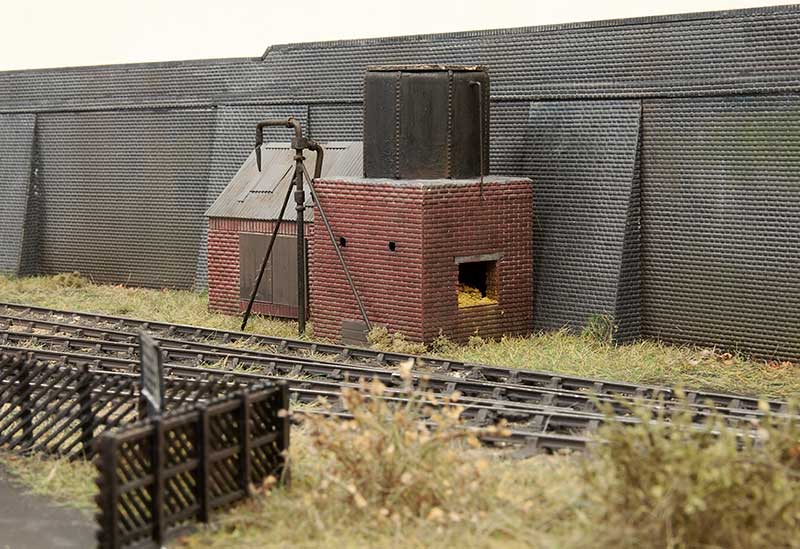 In position on the layout. Its days of servicing the EoD fleet of 0-4-0 saddle tanks are long gone.
24th September 2021
 Just a little look-back. This weekend marks 10 years since New Street was last seen in public. Time flies! For more pictures from the show click here.
Before anyone asks, at the time of writing there are no plans for it to do any more shows (sorry)
A short post in brass
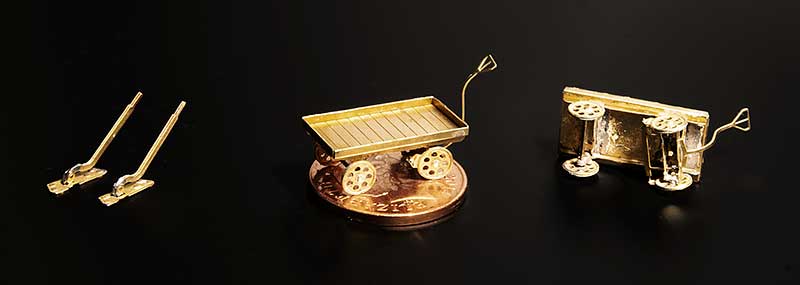 Been fiddling with bits of brass again. I wouldn’t normally bother taking a picture of something as simple as a point lever but I found that the ones I built before were a little vulnerable and easily bent. I haven’t changed the ones i use (Shirescenes) but what I have done is doubled up the levers themselves and they now seem a lot more robust.
I’ve built platform trollies before to but this time I have changed the supplier. I think my previous ones were Scalelink but this one is from London Road Models and is much more detailed. It even had a representation of the brake linkages. Regular readers will no doubt know by now I’m a sucker for this sort of thing! The trolly is shown perched on a two pence piece for scale.
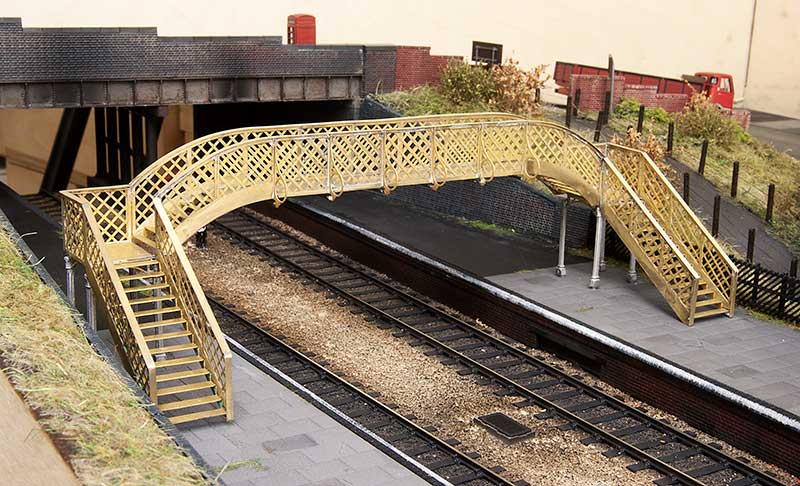 Moving on to something a little more obvious. This is the Churchward models (now sold by Phoenix models) footbridge kit shown in temporary position. As my track spacing is quite wide here I did need to extend the main arch by one panel and, luckily as the etches for the arch are the same, I could use the spare bits that weren’t needed on the facing side. The sides were cut and shut with the new panels grafted in meaning the only bit I needed to fabricate from scratch was the main span floor. An enjoyable kit to build this one.
Revisions and clutter
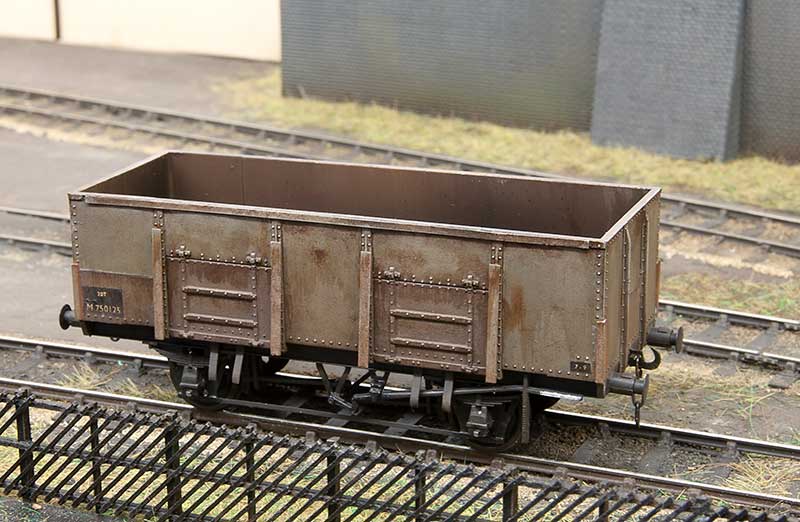
Remember the diagram 1973 mineral wagon I posted a few entries ago? Turns out I missed some of the reinforcing bits that were added after they were built. Im not sure how as they were in the prototype pictures I was looking at! Anyway thats been corrected now
 Ive finished off a few Bachmann RTR wagons too.
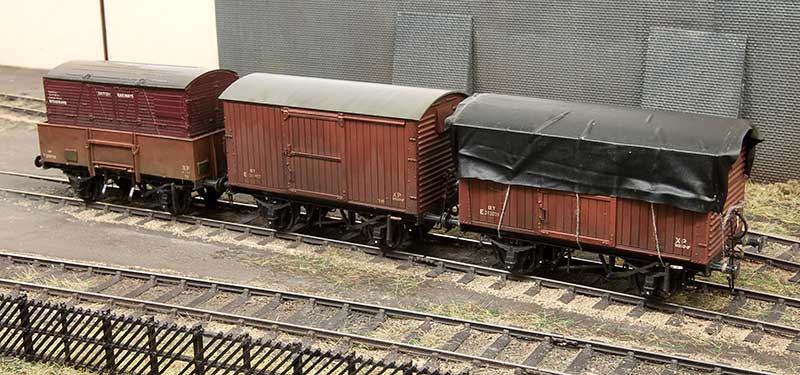 The steel high-fit was actually already done. Ive just added a container to it. The other 2 are actually 2 of the 3 vans I first brought for the layout. Discounted in Modellers Mecca bargain bin! The tarpaulin is black latex cut from a surgical glove.
 When I built the retaining wall for this side of the bridge I did intend to do something a little more substantial but decided that It would look weird if the wall was 2 different designs. However a friend mentioned that the buttresses looked a little too puny so I reverted to what i should have done originally and modified the existing wall to match. I admit I did want something more grandiose than this but for where it is it wouldn’t have made a lot of sense to have something to elaborate. I definitely don’t subscribe to that inane ‘rule 1’ idea of its your layout do what you want. There has to be some degree of plausibility in there somewhere.
Clutter – What is a yard if it doesn’t have some clutter in it? Much like the retaining walls though you don’t want to go too mad. At the end of the day this is someones product and they aren’t all that likely to leave it lying around on the floor.
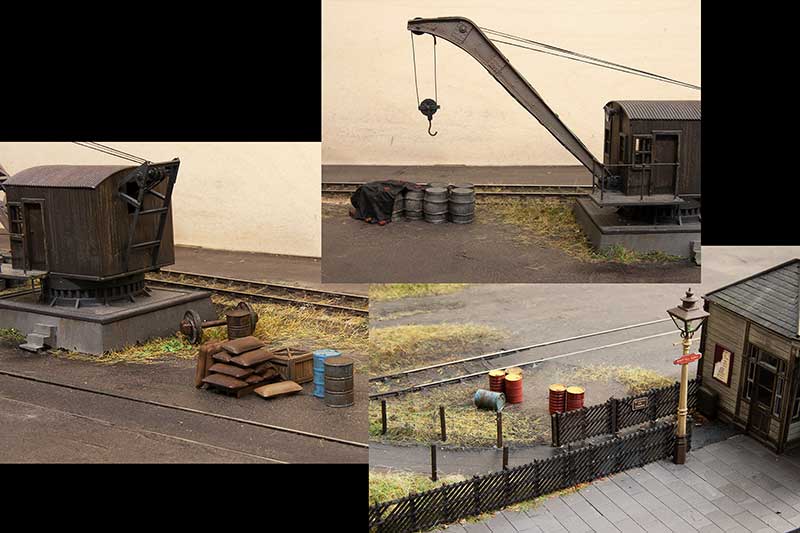 So I opted for 3 small groups of stuff as can be seen above.
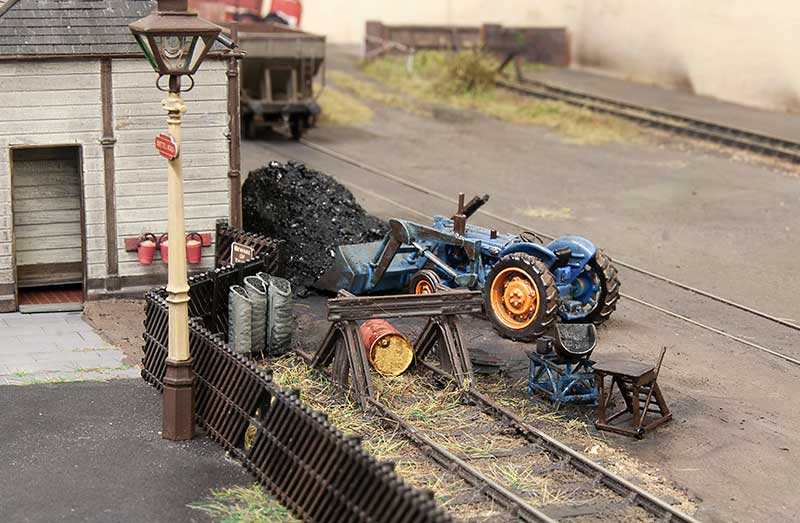 I always wanted some coal facility and I had this in mind when I built my tractor. Again nothing too posh, no coal staithes or anything like that – just a few piles and some more clutter. The steps, scales and the conveyor (behind the tractor) are 3D prints kindly donated by my friend John.
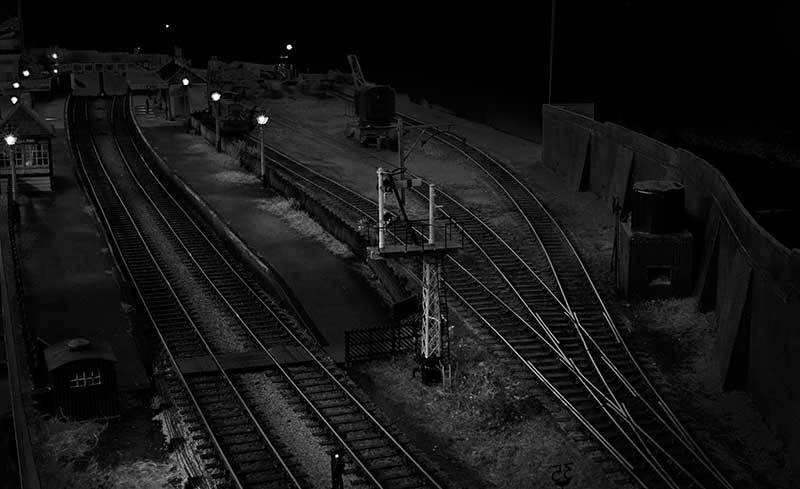
Finally a couple more evening shots.
A few in progress lorry kits
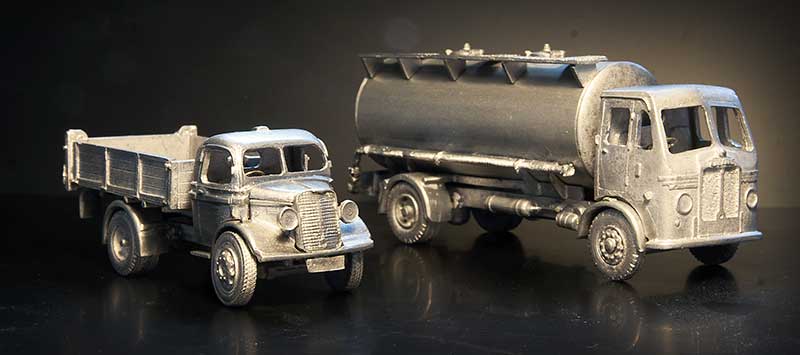
With my first demo in a few years (my first exhibition in any form in a few years actually) coming up in a few weeks*, I thought it an idea to do a couple of in progress lorries as a change to all the finished stuff I usually drag along to this sort of thing.
Both are Langley kits and were chosen for absolutely no other reason than they popped up cheaply on ebay! OK they were a little interesting anyway and i thought the dumpy little Dodge 5 ton tipper truck was kinda cute. The Milk tanker is a Leyland Beaver and both hail from the end of the 40s so they would likely be pretty tired by the time they reach Brettell Road. The make do and mend attitude of the Black Country would mean they might soldier on for that long but the impending Motor Vehicles (Tests) Regulations of 1960 must mean their days are likely numbered!
*See the news page
14th September 2021
With the model railway exhibition circuit starting to show signs of emerging from its enforced hibernation I have updated the shows page. However with Brettell road undergoing its rebuild and one last show for Birmingham Moor Street I will admit it’s somewhat slim pickings at the moment. Heres a link.
Theres no Scaleforum this year but what there is instead is a set of smaller events from some of the area groups. For a full list click here.
The one I will be attending is this one
North Norfolk Area Group Event 25th September 2021
The Copeman Centre, Hall Street, BRISTON NR24 2LG
https://www.thecopemancentre.org.uk/
Opening times: 10:00 – 16:00. Admission free.
Light refreshments will be available and for this venue there is no need to pre-book.
The following layouts will be present:
North Elmham – Currently under construction by the North Norfolk Area Group, this layout will depict the station on the Wells next the Sea branch with its grain and milk traffic giving some variety from the norm. The layout will be set in the late 50s/early 60s period.
Obbekaer – A Danish independent line connecting Rebe, Gram and Vojens in South Jutland from Geraint Hughes set in the mid 50s. The Model is built to P87 standards.
Wheal Elizabeth – The end of a Cornish China Clay branch set in the 1970s/early 80s. from Jeremy Good.
We will also have the North Norfolk Area Group’s test track available for those who want to give their stock the chance to stretch its legs.
We will have six demonstrations, which are:
Modelling road vehicles – Jim Smith-Wright
Air-braked wagons – Phil Eames
Etched brass carriage construction – Tony Brenchley
Kit-bashing plastic coach kits – Alan Hall
Turnouts with a difference, an approach to building the inter-laced variety – John Geggie
Cavelex Models – will be showing production models and their latest samples for visitors to examine and will be very happy to discuss any aspect of their products
Hope to see some of you there.
Signs of life
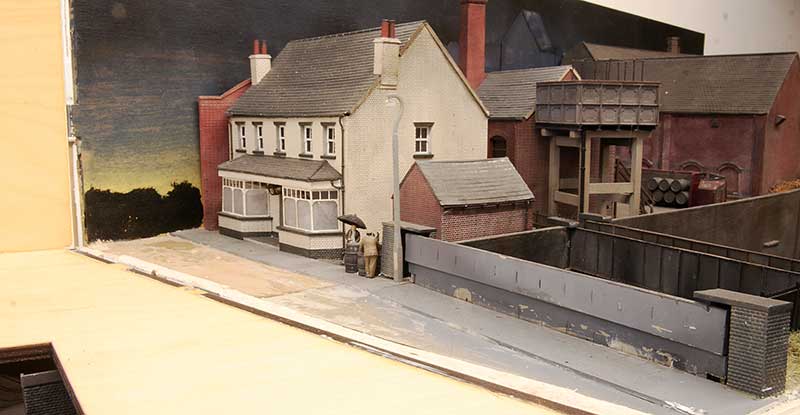 With the Stourbridge end of the layout looking half decent attention has turned to the Dudley end of the new boards or the middle of the layout. Theres a few things that jarred about this scene now that it’s more open. Before you couldn’t really see them. The pavement doesn’t flow properly and there are big gaps at the end of the bridge girder. Also the lower part wasn’t finished. When I designed the bridge I did have the foresight to include a half etch to allow the rivets on this side to be punched through. However when I built it i didn’t bother! Ive already pulled up the road.
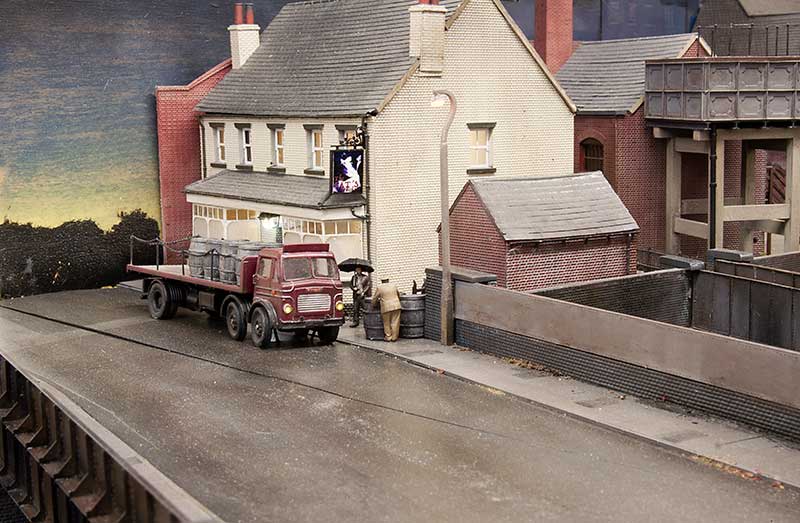 So the road and pavements have been redone. I made an overlay for the bridge from paper. The pub sign is from Model scenics and features our much missed cat Moo. The figures are from Modelu.
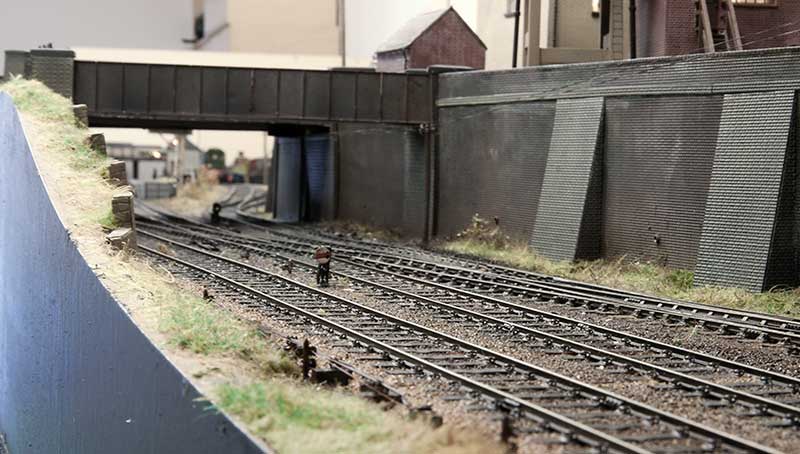
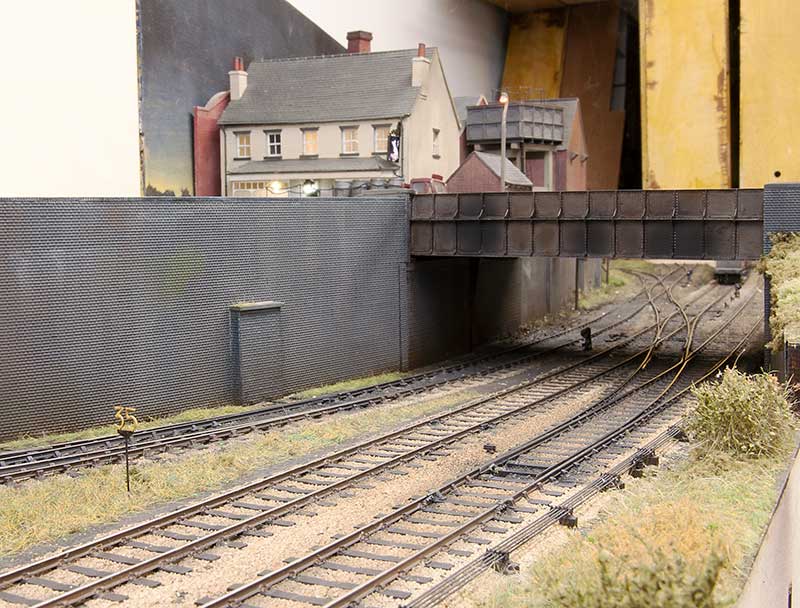 The bridge from track level. Ive added the retaining walls with some nifty top capping that Tim kindly cut for me.
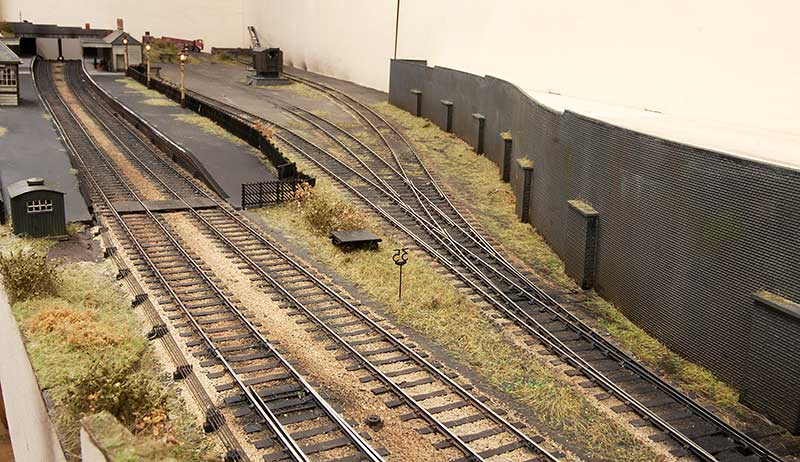
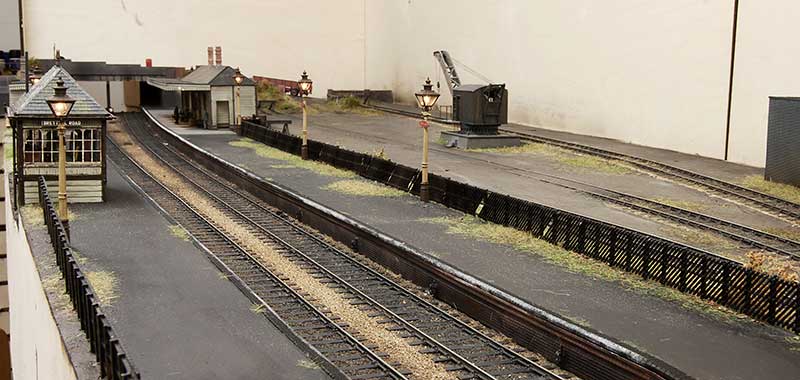 Turning around we see an overview of the somewhat neglected platforms.
 An overview of progress so far.
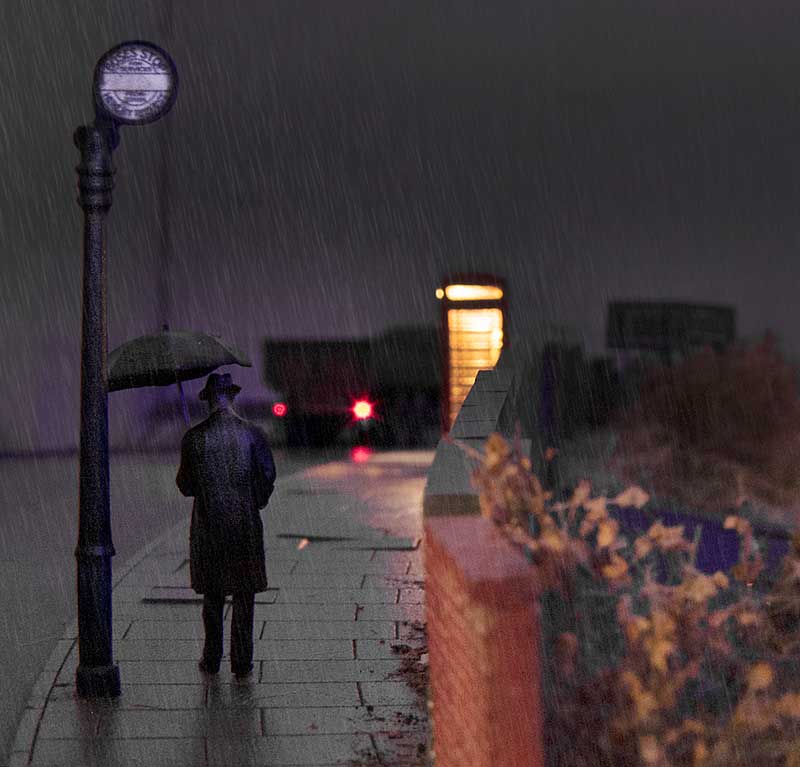
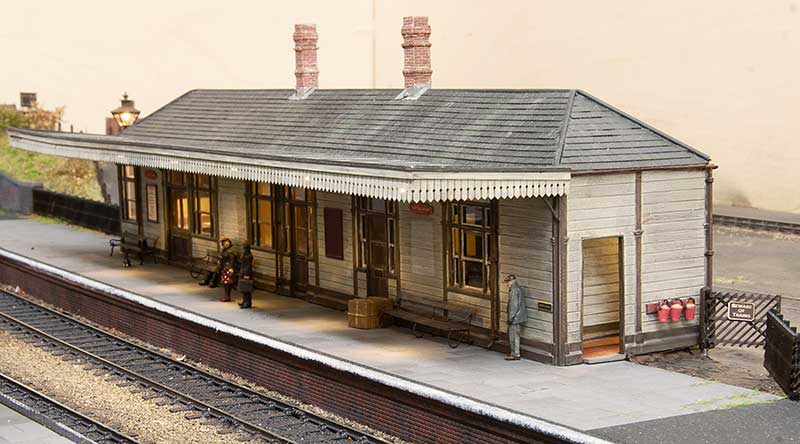 Ive added a scattering of people from Modelu and Airfix. I thought the lady with the umbrella was particularly suitable. I still need to do more work to bed this end of the building in. Considering this is the rush hour theres not many people about.
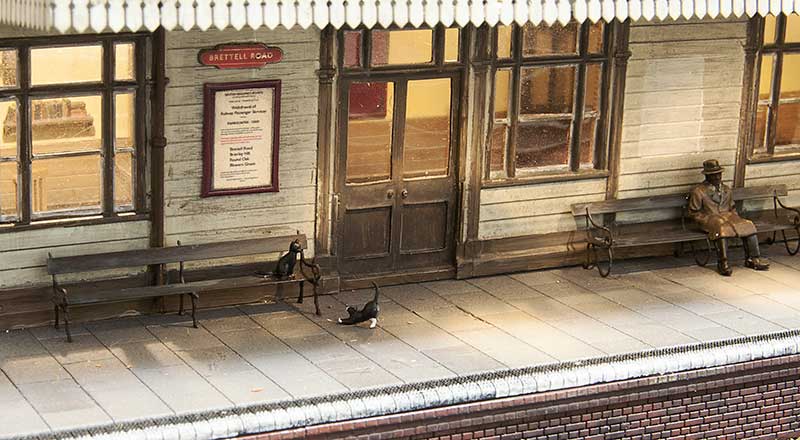 The station has 2 cats. The sensible one is Shadow while the mischievous one who wants to play is comet They are more interested in chasing each other than the local rat population!
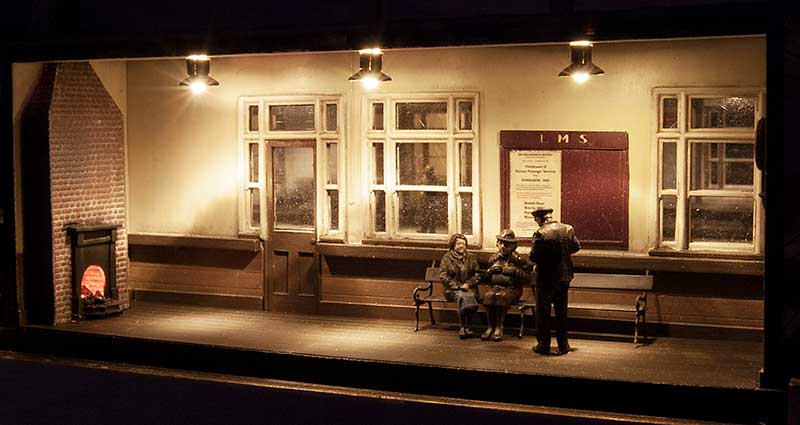 On the other platform a couple of elder ladies discuss the immanent closure of the station with the station master.
Agent 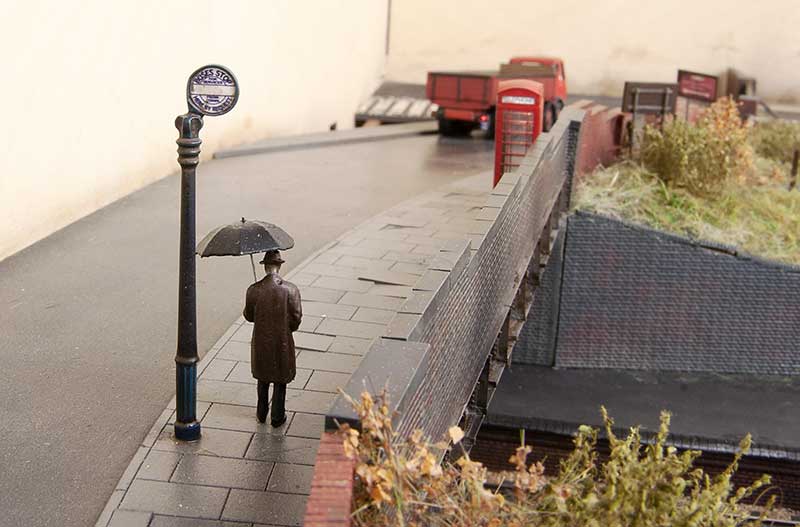 A gent waits for the bus. It’s late as usual!
Now that the some of the lighting is in place a few dark shots.
Greenery and decoration.
I’ve reached the stage where all the significant greenery is pretty much done and I can move on to some titivating of parts of the layout.
 I’ve made a basic wooden fence to block off the line that crossed the road originally. The rudimentary gate (which looks like it hasn’t been actually used for years) is simply a few bits of 1x1mm brass soldered together.
 Proverbially walking up the road a little we come to the station signs. These are based on a photo I found somewhere. The fading on the signs themselves was actually an accident. The result of me handling the printout a little too early.
 Continuing our walk we come to this. What can be more of a model railway cliché than the good old bus on a bridge? Well since I am not going to be doing any buses for this layout I have gone for a midlands style bus stop instead. The main column was something I had in my spares box. The rain on the layout is always going to be going left to right as you look at it, so it makes sense that the autumn leaves and litter do the same. The top of the bridge is particularity known by the locals as being a bit blustery. (Theres actually a real location nearby known locally as ‘windy corner’)
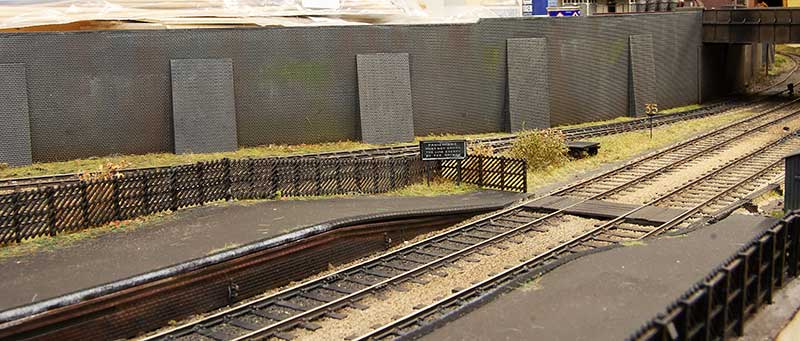
 Peering over the bridge we see the lower end of the station footpath. The Midland style fencing and wire fencing posts both come from Scale Model Scenery as does the little beware of trains sign.
 Looking back at the bridge we just walked over. The girder is 2 of my previously designed etches combined together. I still need to add the top capping to the sloping walls yet.
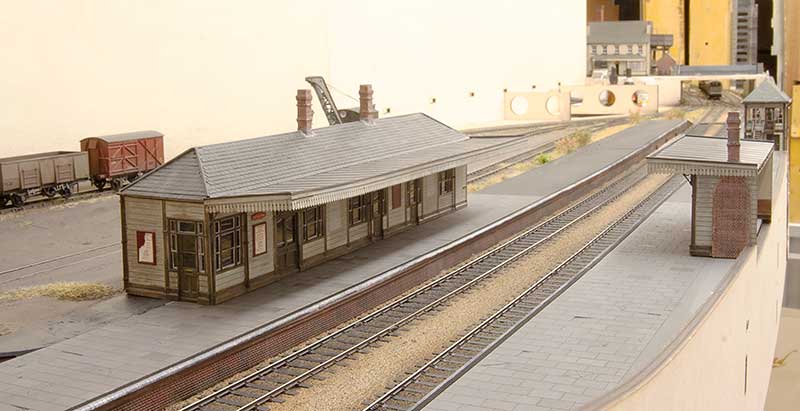
 Overview looking towards Stourbridge. The 2 buildings are still just loosely placed at this stage.
 … and towards Dudley. You’ll have to use your imagination for the moment for fill in the bridge and the wall on the left.
 Old warning sign from Ambis Engineering
 A train! Remember those?

The march of progress
Ive been a bit busy. All the track is not ballasted and the first stage of weathering in complete. I have also put the platforms in.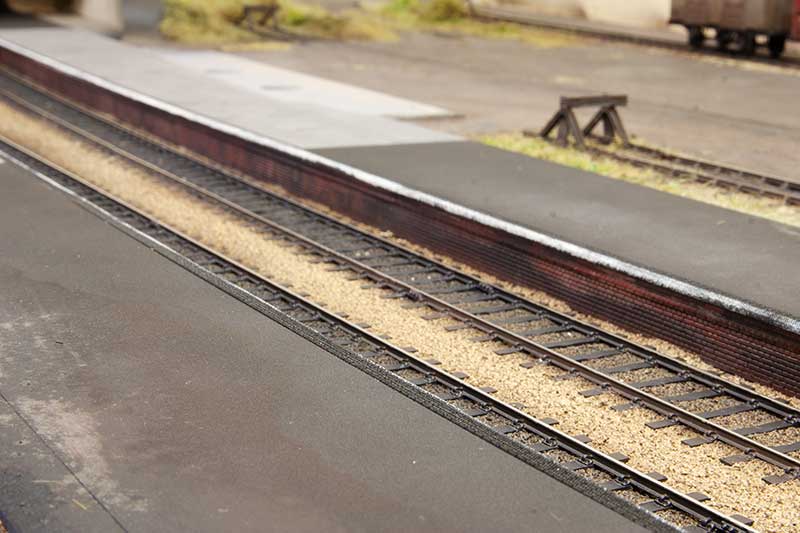 The sides and tops were cut when I was over at Tims. The brick platform edges are something Tim developed and they do look really smart.
 Overview from the Stourbridge end.
 And from the Dudley end
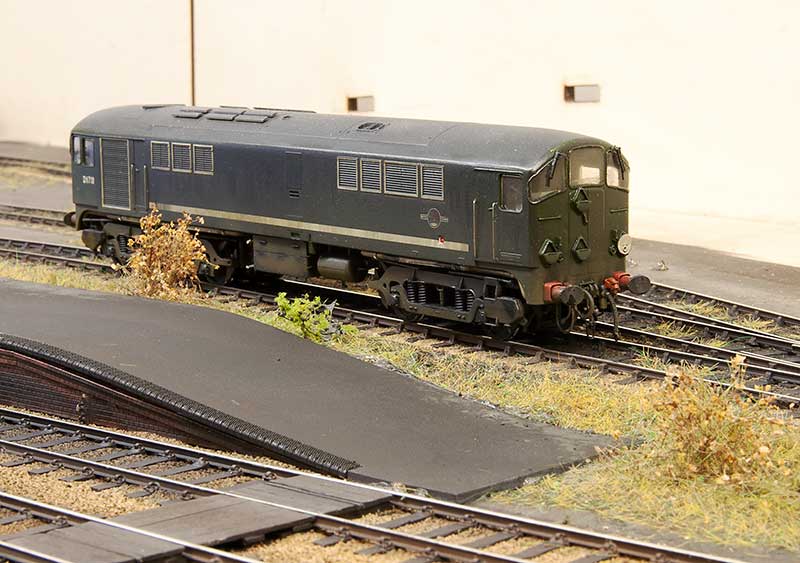 Co-Bo lurks in the weeds.
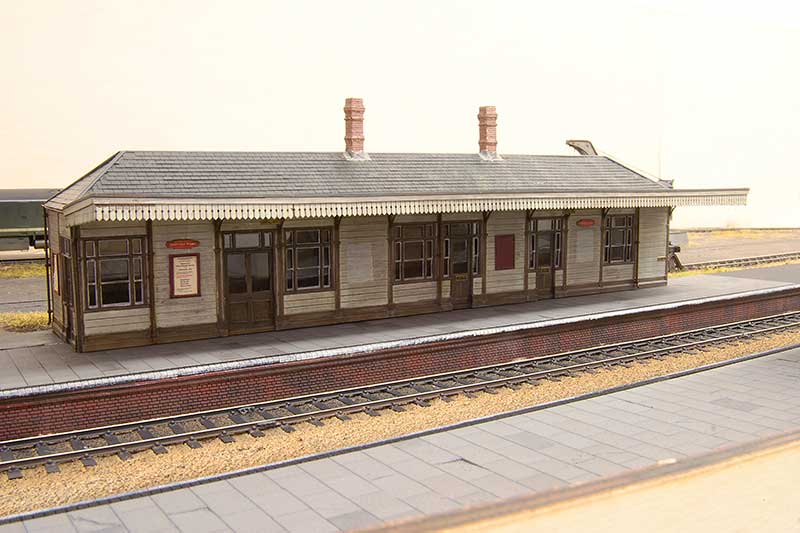 Up until now i have resisted the urge to plonk the building in place but my resistance has now caved.
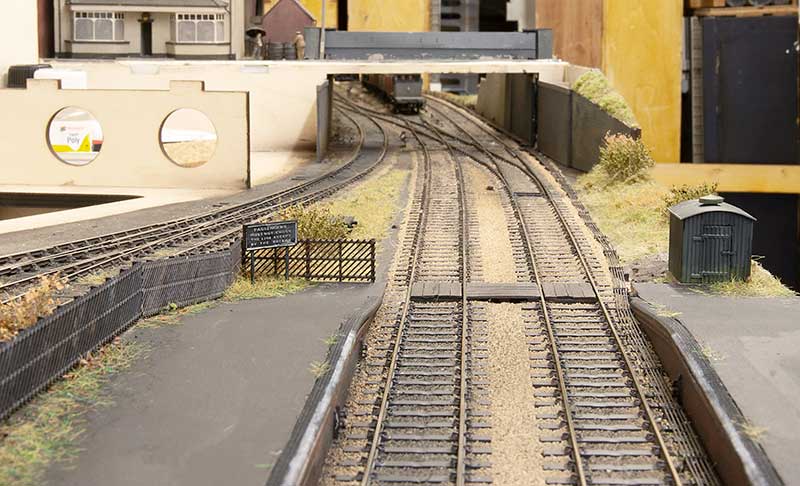
 View from under the bridge. This gives a good idea of the elevation changes in the yard. And before anyone says anything, doing the point rodding was probably a bit of a pointless exercise if I’m honest!
Bitsa post
This post kind of jumps around a little but lets start with a simple wagon as we’ve not had one of those for a while. 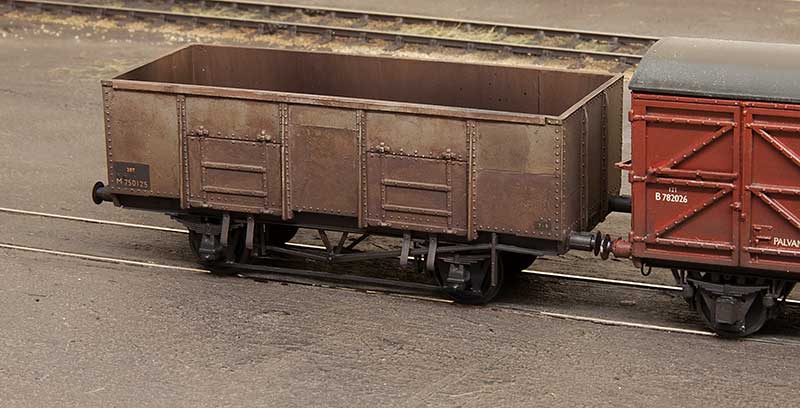 LMS diagram 1973 mineral wagon. These were a little odd as they had no end doors just side ones. The model was created by splicing 2 sections of the Dapol (ex Airfix) mineral wagon body together and mating the result with a Parkside 12 ft wheelbase chassis. The W-irons are Bill Bedford, door springs Rumney models and buffers from Accurascale.
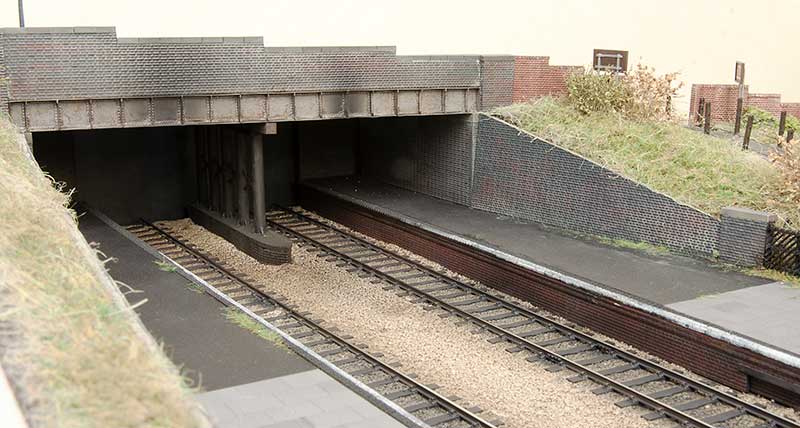
 Both the real Brettell Lane and Round Oak stations had central supports under the bridges. As this will be right at the end of the layout, under a bridge and in the dark I didn’t feel I had to go mad as a silhouette is pretty much all thats needed. The main pillars are actually nothing more than a couple of Hornby gradient supports spliced together.
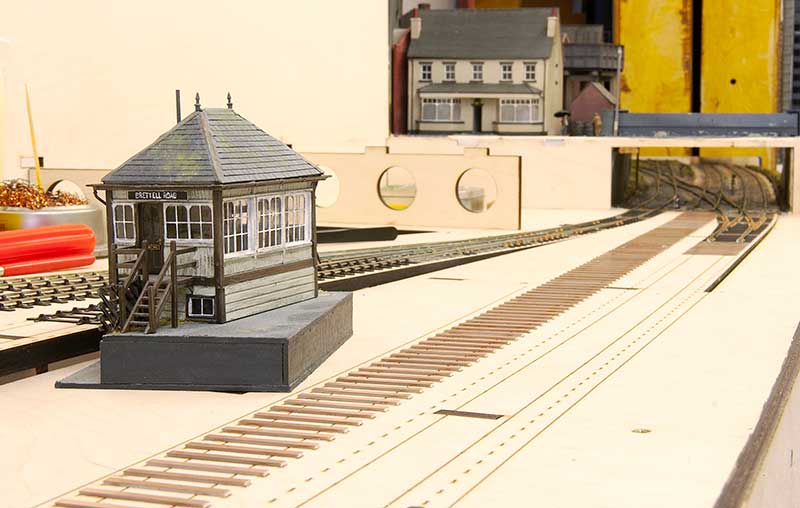
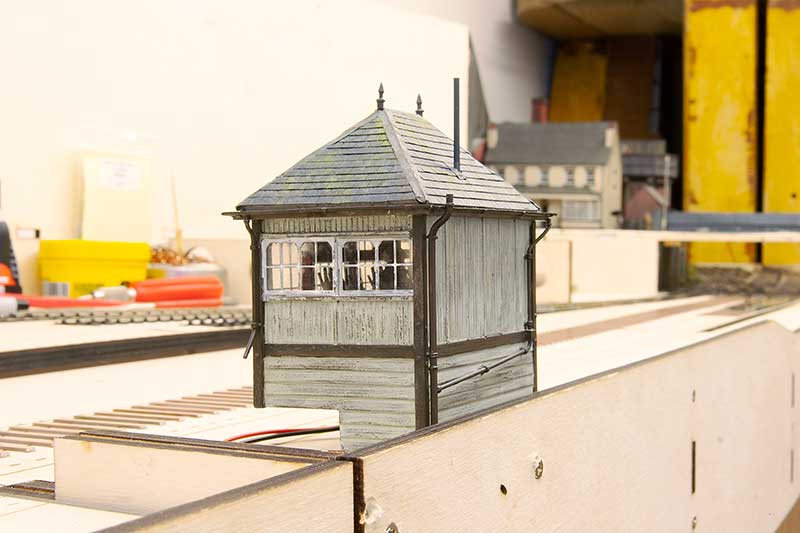
 I mentioned in a recent post that i needed to reverse my signal box so the steps are at the opposite end. Thats ticked off now and the results can be seen above. To see the original build click here.
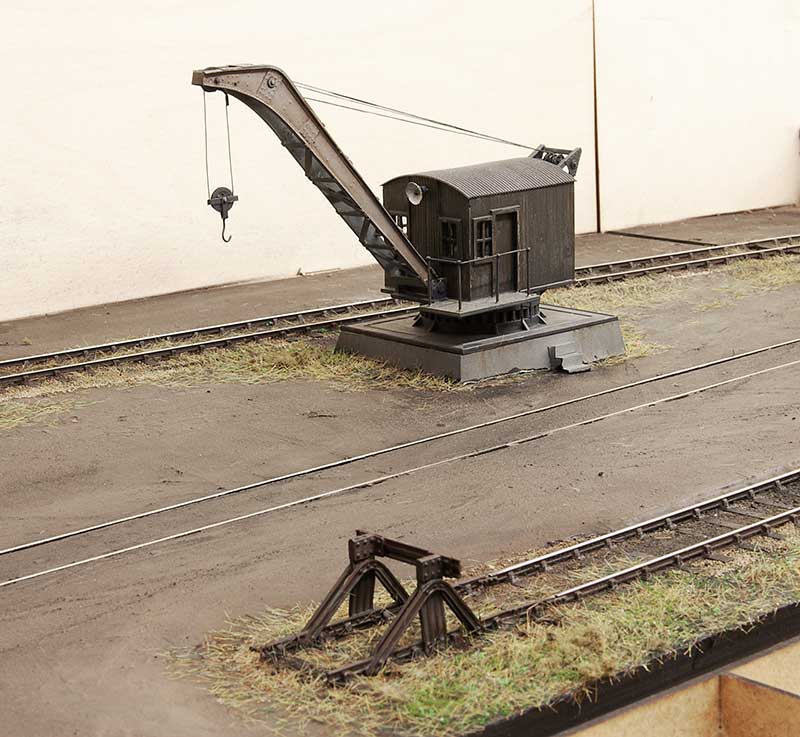 Moving back to the layout itself the much modified Airfix crane has now been planted and the yard track has been ballasted and suitably ‘neglected’.
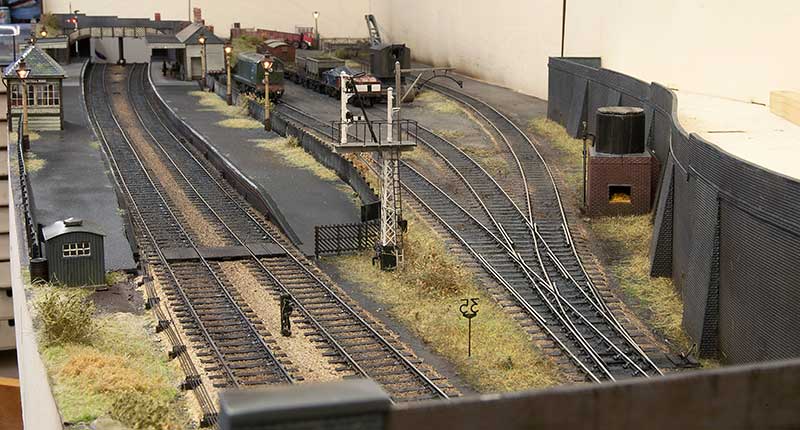
 Overall view of the yard so far.
Landscaping and a couple of firsts.
Don’t worry, I’ve not ditched model trains and took up gardening. As far as I am concerned a garden is just somewhere where a model railway shed should live!
With the track and wiring done on Brettell Road part 2 thoughts have turned to the landscaping of the yard. 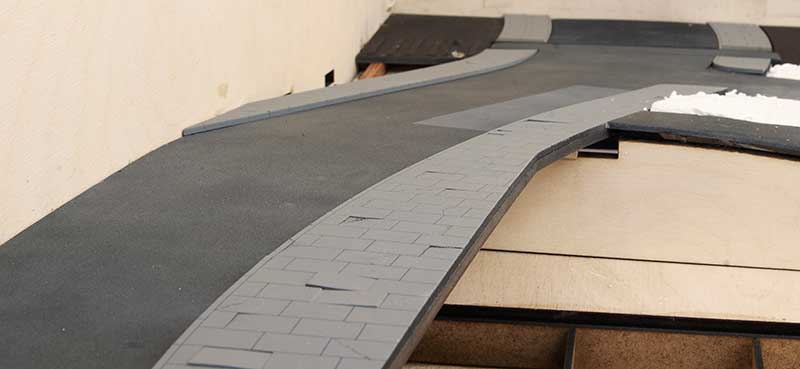 Before I could start on the yard I needed to get the road in as this will need to be blended into the yard. The parts for this were cut out at Tim’s but I did add a layer of 1mm balsa to the road and sanded a camber into it. The thing with laser cutters is they are so neat. By using 2mm mdf for the pavements i could carve away some of the slabs to make it all look a bit more scruffy. I also cut a few of the slabs out completely on the laser so that I could add plasticard instead and do a couple of raised slabs. Brettell Road is set well before the ‘where theres blame theres a claim’ culture. I guess people back then just looked where they were going or called themselves an idiot if they ended up on their backsides!
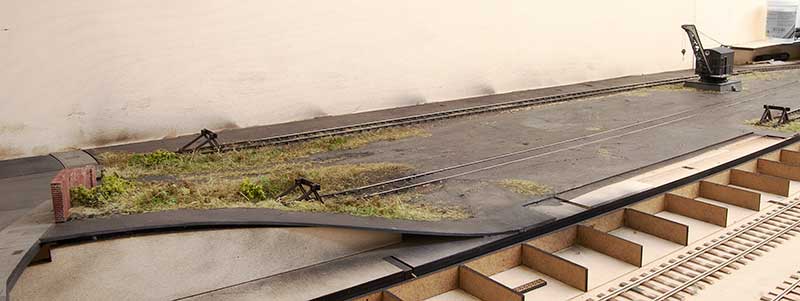
This is my nod to Brierley Hill’s level street. Which if you’ve ever been there, is anything but level! At the bottom is a now abandoned level crossing (the real Level street had 2 that were part of the Round Oak system). The line it was on now forms the back siding. The road will need more work yet and weathering but this was far enough to let me move to the yard.
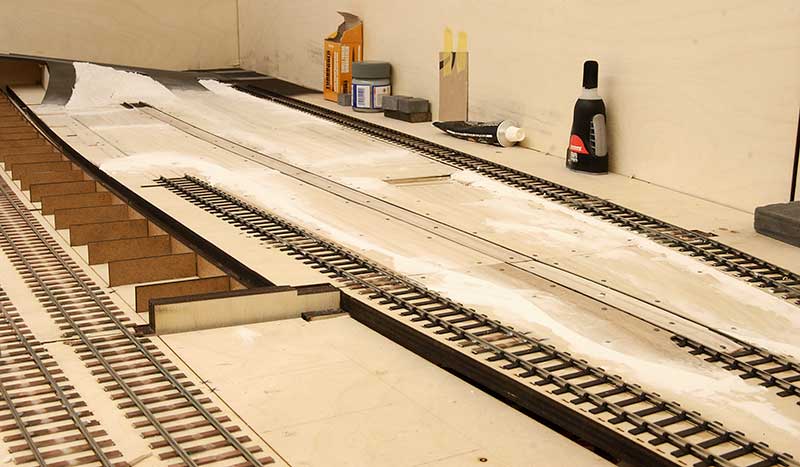 I’ve never done inlaid track before and, added to the bright idea to have different levels, I figured the easiest way would be to infill the gaps with layers of balsa The top layer is 1mm thick and is glued to various different shapes underneath as I didn’t want it to be all that flat. The infill in the track is 1.5mm balsa as I figured a half mill difference between the surface and the rail would aid track cleaning and wouldn’t be noticeable. I used track pins to hold it all together as well as PVA. Incidentally, I think this was the first time I’ve ever brought track pins!
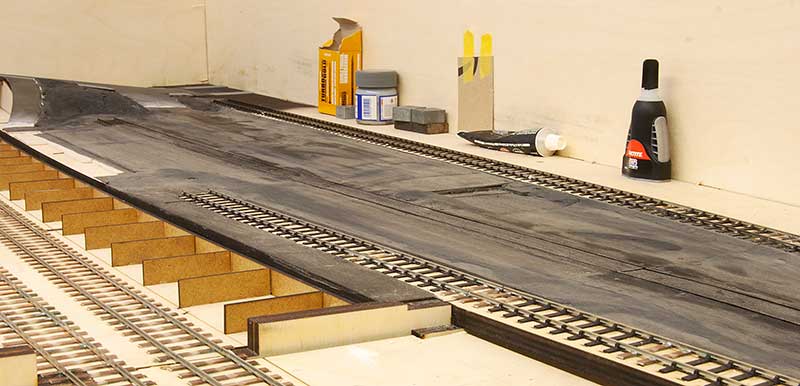 Despite my half mil’ gap idea i was still a little concerned that track cleaning would result in patches of nice fresh wood showing through. So rather than paint I decided to stain the wood black.
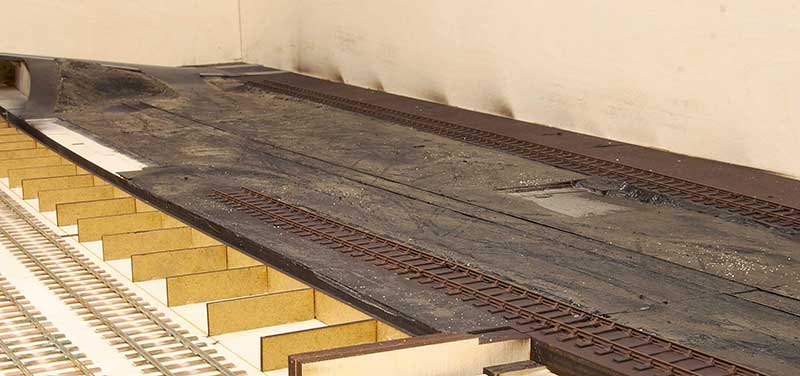
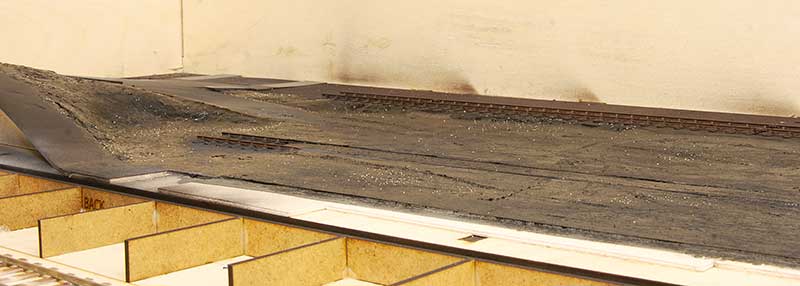
Time for another new (to me) product. I’ve used 2 colours of ‘mud’ from WWS Scenics. Peat and dark brown. These are like a very smooth liquidly filer. I used the peat first with the dark brown over the top. Applied with a plastic spatular and then stippled with a large brush. Ive also added some tire marks and a light sprinkle of chinchilla dust while it was still wet. More to do to it yet but I’m pleased with how it’s coming along so far. Lets just say the yard at Brettell Road was somewhat agricultural! For WWS muds click here.
Tracks and tweaks.
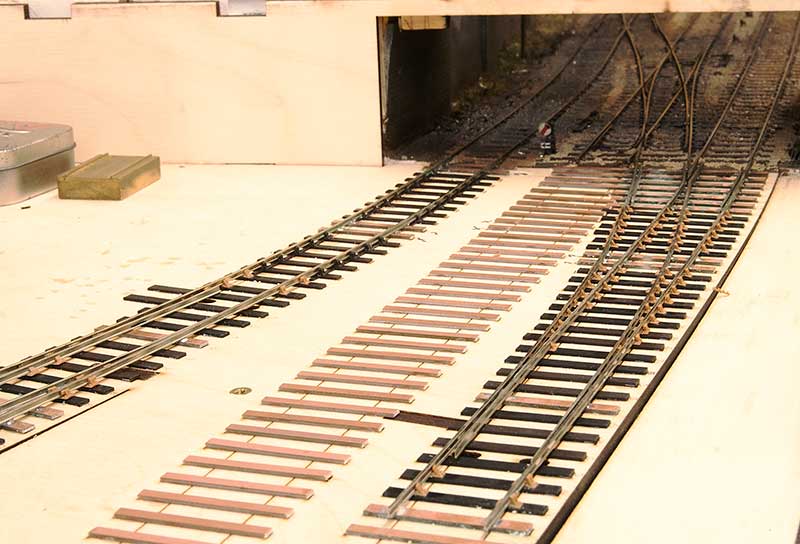
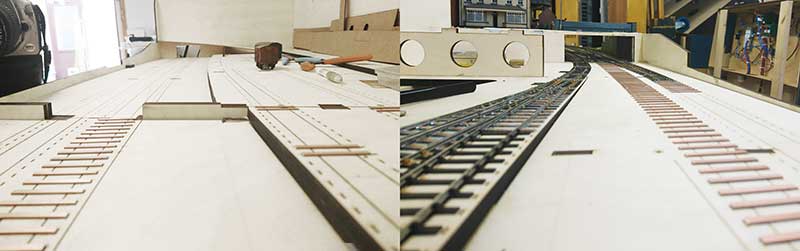
Been busy doing the fiddly bits of track for Brettell Road part 2.
 Ok, this is just a B9 on a slight curve, not exactly fiddly.
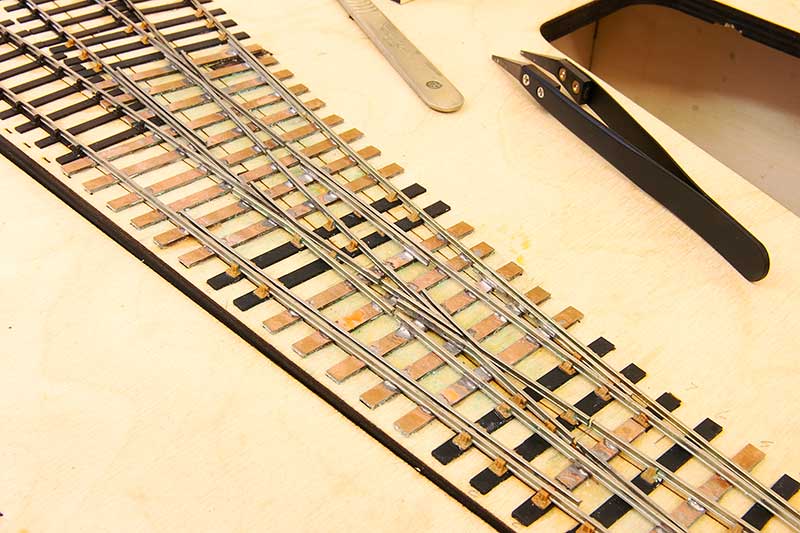
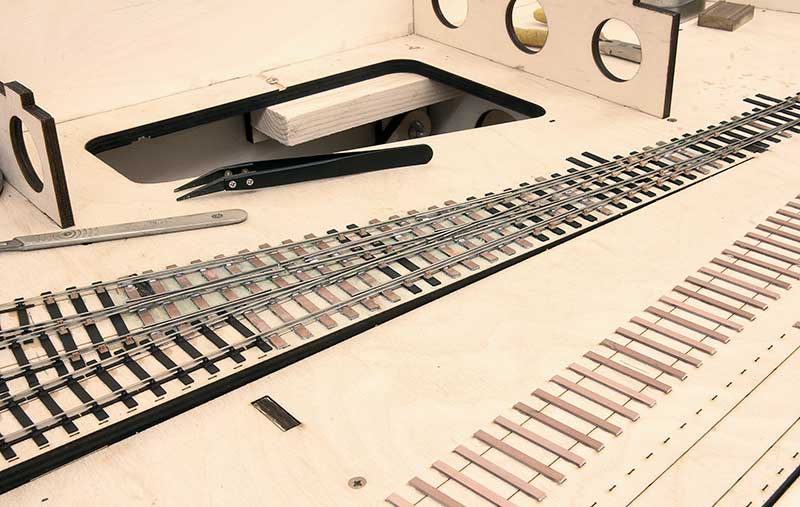 This is a bit more entertaining though. Ive tried a slightly different approach from my usual norm by using more copper clad and building more in situ than I usually do. I normally build the crossing assembly away from the layout but decided this time to only assemble the vees themselves remotely. I think its a bit quicker and allows a little more wiggle room doing it this way.
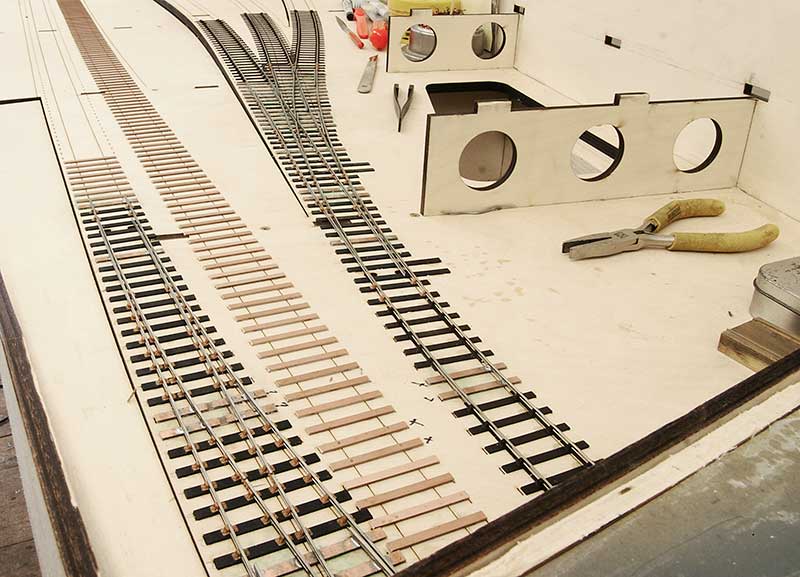 The view from the bridge.
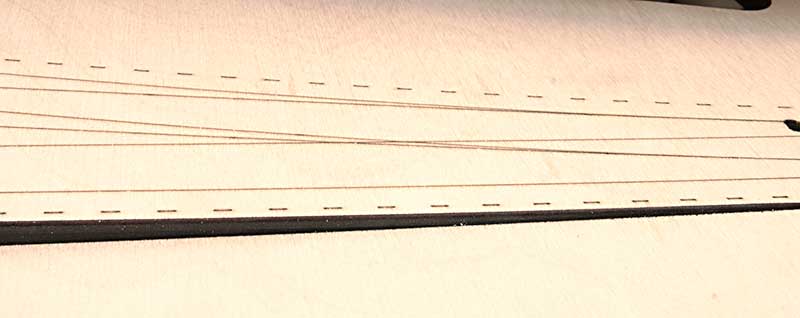 No matter how designed you think something is theres always some tweaks needed when you see the thing in the flesh. I never noticed how the 2 vees had ended up virtually on top of each other.
 You can see here how the middle road has been realigned. The original alignment showing through under the sleepers.
 Another tweak is the position of the signal box. I don’t think I fully took into account the curve and the sighting lines are worse than I thought they would be where I put it originally.
By moving it to to the other platform and along to the left a bit the sighting lines are much better.
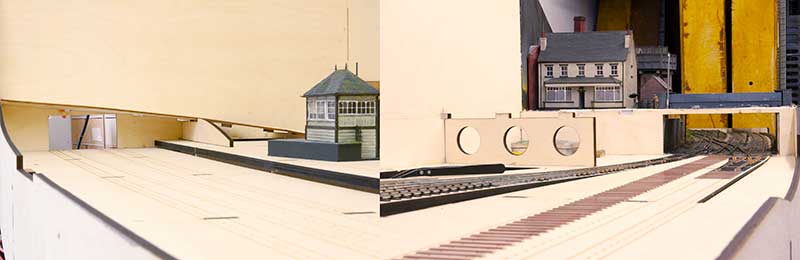
So the signal box will go here instead. I will need to move the steps to the near end and I plan to fit deeper windows so that it more like a type 3 box.
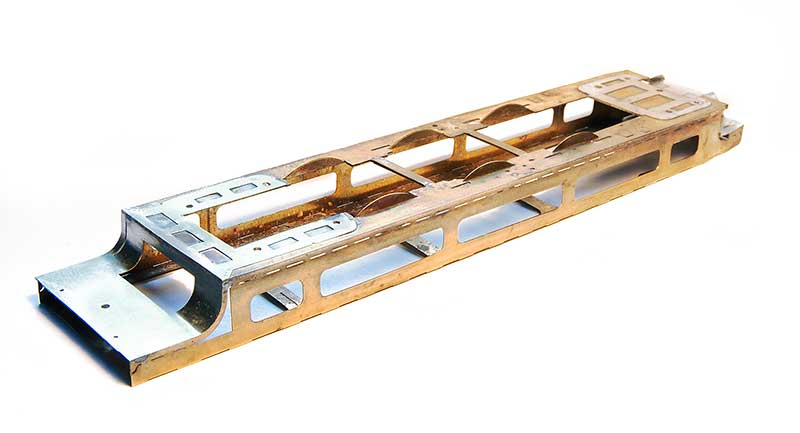
Duchess update June 2021
After a longer gap than would have liked attention had returned to my Duchess build.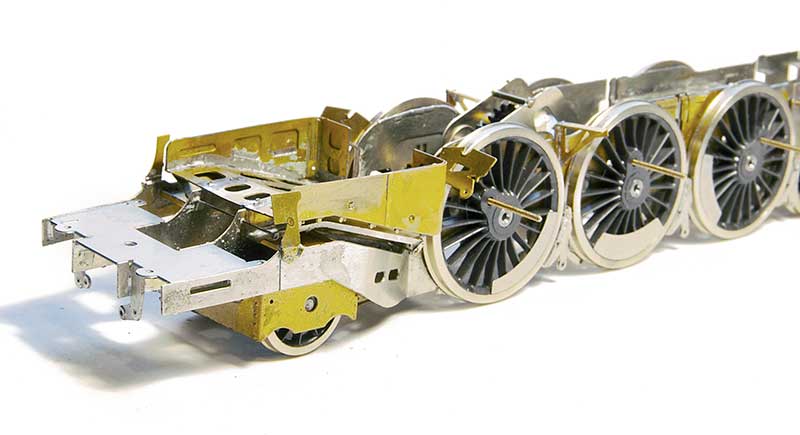 Starting with the lower firebox and damper operating rod.
 Next up the brakes. As can be seen clearance is kind of on the minimal side. Theres no springs fitted yet either so the chassis will sit a little higher than is seen here.
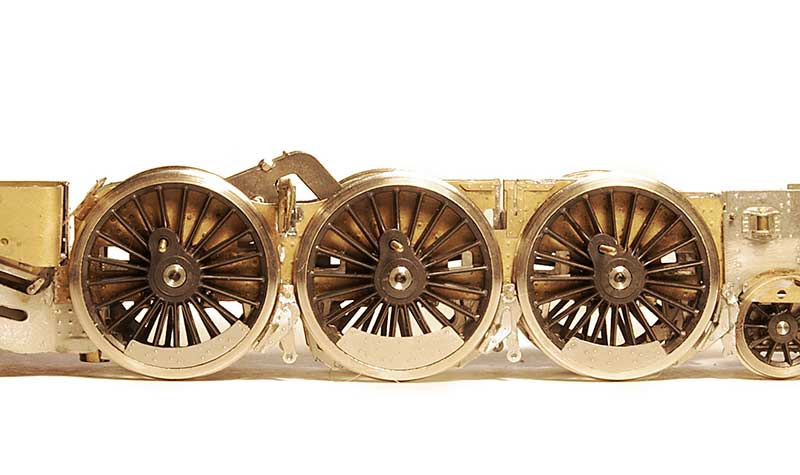
 The motion brackets. Again theres not a lot of clearance between the bracket and the leading driving wheel.
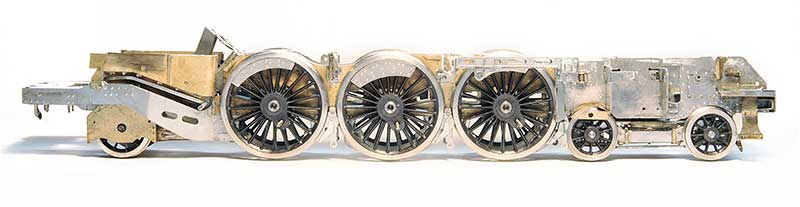
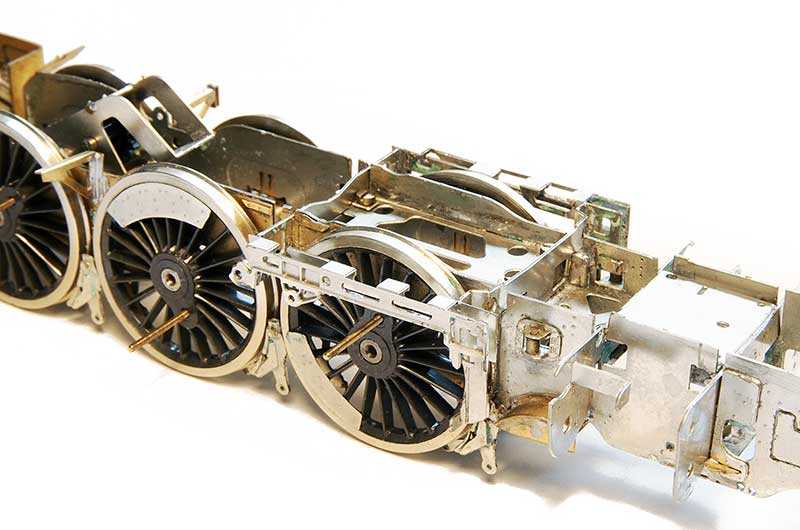
The chassis so far.
 Moving on the next stage is the footplate Seen here in its assembly jig.
Brettell Road part 2
I guess I was supposed to be here about a year ago but Covid happened. I actually had a trip over to Tims planned between the first and second lock down but that got delayed to the start of this week. Tim Kindly agreed to me using his laser cutters for 3 days but in the event it only took 2 to do the new boards for Brettell Road. I must say there was only a few of the most minor amendments needed which I was very pleased about and unlike some of our previous efforts next to no scrap bits this time!
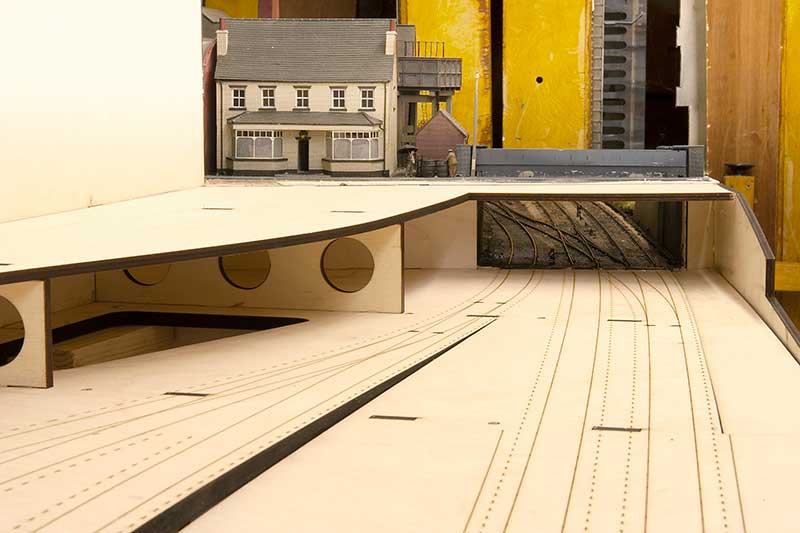 Here we see the new board meeting the old. Perhaps one of the biggest advantages of drawing baseboards up digitally and cutting them on a machine is that everything should be consistent. In the event the track bed was about a mill and half too high which considering I had rebuilt the main lines wasn’t to bad at all. Nothing a few minutes with a saw and a chisel didn’t fix anyway! The end back scene from the original layout has been cut away.
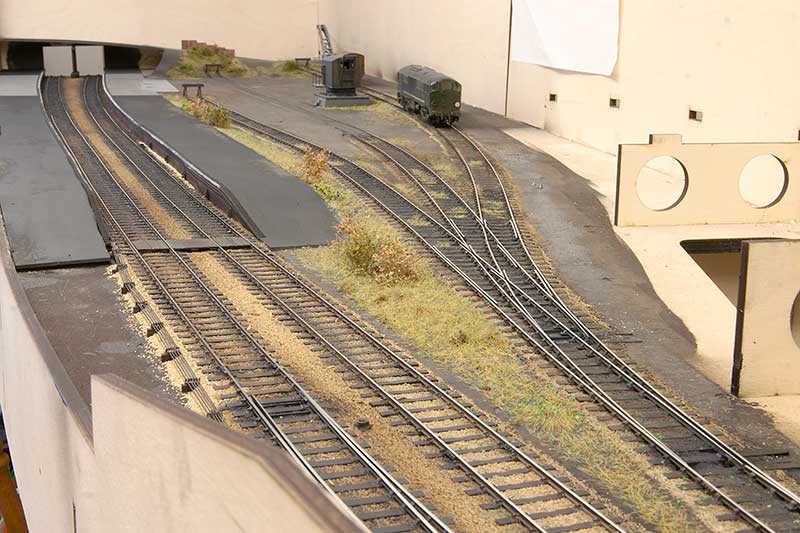
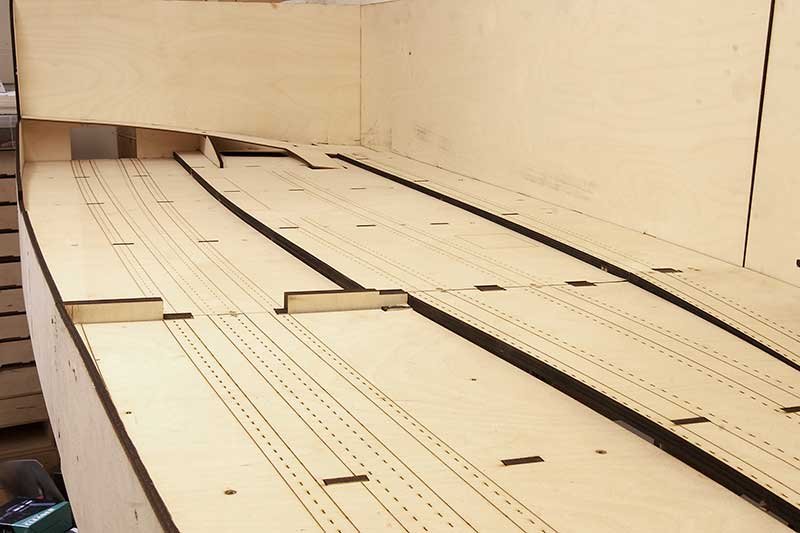
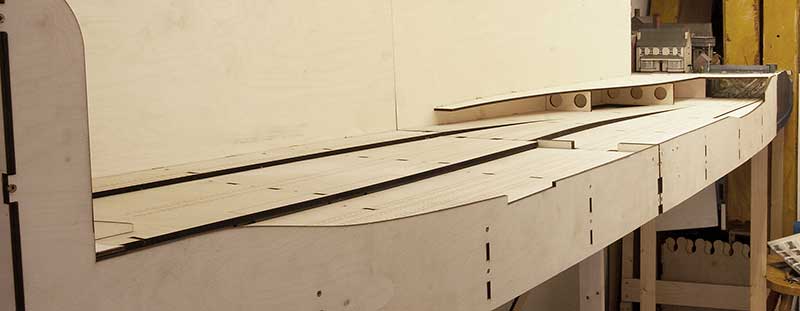 Overview of the 2 new boards. Unlike the previous boards the mainline is flat on these boards with the yard rising behind them. Kings Heath station was the inspiration for this arrangement. Time will tell if I need to get creative about how the wagons in the yard stay put.
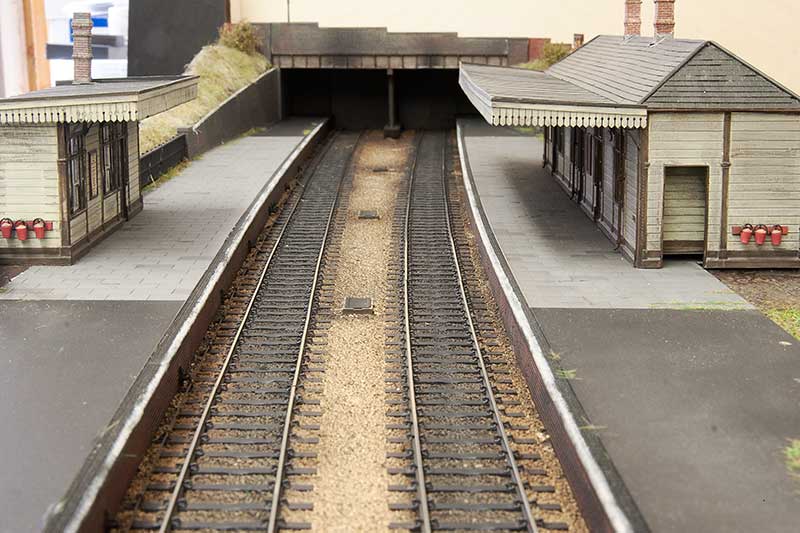
 Looking towards Stourbridge. The platforms will fill all of the view here along the mainlines I have a thing for stations with much longer platforms than the trains that serve them. I wonder if its because much of the northern half of the North Warwickshire Line had stations like this (as a kid our garden backed onto it)?
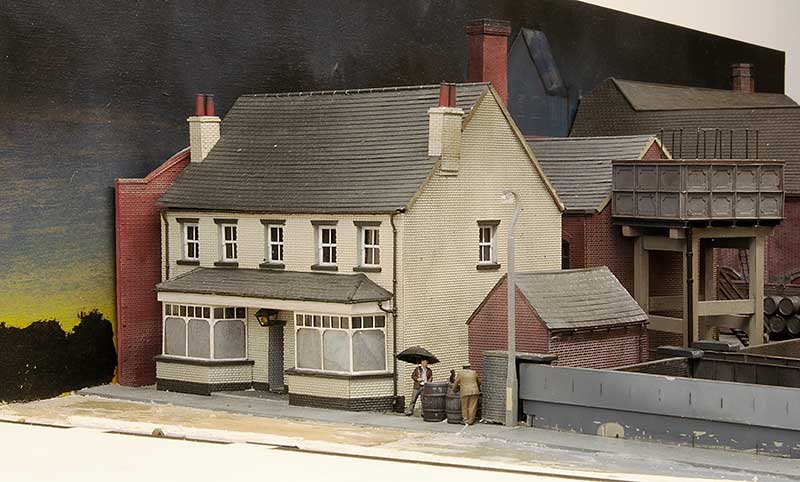 With hindsight it was probably a good thing I was a tad obsessive about the buildings and detailed up the side of the pub that, at the time of building it, I never thought anyone would see!