Just a spot of finishing off
Recently attention has returned to the main warehouse with the top floor being finished off and the ceiling added. 
 I decided on a sort of rest room that wasn’t lit. I quite liked the idea of light from deeper in the building coming through the internal windows and bouncing off the tables and chairs.
  On the main floor, again just a hint of activity.
 After much experimentation and having tried different materials (thanks to those who made suggestions) I have settled on black latex from a surgical glove for the Kirtley weather hood.
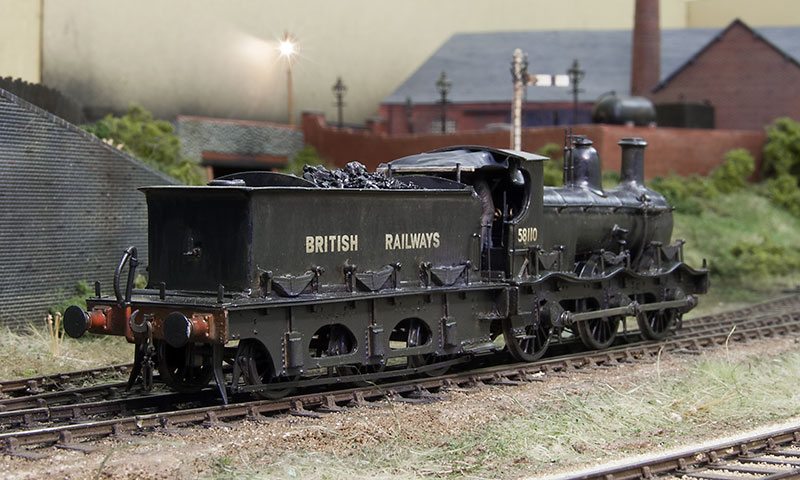
 After some good, constructive feedback I’ve made a few tweaks to the 94xx tank. The chimney cap has been swapped back to the original lima one which was mounted in my mini-drill and ‘improved’ with a sanding stick. The whistles have been replaced with a shielded set from Modelu and the toolboxes have been made 20 thou deeper.
  The 2 latest loco’s together. Is it me or does the pannier look like it dwarfs the Kirtley? Finally below another mood shot!
15th March 2017
 It’s been running for a while now and many of you have already found it but for those who haven’t I have a Facebook page. I’ll be posting much the same content as here but I hope the Facebook page can be used for people to ask questions too. It’s a bit difficult to ask them on the site unless it’s a topic I’m already talking about. That’s the plan anyway! Click on the picture to go to it.
 We are about to kick off out 2017 exhibition season with both Calcutta Sidings and Brettell Road due to go on the road this year. Calcutta will be out first at Scalefour North, the first weekend of April. Again click on the picture for more info.
On the subject of Phil (Calcutta’s owner) he has recently taken over much of Colin Craig’s range of usefull stuff. Phil’s new company is called Stenson Models and can be found here.
Haven’t had a loads of finished things post for a while.
So lets start with a buildings and a request, When I posted the image of the pub at night I was asked for a picture of the area in the light so here it is This also shows the water tower I was working on too, speaking of which…
 Remember the lower part of the Hornby water tower I was fiddling with and how I didn’t worry too much about details? This is the reason why – you can just about see it, if you know where to look!
  Moving on to some wagons. This is the Chivers kit for a Dia1674 LMS Bolster wagon. A nice simple kit to build although given the long wheelbase I did opt for Bill Bedford springing.
 This was supposed to be a quick win. I liked the local livery and thought that it would break up the sea of grey and bauxite wagons. Its a Bachmann product but an older one that was stretched to fit their 10ft wheelbase steel chassis. Some careful cutting in 4 places lost some of the extra length and while it is still too long it does now fit the longer Cambrian wooden chassis.
  I’ve finished off the vans I was working on too. Not a lot more to add about them really but here’s the pictures. LMS 6 wheel fish van – Chivers Kit.
 LMS GUV
  Palethorpes 6 wheel van
 And the larger bogie version – Transfers are from Cambridge custom transfers. Sheet BL153 covers the 6 wheel vans while sheet BL154 covers the bogie vans.
Finally aside from the crew and some coal (plus a slight warping of the footplate) the 94xx tank is done too. Here’s a few images.


94xx tank – thoughts on the footplate
With the chassis complete and test fitted thoughts turn to the footplate.  Left hand side. One little point to mention, I mounted the valve gear rivet backwards on the coupling rods as the hollow appearance seemed to match prototype pictures better.
I tend to carry forward things from one project to the next and stuff I’ve worked on before seems much more obvious in the future. In this case the splashers are too big and the rear one is in the wrong place. so these will need changing. Somewhere in the history of owning the model the forward footstep has broken off and been long lost.  The lower part of the firebox is much wider than the upper part – no doubt to accommodate the RTR mechanism. So this will need looking at. It also means that the details on it are all a bit flat.
  And after! I filed up new forward tank supports from a bit of H section. The forward steps are from a mainly trains etch, I replaced the steps under the cab too and the rear-most steps are knocked up from a bit of brass. The splashers were cut off about a mm from their base and remounted. the ones behind the toolboxes coming from a scrap chassis
  I carefully cut away the lower firebox sides – leaving the front bracket in place and made new sides from plasticard. The injectors were an enjoyable little project, soldered up from bits of brass and tube. Below is a close up of either side.
Return to the 94xx
A while ago I started work on a Lima 94xx tank I’ve had from my childhood. The idea was to match it to a high level pannier or Collett chassis as a quick project. However after speaking to Chris at High Level he decided that the 94xx wasn’t really like either and said he would be interested in doing a specific kit for the loco – the , at the time, recent announcement from Bachmann that they intend to look at the class too might have helped. Top view of the chassis before fitting the wheels – at this stage I decided to give it a basic coat of paint. Below is the underside.
  High Level Kits website
One thing leads to another
On a couple of forums people asked for more details on the Lowmac compensation shown last time so…
 This is the underside. It’s best to set everything up with normal bearings first so that the rise height is correct. Then a simple case of adding a bit of scrap etch for the axle to rest on.
 Once happy you can replace the bearing with ones that have been filed into a slot. This means the ends of the axle can move up and down, it really is that simple! On the subject of track holding…
 This is the Chivers kit for the LMS fish van (diagram 2115) of course ive done plenty of 6 wheeled bogies before but never a 6 wheeled wagon. Brassmasters do a clemenson chassis for 6 wheeled vehicles but as the fish van has stretcher bars I didn’t think it would work. To the right of the picture is a Bill Bedford pedestal suspension unit converted to inside bearings, the outer axles use normal suspension units. The plan is to join them all with wire so that the center axle can slide side to side. Speaking of 6 wheeled vans and clemenson chassis…
 A black country icon, the Palethorpes sausage van. this uses the ancient Hornby model (well 2 of them) and chivers sideframes. You can see from the picture where the 2 vans have been cut up to correct the length of the van as supplied. Note also the strange backwards brake lever.
 Where the fish van is quite open underneath these vans are not. They were fitted with onboard lighting and internal fans thus the dynamo and battery boxes. It’s all a bit cramped really!! Speaking of palethorpes…
 The 6 wheeled vans bigger brother. Surprisingly you only need 2 vans to do one of these too! the underframe is from the comet kit. And finally on the subject of bogie vans…
 the good old Lima GUV, fitted with new bogies and underframe details.
Kirtley finished (well nearly)
First up a short video of the inside motion doing its thing.
There’s still a bit of work to do on the Kirtley – add a crew and the weather sheet, some coal and the wet weather effect but its pretty much done. Below are a few pictures. 

 I have been doing a few wagons as an aside to the soldering iron.
  Another lowfit from Red Panda. This one has a Parkside chassis and buffers from my supply. I don’t know who made them or what type they are but they matched some of the pictures on Paul Bartletts wagon site Thanks to my friend Brendan for the lowfit transfers.
  The Dapol lowmac kit. Reworked with Lanarkshire models buffers, archers rivets and new axleboxes from the spares box. The brake lever is an etch and the ratchetey looking guide is from a piercing saw blade. This wagon is really too long to be rigid and there’s not a lot of room for any sort of springing or compensation units so the solution here (which I remember from a P4 society digest sheet years ago) is to file the bearings into a slot and use a bit of scrap etch in the centre of the axle to allow it to rock.
Kirtley part 3 – ready for primer
 My Kirtley project has reached the stage that its ready for primer. Buffers are from Lanarkshire models whilst the whistle and safety valves are from Markits. I’ve replaced the steps and cab roof with brass.
 Rear view. Some Kirtleys had a simple weather hood to protect the crew. It stretched from the cab roof to the tender front. Anyone got any thoughts on how to replicate this? It will need to be flexible.
Kirtley part 2
 The Kirtley kit came with wheels (00 obviously) I think they might be Romford. The above picture shows a comparison with a scale wheel (Gibson) and highlights a problem with 00 gauge steam loco’s While the diameter of the wheels match the oversized flanges mean that the splashers need to be much bigger to accommodate them. They are generally too wide too and sometimes in the wrong place. Some manufactures of RTR loco’s solve this by fitting smaller wheels.
 On the left the original splasher (and somewhat crude spring) and on the right my resized version/ I chain drilled a line of 1mm holes inside of the splasher (from the back) and added a new top from some scrap etch.
 The oversized splashers mean the boiler is compromised to fit around it. I modified it with some scrap whitemetal disks (from a southern Pride 310 kit – see, never throw stuff away!) Below is the loco so far with new splashers, springs and beading along the footplate. I’ve also mounted the chassis a tad higher into the body since the first image the other day.
trying a little tenderness.
I never planned for Brettell Road to be populated with anything other than tank engines but as with most things I have planned it’s all gone a bit wrong! So…
 I present you the Brassmasters easychas for the Bachmann 4f, not that its going in one mind you. I found a picture of an interesting little loco at Saltley in one of D.J. Nortons West Midlands books and there was a ancient kit for it too. However the chassis supplied is literally 2 bits of brass with 6 holes in it. It wasn’t really going to do!
The chassis has been built kind of as intended although I needed to shorten the tender wheelbase a bit. I also added a few Alan Gibson frame spacers to the chassis and a high level gear box (smaller motor is in the post) . The p4 frame spacers were a tad wide and I wonder if the EM ones might be better if you are following a similar approach?
 Having never built a tender loco before and figuring if you are going to do something you may as well go for the ultimate solution (or potential failure) I decided to have a go at Brassmasters working inside motion too. It certainly ticks the fiddly details box that’s for sure but was fun to build.
 This is what it looked like before fitting to the chassis. But what loco is it you might wonder?
 A Kirtley goods, I was attracted to its ancient appearance. These loco’s (the 700) class were introduced in 1869 and the last one made it to BR as 58110 being withdrawn in 1951 when she had seen 71 years service! The body and tender (shown losely mocked up) are the Keyser kit and the kit itself is nearly as old as I am. I’ve removed the springs to be replaced with something a little more refined and shortened the footplate so that it doesn’t overhang the bufferbeam, All the rivets have been sanded off, the ones on the smokebox were too crude and the tender of 58110 was flush riveted in the end. I’ve also reduced the with of the tender footplate slightly to add some 0.7mm L section from Eileens (the actual prototype being very thin in this area and nothing like the chunky cast floor thee kit comes with.
Containers and other things
I picked up a few Parkside container wagon kits at Scaleforum and over the last week or 2 I have been putting them together. Along the way a Bachmann example was added too as it was cheap and had the smaller container that I was after.
 Above are the Conflats themselves, the 2 on the left being the Parkside ones and the 3rd the Bachmann one. The first one is built as intended with the usual additions of buffers and brake pipes from Lanarkshire models, safety loops from Bill Bedford and tie bar from Eileens emporium. (I’ll come back to the chains in a moment). The second one uses the Red Panda underframes as a lot of those pictured on Paul Bartletts site (link here) seemed to match this configuration. For the Bachmann one it looked a bit of a faff to sort out the underframe as the brakes were set for 00. Strangely Bachmann had the wrong brake levers on either side meaning that the brakes wouldn’t actually work anyway as lowering the lever would pull the shoes even further away from the wheels! A Parkside chassis is the easy option and I had a spare from the second wagon.
  Above is a view of the different underframes. You could go much further than this if you wanted too but this is a representation of what I feel you can see in all the gloom. If you did want to go further then the obvious start point would be one of Justin Newett’s excellent etched chassis but even if you didn’t he puts his instruction on his site anyway and there’s some good references and info on how it should all look. Well worth clicking here! The wagon at the front is the BR clasp underframe.
  I mentioned earlier that I would come back to the chains and to my eye Parkside have been too delicate in the details on this kit. There’s a tendency to think that finer is better but I don’t think it works here. The chain I used is 23 links per inch from Langley models Which as supplied has quite round links with a twist to them. You can see the original shape on the container on the right. To get them to the more lozenge shape it’s simply a case of putting one end of a length of chain in a vice and pulling the other to stretch it. Nothing cleverer than that! The lifting shackles on the roof were also too fine and were replaced with spared from Justin’s Bogie Bolster E underframe detailing kit. In case you are wondering the wagon on the right was destined for the smaller container which is why the raised links are towards the middle.
  The finished wagons – Both large containers were sprayed with Halfords Rover damask red. The apparent difference being due to the weathering. I might be stating the obvious here but it pays to weather the wagons and containers separately meaning the weathering process is earlier in the build than normal.
  The shackles are from Roxey models and use the same Langley chain links. While a little fiddly it does mean that they can be assembled without resorting to the soldering iron! I didn’t use the supplied eyelets for the containers as I felt they didn’t really look much like the prototype pictures I was using so I just used a bit of fine wire instead. Once the chains are in place it worth treating them to a thin coat of ZAP thin CA (the pink bottle) to set everything solid.
 I’ve been doing other wagons too. Above a Dia 1/002 Lowfit from the Red Panda kit.

D2109 LMS 16t mineral wagon from the Cambrian kit A couple of Banana vans – Wrenn bodies on Red Panda underframes with additional details.
  And finally a couple of brake vans – on the left the Airfix kit with Bill Bedford springing and extra details. On the right Hornby RTR.
Some handy links
Parkside Dundas (also for Red Panda)
Eileens Emporium (also for Bill Bedford)
More mk1s
As coach building continues for New Street, much of it is more of the same and to some extent so is this
Another Bachmann mk1, fitted with replica bogies and the usual details. Like the rest of my Bachmann based NSE liveried stock I repainted the blue to something lighter which I feel better matches the early vehicles so painted. The IC liveried coach behind was completed at the same time.
Its that time of the year again.
 The Last full weekend of September is usually scaleforum weekend. I will be there with a collection of DMU’s (along with a EMU or two) dispensing my (erm) wisdom on the subject. If you are popping along please stop by and say hi. Full details can be found here
the other half of the Hornby water tower
A while ago I posted an image of the Hornby water tower building that I had converted to a disused pump house. Well waste not want not I decided to use the water tank bit for a small industrial tank.  Here’s progress so far. The Hornby tank, like the building it came with is a tad basic so I reduced its length a bit and added more framing from microstrip. The base it sits on was made from evergreen section using a simple jig and was sprayed with plasticote suede to give a concrete texture.
  The handrails are some very nice turnings from Modelling Timbers who specialise in stuff for ships. they are actually 1:72 scale.
The pub and little industrial building have also been finished and planted. Below are a few images. 

A message from High Level Kits

I would appreciate it if you could keep your eyes open for my GER Coffee pot which was nicked from my stand at Expo EM North on Sunday 18th Sept.
The model was built from one of my kits and to anyone who knows anything about models it would be fairly easily recognisable – it’s a fully etched kit with every conceivable detail. I’ve haven’t sold a lot of them and even fewer will have been built so it’ll be pretty rare. It was built to P4 gauge, numbered 227 and even the GER decals weren’t that easy to get hold of so, considering all the above, it might be the only one like that in existence.
If this was stolen to order, or by an enthusiast then they’re going to have to keep this model out of sight of any other P4 or EM modellers. The thief also stole the identification card from the stand which, at first I thought this was some sort of sick way of twisting the knife, but now wonder if it might be because they were an opportunist with no idea of what it actually and so took the card so they could quote it when moving the model on. For this reason, I would think internet selling places like EBay might be where it‘ll end up.
On the same day a Flat Iron loco in EM gauge was also stolen. Like My Y5, this had great sentimental value to its owner and was irreplaceable. If the two engines are offered together then it’ll be a dead giveaway.
Please, spread the word and keep your eyes peeled. The Police have been informed, but if you know anything contact me at chris@highlevelkits.co.uk
Class 11 finished off.
 Not a lot to say really, the class 11 is done and ready for service. Here’s a few pictures.

 OK so the irony isnt lost on this one but its a good comparison between the class 11 and class 08 shunters. Of course class 08’s never carried LMS livery in their early days while the class 11s did. It will be interesting to see if anyone ever notices that 12049 is a bit more than a repainted 08!
 Whilst I had my airbrush out the Mk1 got all mucky too!
 I haven’t done any photo-shopped pictures for a while but here’s a spot of shunting.
revisiting a class 47
One of my early class 47s featured a Lima body on an Athearn PA1 chassis as below.  This was done before I settled on the windscreen modification for the Lima 47 (I don’t think Shawplan actually had done them at the time) so I wanted to revisit it to make the face match the others on the layout. Along the way I had been collecting cheap ViTrains 47s so while it was in for an overhaul I swapped the chassis too. The results can be seen below.
back to the class 11 and a thought on coaches
My class 11 is ready for a visit to the paint shop  I prefer to give models a coat of undercoat when the basic work is done before adding details as this allows me to see any areas that need attention first. The rivets are archers and the ladders are Colin Craig’s.
 One thing you can’t do is just refit the brake gear as it will now sit too low and too far from the wheels. My solution was to trim the mounting blocks down and add new pegs from microstrip set to bring everything back in line.
  With plans afoot for my what if the Flatirons weren’t scrapped idea I have decided a short passenger train might be in order to go with it. As such I picked up an old Bachmann Mk1 suburban for a fiver on eBay and set to work. Starting with the bogies.
  These are the older style Bachmann bogies and P4 wheels would have simply dropped in but the out of line brake shoes kept catching my eye so I mounted them on my own etched subframes (available from Brassmasters). The top image shows how much of the original sideframe is reused.
  The principle work done to the mk1. Starting from the top the roof ribs have been reduced in size, Replica Railways windows have been added, bufferbeam details and steps along with underframe details from Masokits and Replica.
making a start on the left hand upper side.
I was recently asked for a track plan but I thought a satellite style image was better so here it is.
 While the left hand end is coming along pretty well the right hand side is looking a bit neglected so more building work is required, starting with…
 …a bit of cheating. This is actually to go behind the large warehouse on the left and is a blatant short cut. The reason for its existence is an excuse for the chimney, perhaps when the warehouse was a factory in its previous life it had a small steam engine or something? In truth you will only see the chimney so I could have missed out the building completely or just used a box but I had an old Hornby water tower so why not just use that instead? I knocked up a new roof, gave it a light dusting of red primer and blanked of the windows with a bit of scrap ply I just need to paint the door and weather it.
  No such short cuts on the more visible bits though. This little building is based on a picture I found on the brumpic site. Construction is 2mm card clad with plasticard while the arches are left overs from New Street. The steps are plastruct and microstrip.
  The real life Brettell lane and surrounding area has an awful lot of pubs so I decided to have one on the layout. Construction is the same as above and the windows are modified Brassmasters ones. The roof slates are from Mr Horns laser cutter.
  This is the rear view in roughly the position it will occupy on the layout. I knocked up a little store hut too.
  I find things like guttering to be strangely therapeutic. The actual gutters are half round brass from Eileens while the rainwater downpipes are 1mm brass with a single strand of electrical wire double wrapped to form brackets. Experiments have shown mounting the gutter brackets on top of the wall is the most robust way to secure them with the roof adding extra reinforcement later.
Some more plastic bashing
I fancied a diesel shunter for Brettell Road. I was quite taken with the idea of bringing my decades dead mainline class 03 back from the grave with a High Level Chassis but as I though about it I drifted away from the idea. A quick win would be just to get a Black 08 and swap the wheels but where is the fun in that?  So what I have ended up with is basically the class 08’s older brother, the class 11. Work so far started with a Bachmann 08. I fitted the smaller 3ft 11 wheels and Brassmasters coupling rods. Some general underframe detailing has been started along with the spring overlays from Mr Horn. Rather than file off all the bodyside doors I thought it easier to just replace the bodysides so that I had a nice flat base to work on.
  The cab roof of a class 11 is a lot more like a continuous curve than the 08 and it just so happens that when lima did their model they completely cocked it up! So much so that it appears they might have been working from class 11 drawings as it seems to match pretty well. So it’s a no brainer to swap the cabs over. I have also reduced the depth of the bufferbeam and will need to relocate the buffers.
A modern takeover
If you can call diesels modelled as they appeared 30 years ago modern, a few have escaped from New Street and ventured to Brettell Road. They have since been rounded up and shepherded back to their own world! 


illuminating secrets
 What we have here is a typical midland type yard lamp from RMLectronics, link here They kindly supplied me an incomplete model as I wanted to change the flat ladder supplied (an understandable commercial compromise) with one of Colin’s 3d versions. I felt the light was a bit white so I painted the LED with some revel translucent yellow. The effect of this can be seen below.
  Although Brettell Road is basically a personal plaything there has been interest in it going out to an exhibition or two at some point. With this in mind I have included a couple of viewer friendly hidden details in the warehouse for those who like a good look at little details.
  First up a lorry unloading scene using a modified base toys lorry and a couple of Airfix platform figures painted to look like factory workers.
  Secondly a hand crane included to give a suggestion of how goods get from one floor to the other. This is very loosely based on one at the SS Great Britain museum in Bristol (well worth a visit if you are in the area. There are a few remains of the railway there too along with some old wagons that are also worth a look.)
More progress on the warehouse
 Work has progressed on my warehouse. Starting with bedding in the building and adding the now familiar neglected feel to the end of the sidings. Just need a light airbrush of general gunk colour to tie it all together.
  I’ve installed the second floor which means the final lighting for the first floor is also in place. I used self adhesive copper tape instead of wire and found it made things so much easier. Something ill definitely be adopting for the other floors and buildings
Finally a couple of pics of the Deeley tank parked up for the night. 

who let the cat in?
Picking up where I left off last time, a few more dark pictures.

 I’m sure we have all had the frustration of glancing something interesting out of a train window but it being hidden away so that a proper look is impossible? That was the idea behind this image.
I’ve been building more wagons too.  More of the same! Another Airfix 16 ton mineral wagon and another 12 ton LMS diagram 1832A van from the Cambrian kit. (C101)
 I’ve done a Cambrian single plank wagon before too (diagram 1987, kit number C93) but the last one was a fitted example. The Standard 12 ton van, diagram 1/208 is a Parkside kit and is an upgrade for one of their older models (PC07A)
 A few more Parkside kits. The ‘french’ mineral wagon is one of their older kits (PC22) but I liked its quirky look, the prototypes for these were built just after the war . The 7 plank wagon is a 1923 example with fixed ends (PC73)
 Another Cambrian diagram 1667 5 plank open (C57) along with a Ratio GWR van of some description (v23 I think) this wagon is a bit of a freebie. I brought some cheap ‘random’ ratio bits and included in them was the sides and ends for 2 of these, the roof for 1 and no underframes. I had a box of underframes that I picked up from somewhere else so this wagon was born!
  Finally for wagons an ancient Three Aitch Mouldings kit for a LMS 20 ton coke hopper. Built with Bill Bedford W irons. I know Hornby are going to do one of these but building a kit is much more fun!
 A slight diversion as a GWR railcar trundles past!
 My warehouse is starting to look a bit more like a building now. The canopy is another old Arifix kit adapted to suit. I’ve mentioned before wanting to depict some life inside this and the following pictures hopefully do that.

 Most of the figures are Dart castings ones with a Bachmann gent thrown in. The last picture is the reason for the title of this entry as the cat is modelled on my own cat Moo! Anyway remembering that Brettell Road is set in the rain, Moo has obviously snuck in to somewhere nice and dry!