Pre-show tweaks.
Been doing some final pre show tweaks before Brettell Road heads off to York in a little over a week. 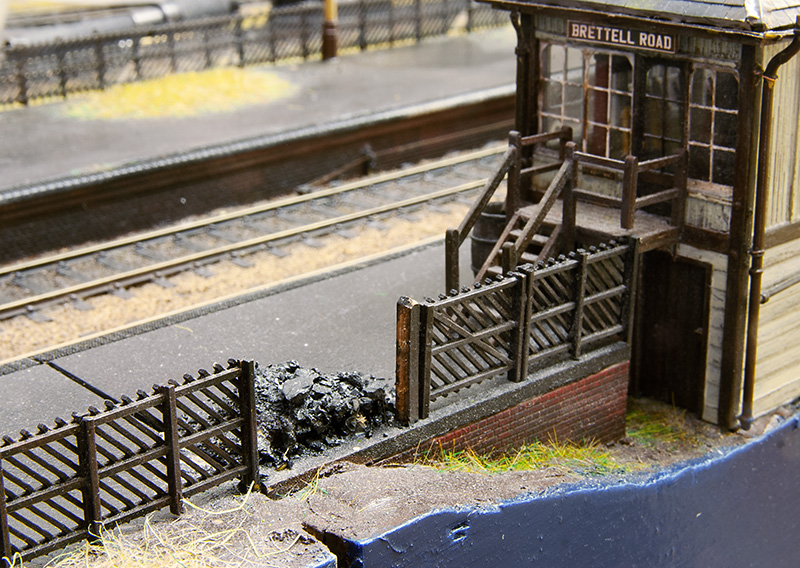
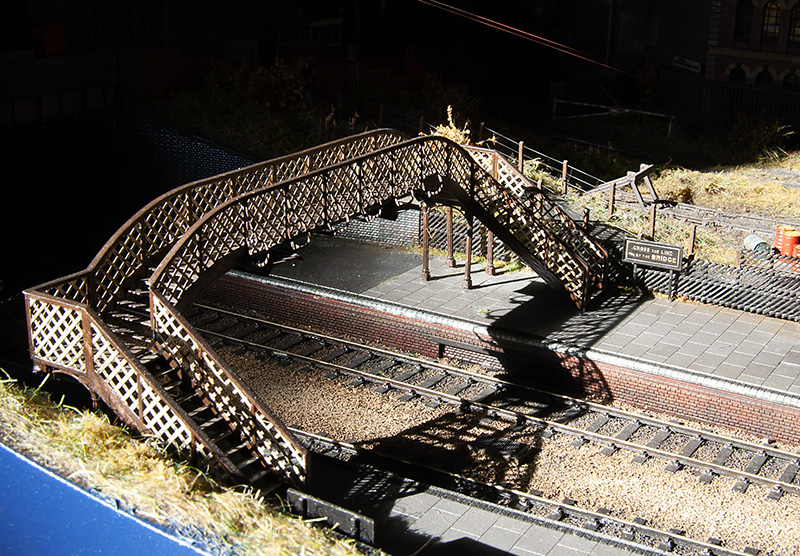
After the last show (nearly a year ago now) there was a little bit of damage picked up. Nothing too major and the kind of job that I intend to get around to at some point but then don’t. Case in point this but of fence which got squished. 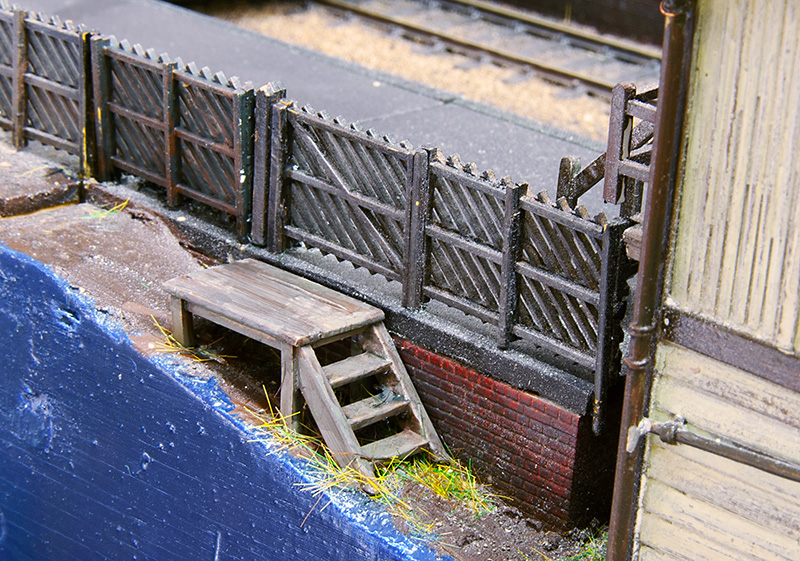 While working on this area I took the opportunity to add some rudimentary steps to the signal box. Something I meant to do at the start but didn’t. I had put the gate in but the poor signaller would break his leg falling off the edge of the platform! There was also a platform light that got bent and thats been repaired and replanted.
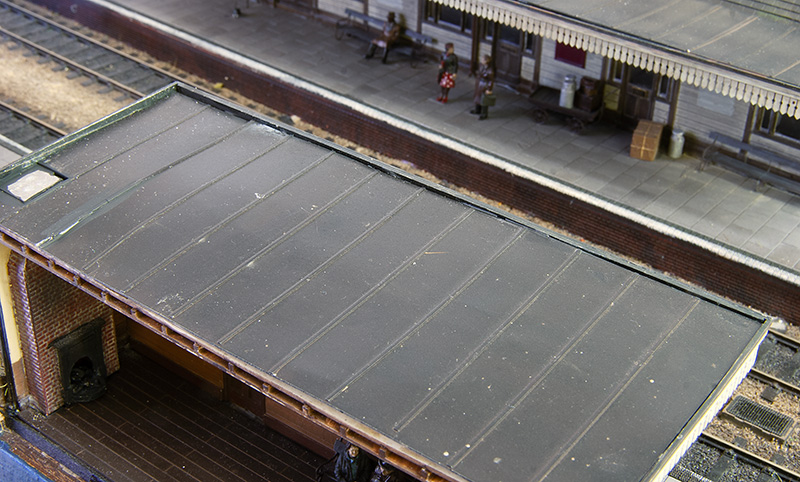 Something else that got bashed but didn’t actually break is the chimney on the platform shelter. This has very little clearance to the other board when packed up so rather than wait for it to get smushed I decided to make it removable. A few magnets popped into holes and a bit of steel on the roof and hopefully thats a problem averted. I also decided that the roof was a bit too vanilla for a building due to be closed in a week so I’ve had a look at this area too.
 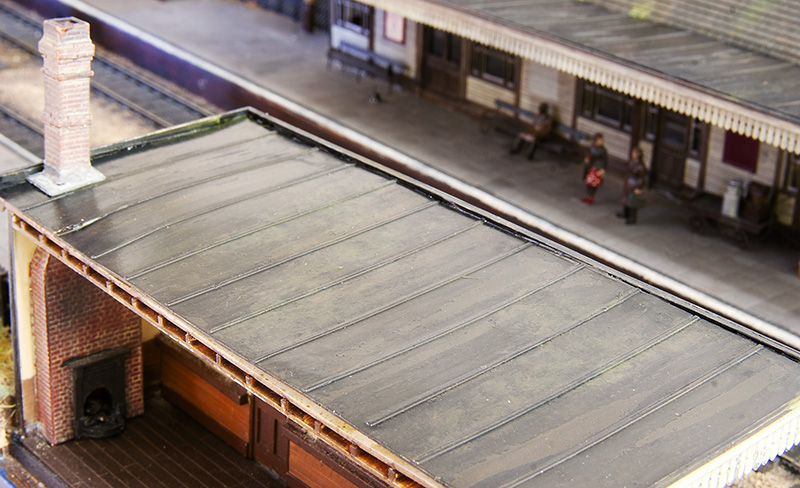 You may remember i talked about distress paint before when I was building the signal box and I’ve used it again here. For some reason it didn’t really crinkle up this time so a wash of Tamiya extra thin cement was painted on to add some more wear and tear. The mossy deposits are AK Interactive dark and light slime with some of their moss deposits.
Next is track cleaning and hoovering before packing the boards away, then the joy that is cleaning wheels!
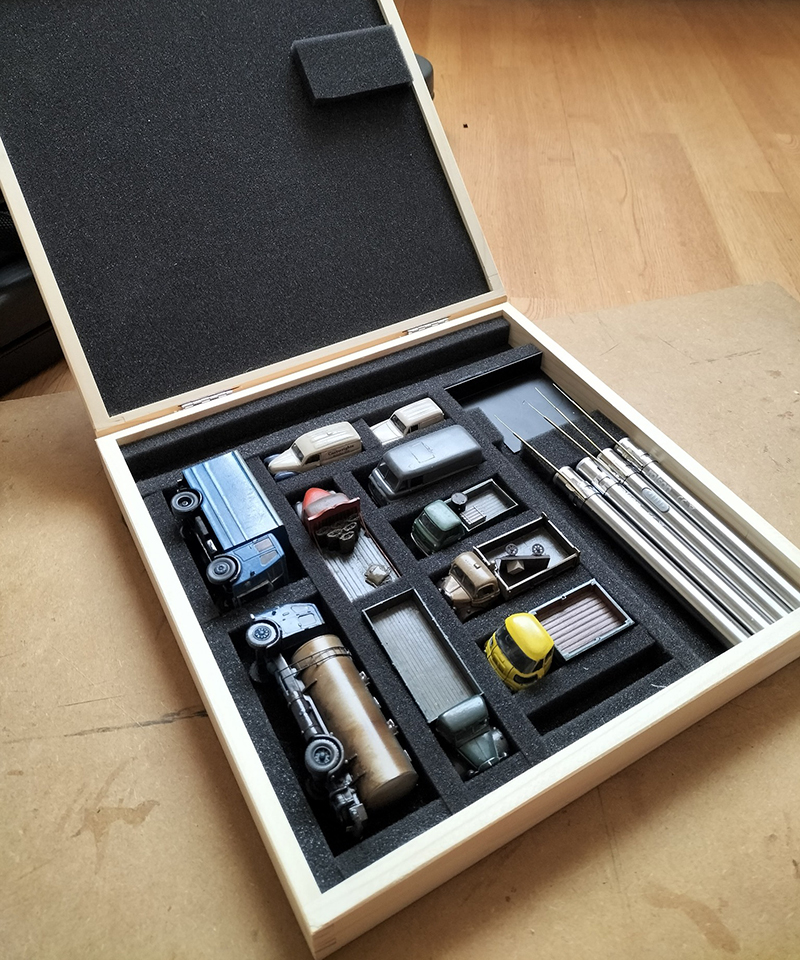 In an uncharacteristic fit of tidiness I’ve made a proper box for the road vehicles, removable chimneys and coupling poles. When I say ‘made’ I mean got a box off ebay for around a tenner and stuck some foam in it!
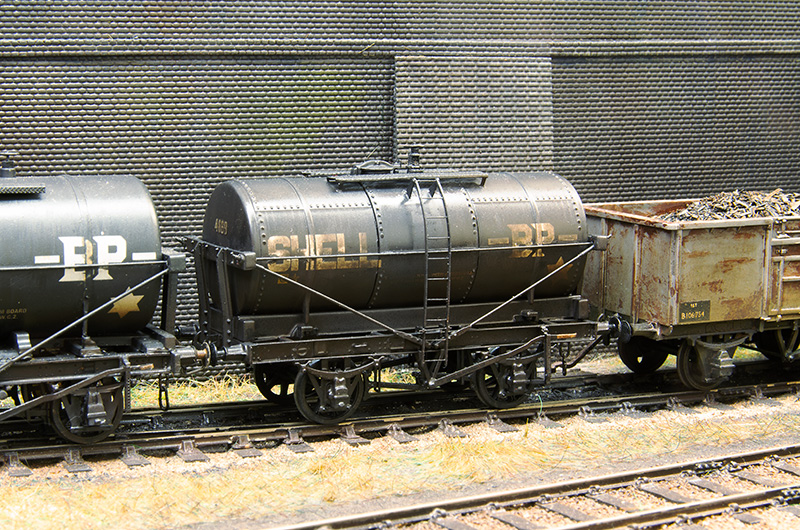
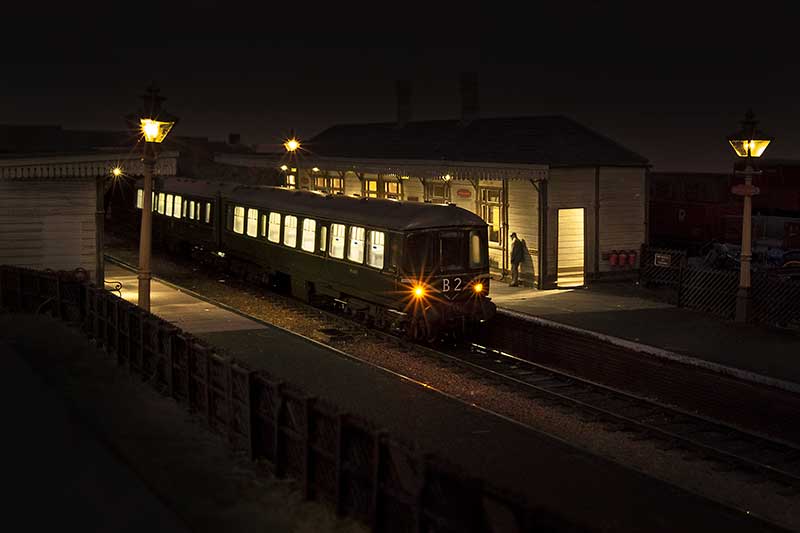
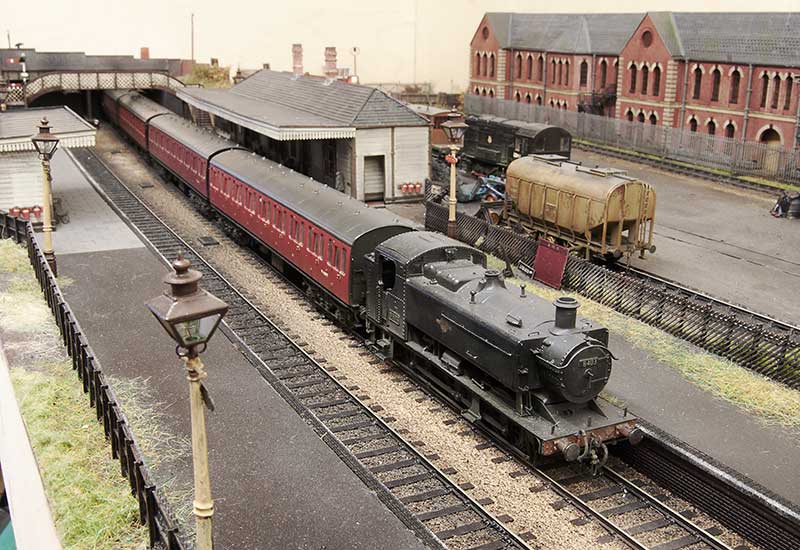
The saddle mounted tank I featured last time is done and tested. 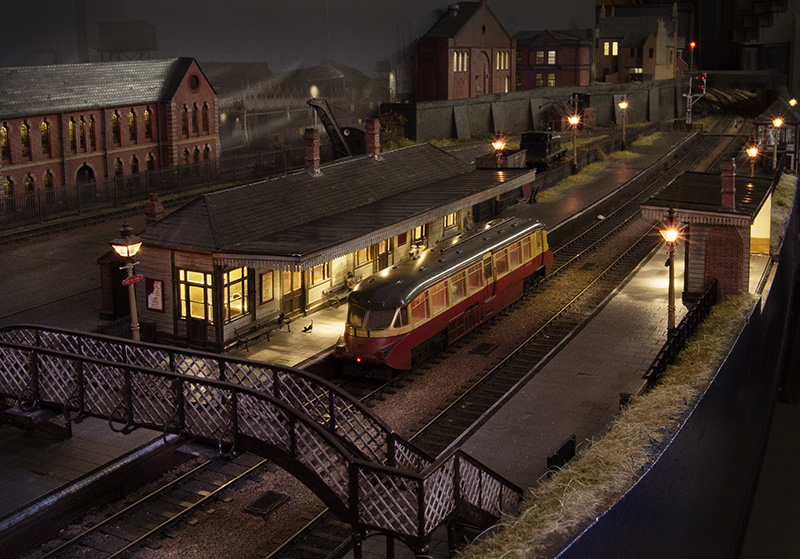 Finally Railcar W14 waits for the road. The cats are undisturbed by its presence.
Info on the York show. Please say hi if you are going.
A trio of tanks.
A trio of tanks this time starting with…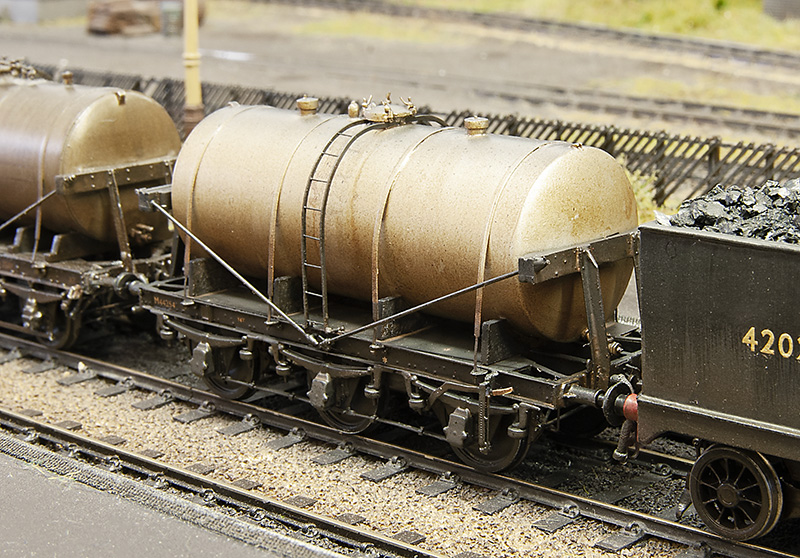 … the LMS milk tank I featured last time. Now ready for service.
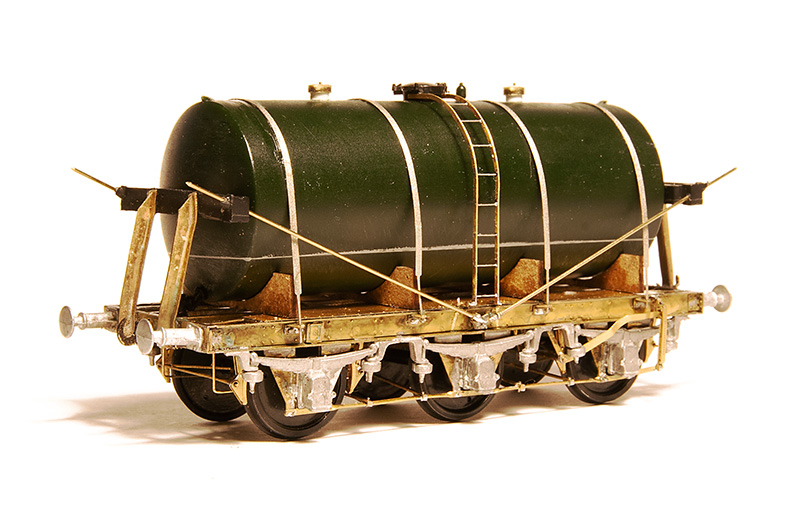
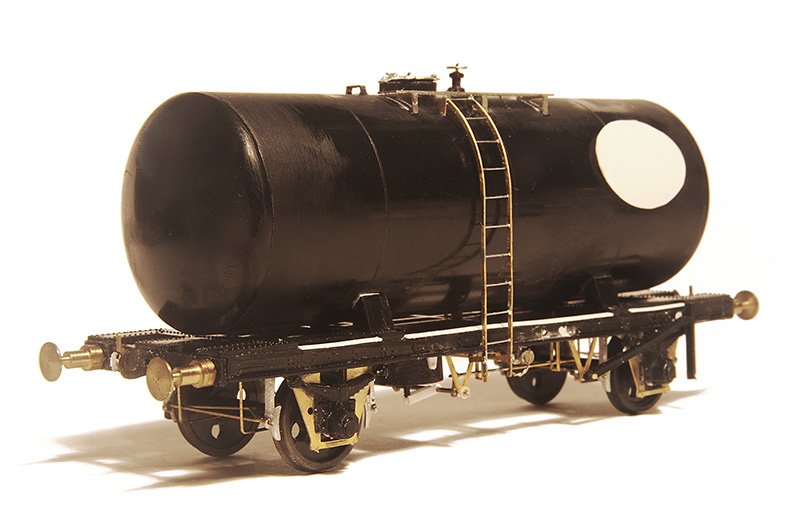
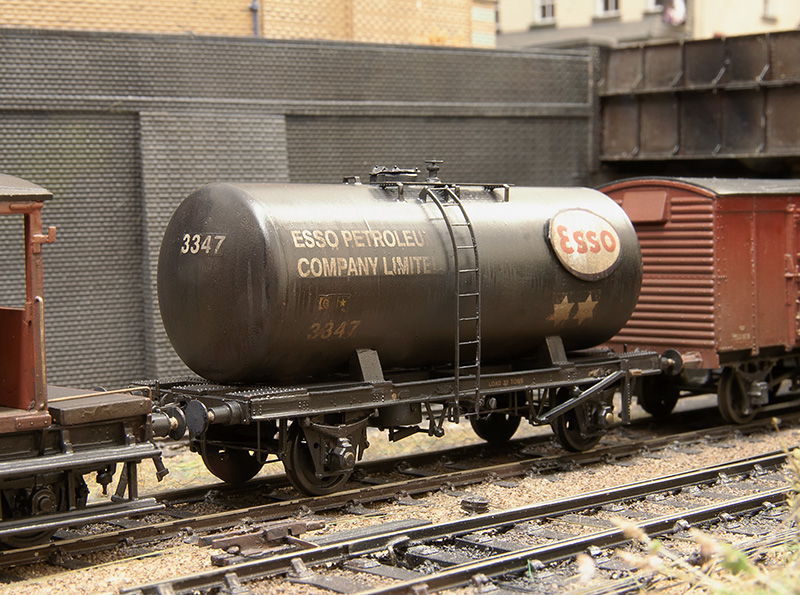
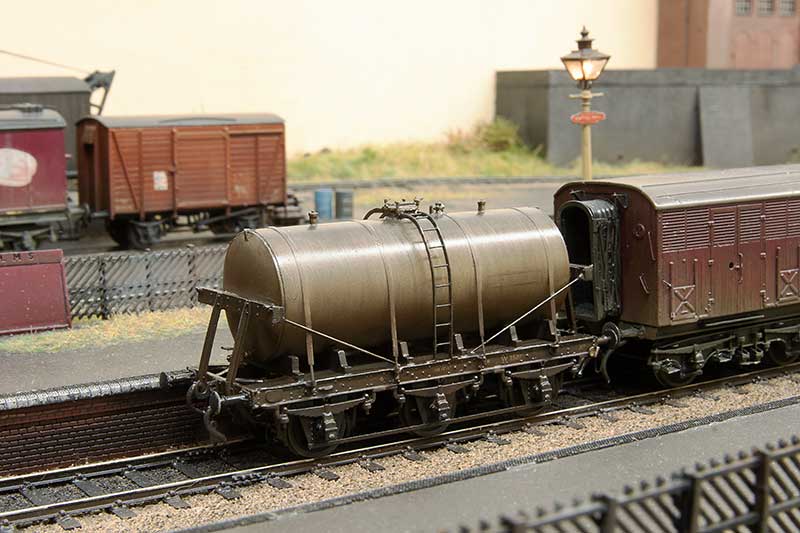
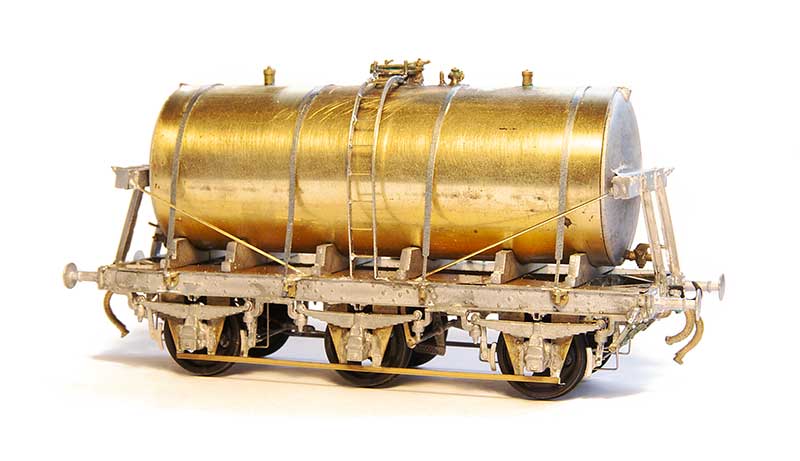
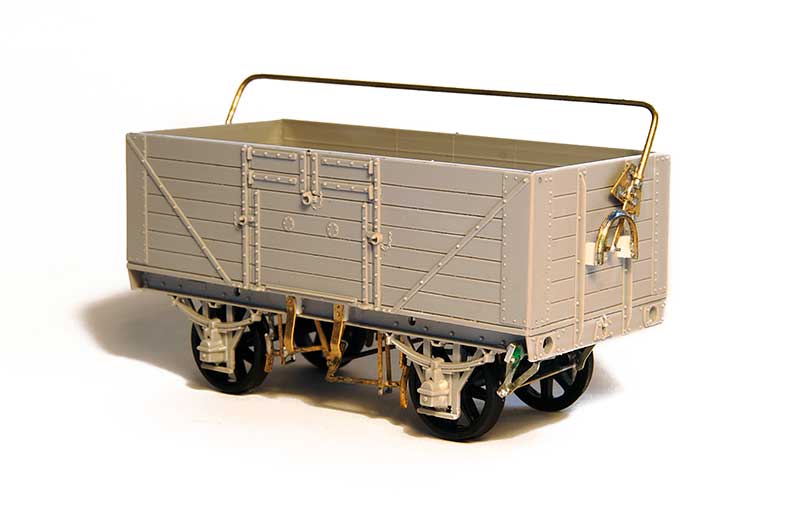
The Bachmann 14t cradle mounted tank wagon. Very much of its time with a very generic (and pretty rubbish if I’m honest) chassis. 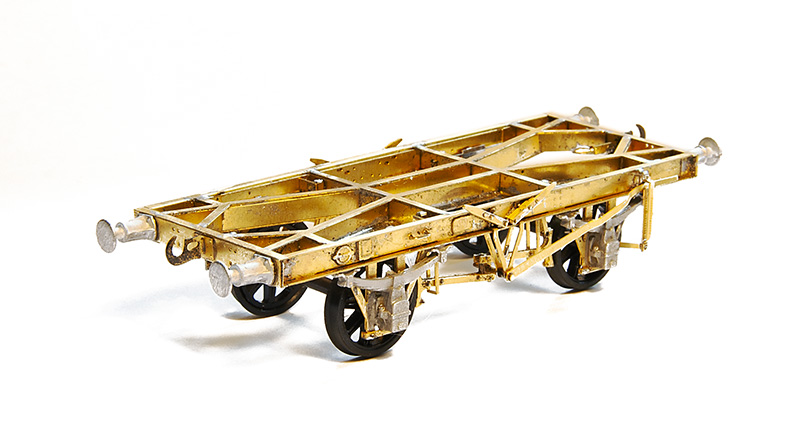
Luckily Justin does something a little more refined and very nice to build it is too.
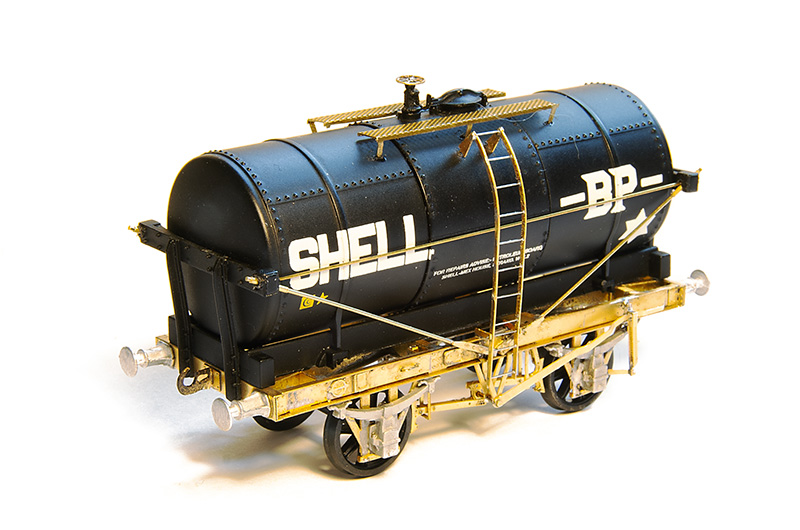
Ready for the brass bits to be painted. The ladder is only loosely in place. The walkway is from my box of useful stuff (I think Stenson models) and the buffers are from Lanarkshire Models.

Still sticking with the theme of tanks but is a slightly dubious way, work in progress on a 96xx tank. I originally picked this up quite cheaply with and idea to include it in my scrap train. Round Oak scrapped quite a few locos, but it didn’t take me long to decide to do it as a working loco instead. Especially as a picture of this very loco heading a freight train through Brettell Lane cropped up in my facebook feed.
As far as I can tell this model by Bachmann is an evolution of the Mainline model I’ve already used to do my 57xx tank, with a later cab and other refinements. All of the handrails are separately fitted but I felt the handrail knobs were way too big so I replaced them with Alan Gibson ones. I reused the long handrail but as its not so wide i had to cut it in half to lose a little from the middle. The sandbox fillers are too far forward as they were repositioned with RT Models linkages but not before the front splasher was cut down in height. A compromise for the over sized flanges on the RTR wheels and something that has entered my ‘now I’ve seen it, i cant unsee it’ mindset when looking at model steam locos. Smoke box dart is also Gibson and the lamp irons are from Masokits. I also replaced the pipes on the footplate. Some 96xx had a bracket half way along with i quite liked but unfortunately 9614 was one that didn’t.
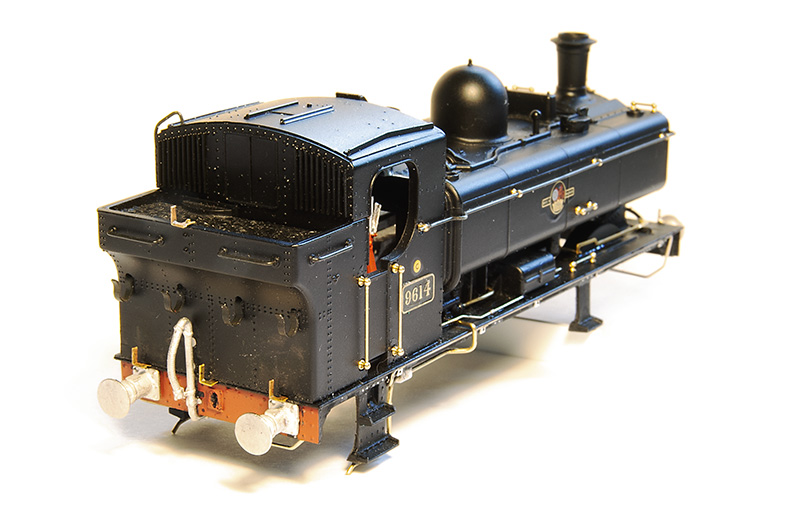 Rear view. The lamp irons were too high up on the bunker. This is correct for a 57xx but on the 96xx tanks they were lower. I was replacing them anyway. Buffers are Lanarkshire models. I prefer a better detailed solid buffer over a less detailed sprung one.
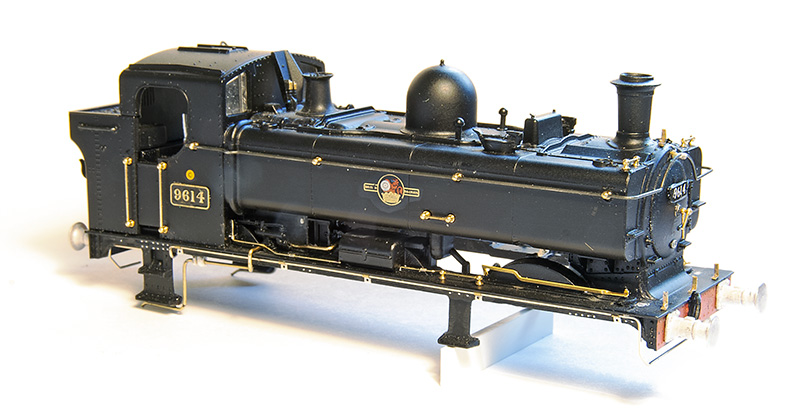
Drivers side. The pipework just in front of the cab is the same on both sides of the model. Again OK for a 57xx but on the 96xx they were different with a somewhat more barren look on this side. The footplate pipework is also routed differently around the cab footsteps. Chassis will be a high level one with my working inside motion bodge as described here. https://p4newstreet.com/an-unremarkable-little-tank-engine-part-1/
 Finally something that you will never see – Brettell road in the sun! It was coming in the shed door and caught my attention.
return to milk tanks
My history with milk tanks has been, to an extent unnecessarily convoluted. Originally I planned to build a David Geen kit for a midland one and I got the Rumney Models underframe for it in preparation. However when I came to get the kit from David he only had one left and that was for a GWR one. Justin kindly swapped the chassis kit for me and, as I’ve mentioned before, doing battle with my collection of bits I ended up with my model of a milk tank.
However the desire for at least one LMS one never went away and for more years than it really should have been I would discuss the idea of doing one using Rumney bits with a Lima tank when I saw Justin at a show. Apparently I wasn’t the only one
Well finally, heres what I’ve come up with, The only bits of the Lima one left are the tank – end supports and filler hatch. The rest is pretty much all Justin with buffers from Lanarkshire models and the tank supports kindly cut for me by Tim Horn.
The diagonal bracing is obviously over-length at the moment. The strapping isn’t tight and the ladder is just rested in position until after painting. This seemed much less of a fight than my other one, so much so that I’ve ordered bits to do another 2.
A batch of good old Airfix kits
I recently picked up a batch of good old Airfix wagon kits. There were 4 brake vans, a 35t tank, a 16t mineral wagon and a cattle van. Of those one of the brake vans was finished and another one along with the 16t mineral were semi completed. I really wanted the brake vans as I had identified a need for more BR ones and more that were fitted as up until now I didn’t have any at all, just a couple of piped ones.
 Note to self – if you’re going to batch build some wagons don’t pick ones that have loads of different sized handrails!
 The first 2. A piped one and a fitted one, both built with Bill Bedford W irons, Rumney models springs and axleboxes and additional details.
 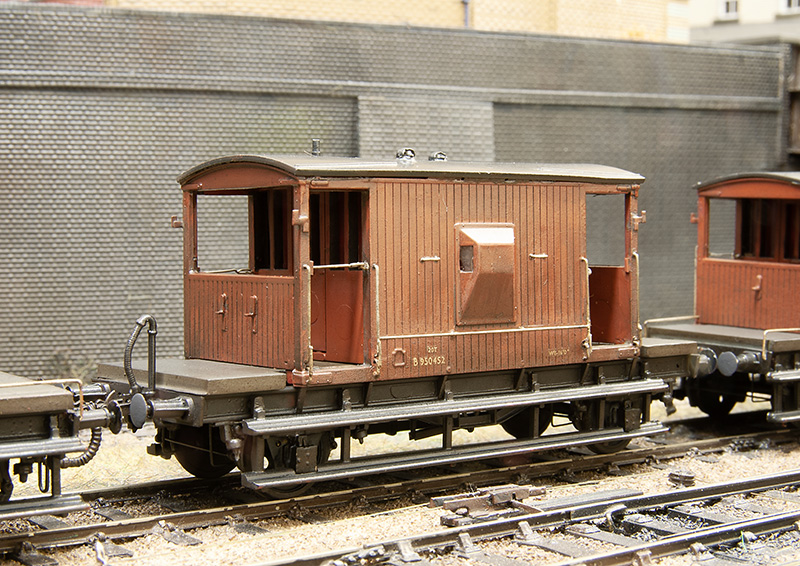 This one is a BR build of the LNER design note the shorter steps, no end handrails and different lamp irons. Build was the same as the first 2.
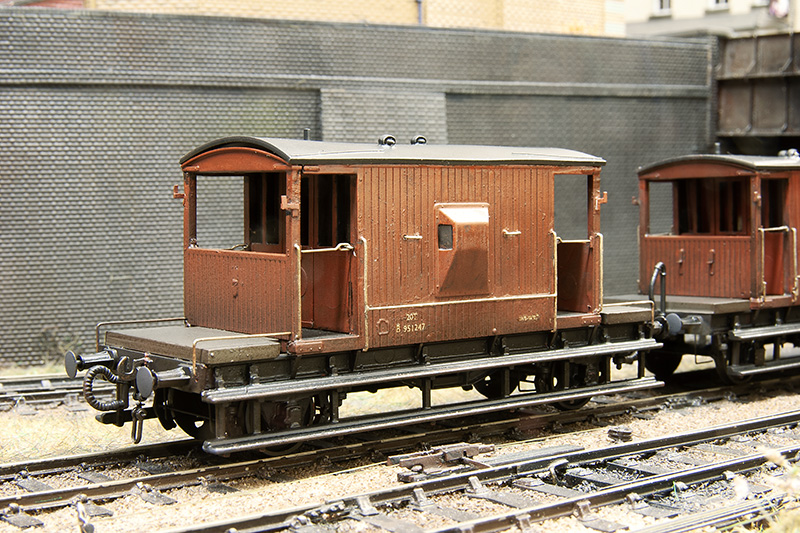
This was the last one and the one that was already built. I replaced the handrails and roof and added the same details as the other 3. This one is unsprung.
On to the tank wagon. Not one this done before. This is sprung with Bill Bedford W irons. As supplied the solebars are too shallow so I carefully cut the top rib off flush with the face and added a new top rib from microstrip. Buffers are from my draw of buffers and I think they may be from A1 models. RT models do a nice little etch for these and while the ladder supplied is really nicely done it is a flat etch so I replaced them with ones from Rumney models. I replaced the brake gear with bits from the spares box.
The finished wagon. Transfers are from Cambridge Custom Transfers.
Back to wagons – and a correction.
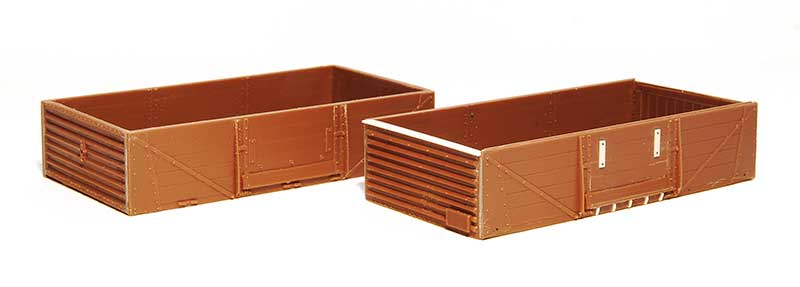
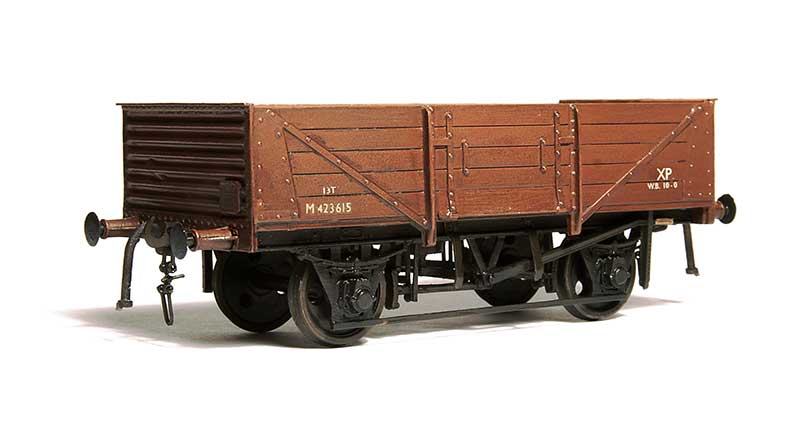
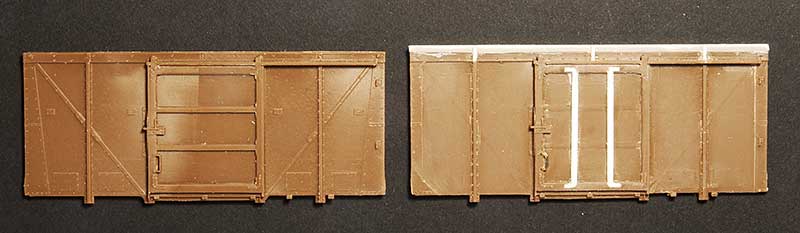
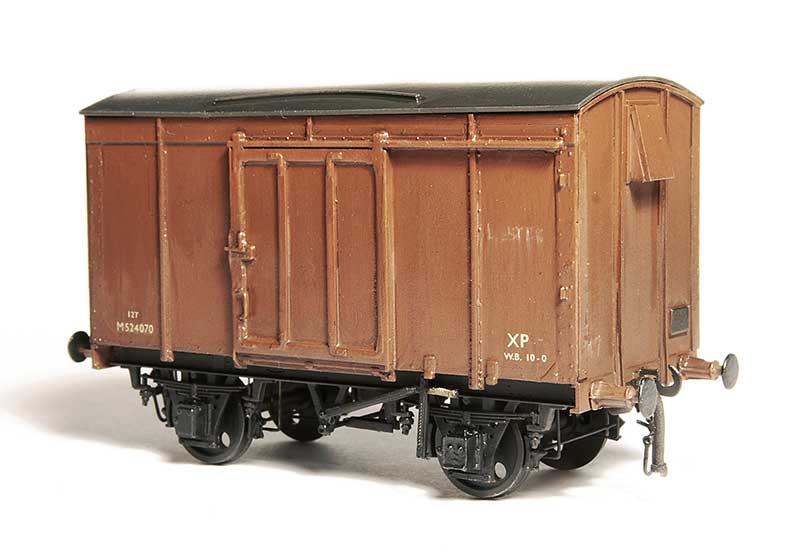
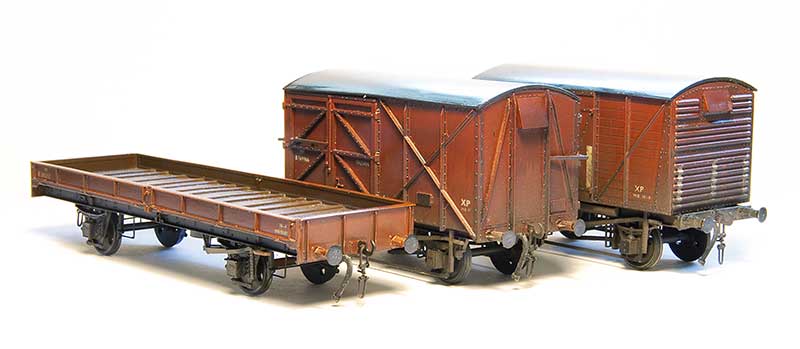
A while ago I did a batch of shock opens including an attempt at an ex-LMS diagram 1983 variant. Justin of Rumney Models noticed that I had used the same ends as the BR version with inset corrugations while the LMS wagon has corrugations that stick out. Something I had completely failed to notice myself. So that wagon had its top lip removed and renumbered back to a BR one. A new kit was brought (well a few actually – saves on postage!) and a second attempt made using cut down spare ends from a Parkside 12t van kit. The BR version is at the back. Theres a few other differences too like the bang plates for the doors, the shape of the panelling on the ends and the braces under the door.
 The finished wagon in the company of yet another D2150 13t open.
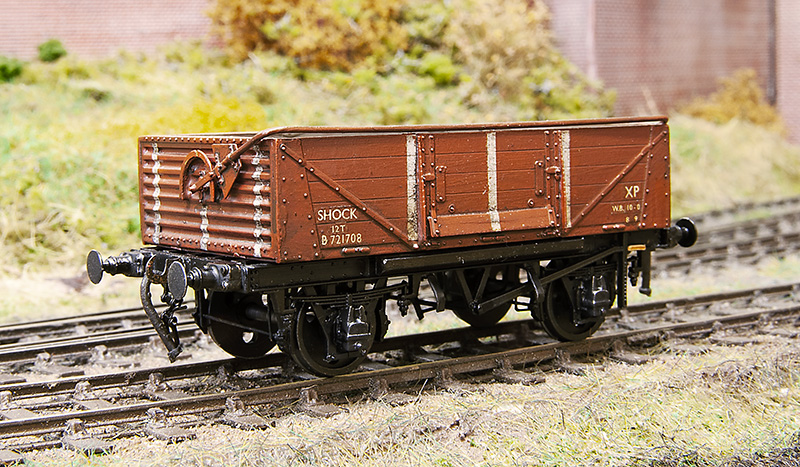 The BR wagon has had a Rumney models sheet rail added and been mated with a clasp brake chassis to produce a D1/040 variant. Buffers are from Lanarkshire Models.
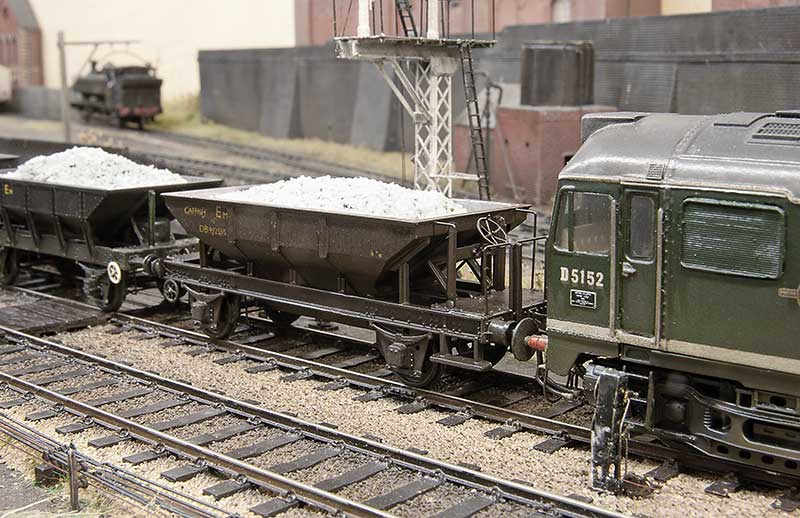
Moving on to a couple of hoppers. 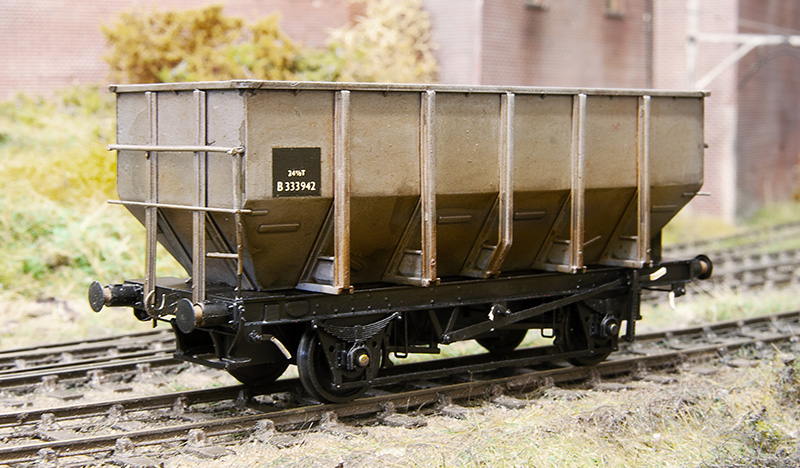 First up the Accurascale 24.5t hopper which i picked up cheaply from a private sale on Western Thunder. It came in brown livery and with a certificate saying it was a limited edition number 061 of 500. If this sort of thing matters to you and you have one you will be pleased to know that your model is now even more limited being 1 of 499 (You’re welcome!). It was separated into its component parts (a process that had already started in the box) and the body resprayed. These are not a straight drop in wheels job as the axles used are a little short and theres a boss on the back of the W-iron, much like Lima was doing 40+ years ago. Its not a huge problem though as a few turns of a bearing cutter (I use Ed’s tool) and a little bit of thinning the boss down and off you go. I also cut off the NM pockets.
What is a little bit more of an issue is it doesn’t weigh anything, just 21 grammes out of the box. Obviously if you plan to run your wagons loaded no problem but if you want them empty (as did ) then a little bit of trickery is required.
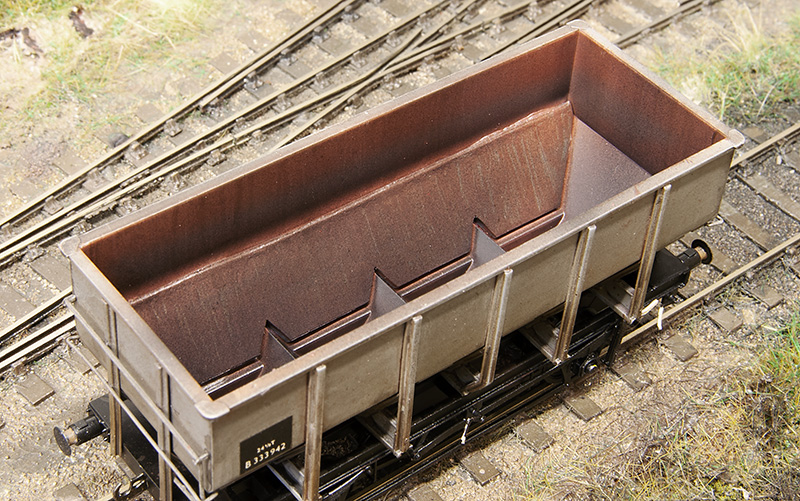 My solution was to make new lower sides from 1mm lead. This brings the wagon up to 50 grammes. If you would like to follow suit I drew up a little cutting template which you can download from here
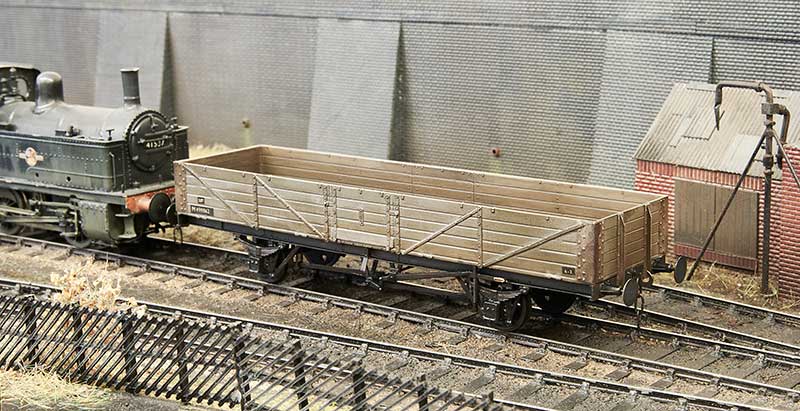
 Another parkside 21 tonner based on a picture that came up on my facebook feed. (some of the wagons in the post are waiting a delivery of couplings you may notice). Theres often a discussion when these kits crop up that they are difficult to build but they really aren’t. The trick is to assemble a side and end as 2 pairs on a piece of glass with a cutting matt to ensure they are square, let these set fully before assembling the rest of the wagon and theres no problems Any slight gaps between the panels can be filled from the inside using Mr Surfacer 1000 liquid filler.
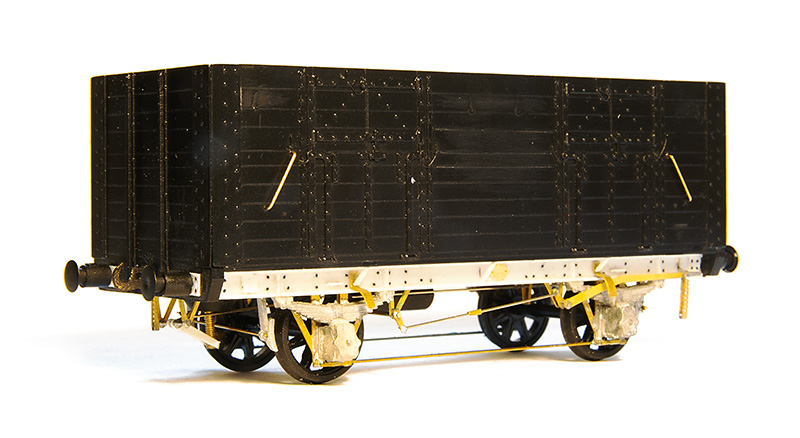 Now a few oddballs – this is an ex L&Y diagram 81 loco coal wagon from the old MAJ models kit. The kit is supplied with a wooden chassis which is correct for the earlier wagons but i wanted the later one so only used the body. The brake gear on these were a little weird to say the least
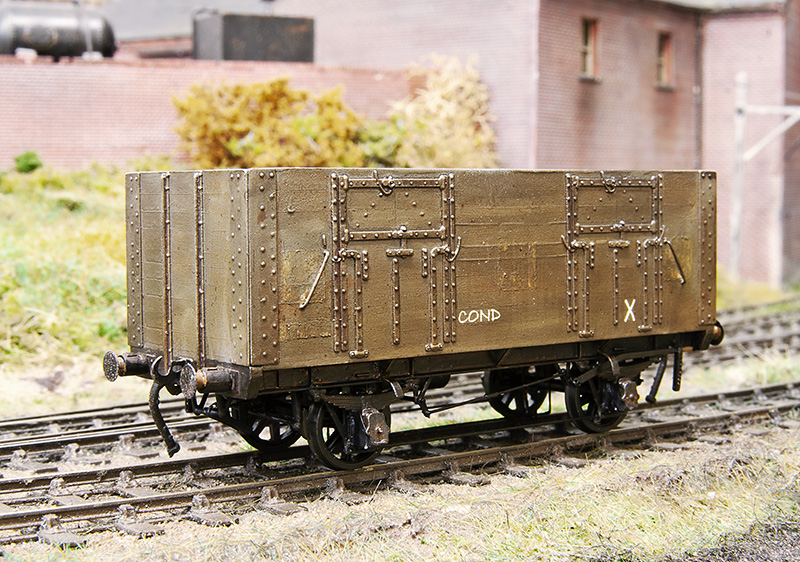 The plan is to have a short train of condemned wagons that is delivered to the yard as a trip working from Bescot. These are then to be collected by one of the Round Oak locos to be taken away for scrapping and the metal bits melted down in the furnaces. This is basically what happened and quite a few locos met their fate this way in real life. Unlike some of the more famous railway scrap yards stuff didn’t hand around for long so nothing from my scrap train will have any hope of reprieve sadly. The condemned markings are from Railtec,
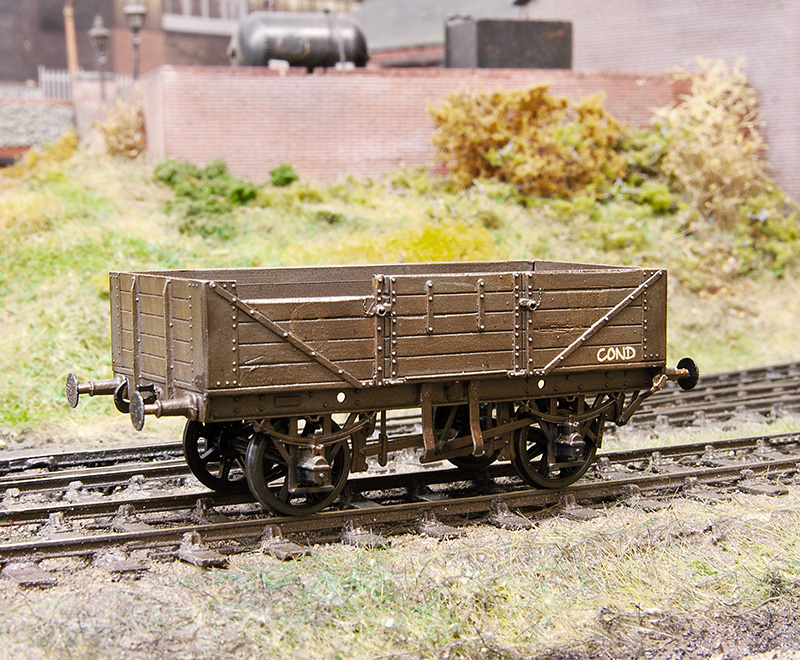 Another victim this time a GWR diagram 04 open from the cooper craft kit. Like another Coopercraft kit I’ve built this has the bearing holes mounted too low meaning that the wagon looked like it was on stilts. This one has slightly odd brake gear as well. You can just make out the old GW branding.
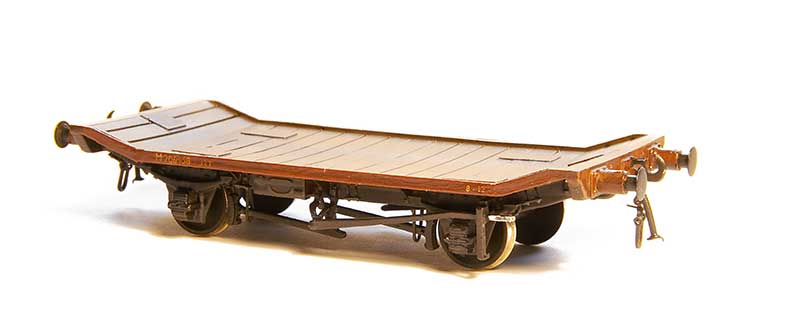
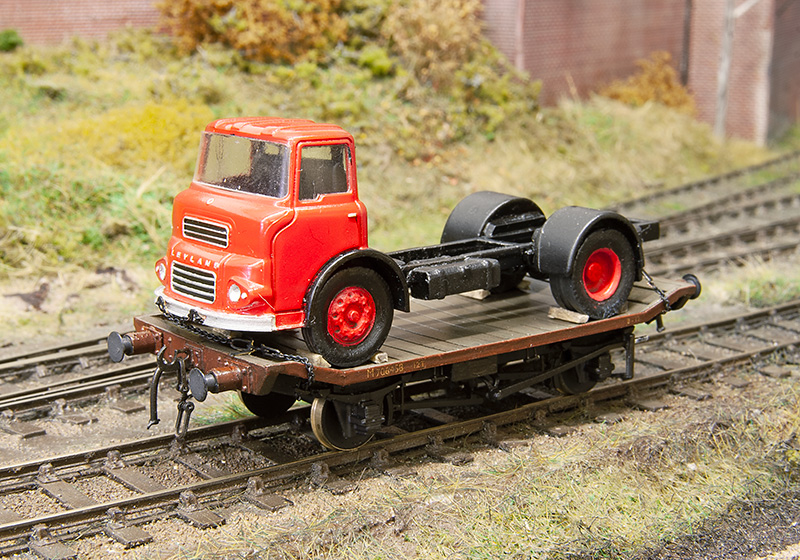 The LMS traction truck has finally been mated with its load.
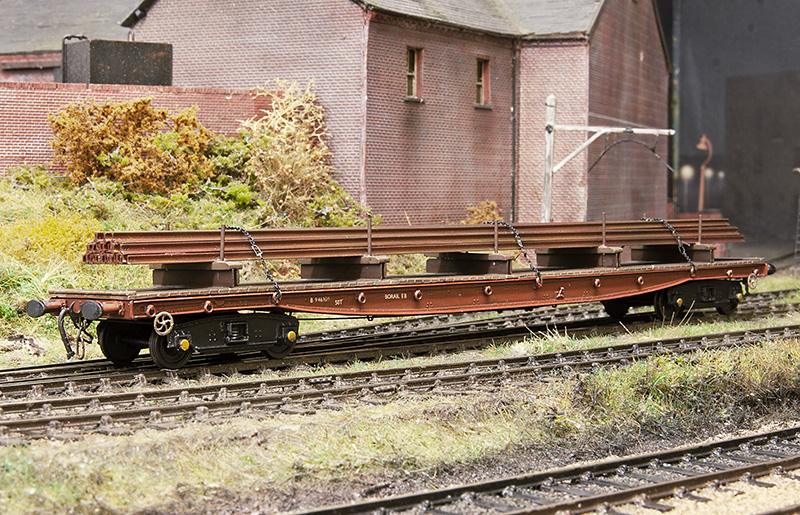 Also based on a picture that cropped upon my facebook feed is this Borail from the Cambrian kit. Making the load was far from the most interesting task I’ve ever done I can tell you and despite it being essentially hollow this wagon still hovered up 5 meters of rail!
shuffling and testing.
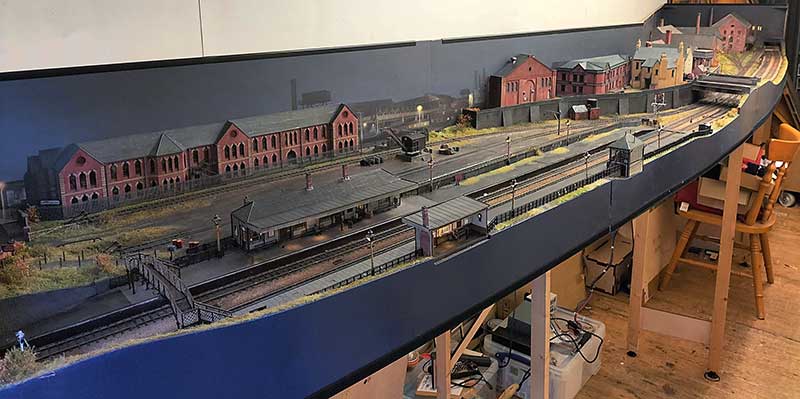
A bit of re-jigging of the shed means I have been able to put all of the scenic boards for Brettell Road up together. Its 5 months since the Cradley show – Time flies doesn’t it?
Theres a few things to fix after the show. A couple of the points needed a check over as they weren’t totally reliable. I also found 2 dead sections that hadn’t shown up during the show so I fixed those too. 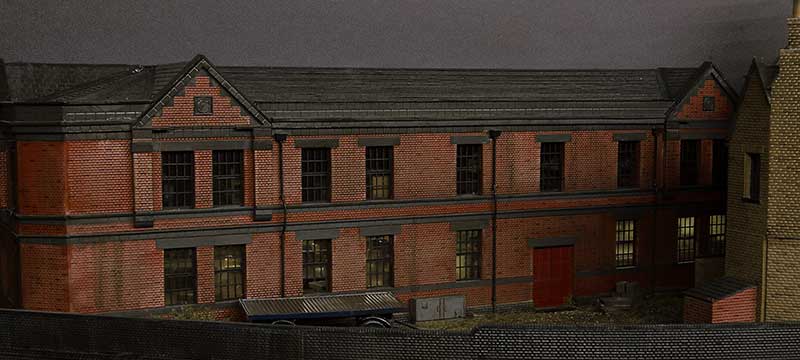 The lights on the upper floor of this building failed before the show but after the building had been planted onto the layout. It was too close to the show to fix it before so this is something to look at now I have time. I also want to add a few yard lights and sort out the telegraph poles on the layout because as they stand now they don’t make a huge amount of sense.
The other thing to fix was the route setting on the main lines. Signalling purists are advised to look away now! Before the track and signals were all operated separately via the throttles with only the yard set up as a route. (My Digitrax system allows me to program routes into it.) So thats been changed for operator convenience so that throwing a signal sets the route as well. I know the route should be set then the signal pulled rather than this way round. You can set the signals to danger on their own but in case you forget the routes will set all the other signals to danger for you anyway. I hoping this will be pretty simple to use.
 Since the show I have a small stockpile of new rolling stock to be tested. The rule is all stock must go everywhere without falling off, even though in this image only the middle road of wagons will go into the yard at shows. Of this little lot only 4 wagons were rejected and returned to ‘works’ for some fettling. These 4 have now been passed too.
Below, just some more traditional layout style pictures. 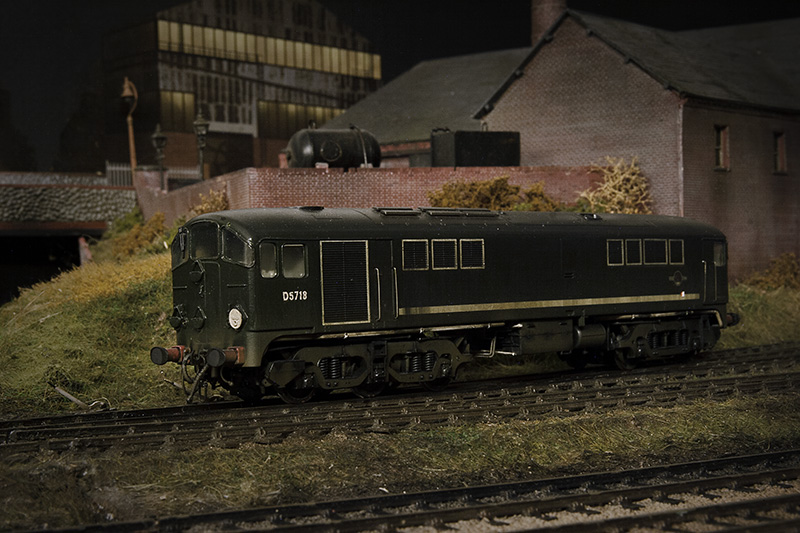
Clay and sheets
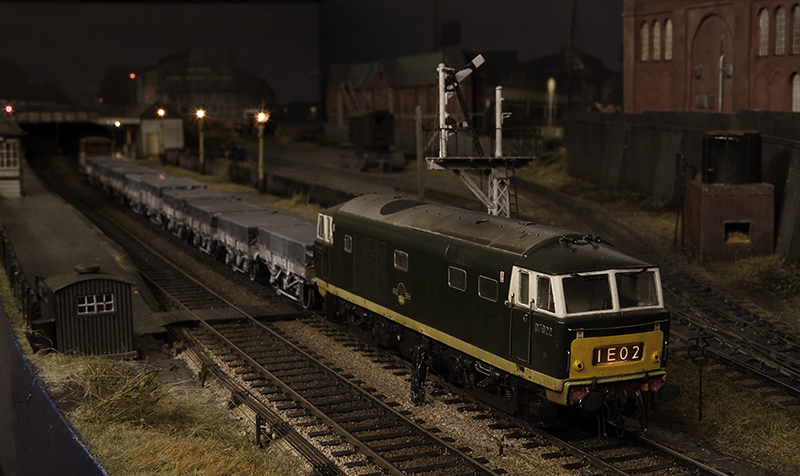
One working that passed through the real Brettell Lane and kind of fascinated me was the St Blazey to Etruria china clay working. This service ran for years and was somewhat erratic in the paths it took. Usually going via Worcester, Stourbrige then Dudley before heading off to Bescot. Or it could go right at Stourbridge via Old Hill and (I think) Soho Junction. These routes avoided the Lickey but I’ve seen pictures of it going that way too in later years. When I was at University in Stoke it would often turn up at lunch time behind a pair of class 37s although it did switch to a class 60 in the time I was there.
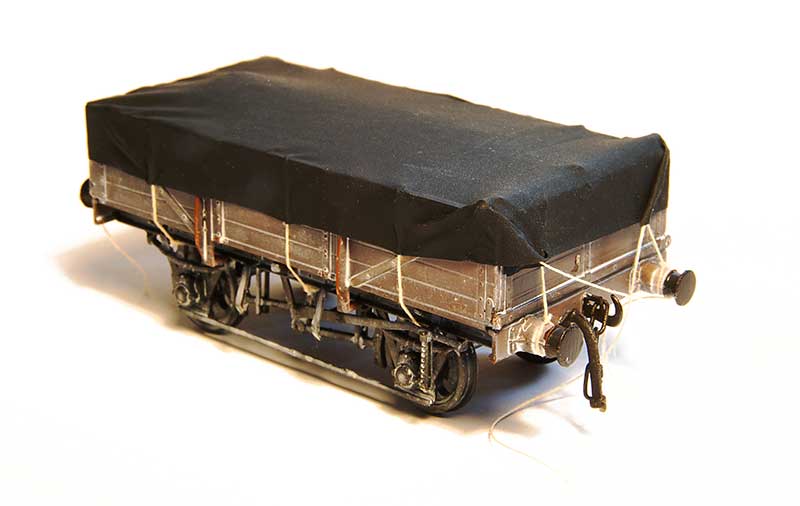
So to have a clay train on Brettell road makes sense as a through service. I like the classic diagram 1/051 clay opens with their sort of cute, baby open wagon look about them. A little bit of rewriting of history is needed though as they tended to stay in Cornwall and not venture out to the Midlands. Brettell Road is set before the introduction of the clayliner service so my justification is that BR was trialing things out to see how they would work and thats good enough for me.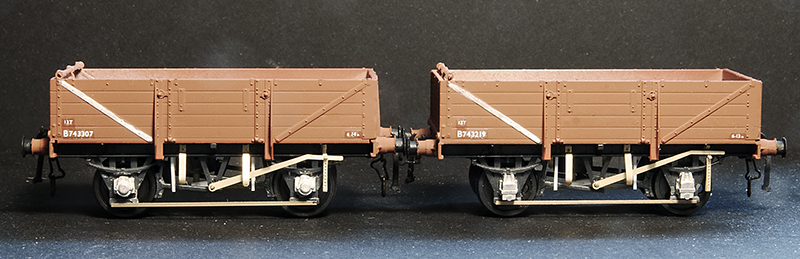
Ratio make a nice little kit for these and I was fortunate to find someone selling a box of 7 on Ebay for what basically worked out as a fiver each. The bodies go together well with a little bit of modification to make the ends fit. The kit features a somewhat crude attempt at a roller bearing and the brake levers are quite poor. It also includes cast buffers that aren’t all that great. So the bearings were replaced with MJT ones although my research showed oil axleboxes to be more common anyway. Brake levers are from the Mainly Trains etch, door bangers from Rumney models and buffers from Lanarkshire models. I did one as a test then built the other 6 as a batch.
Before I move onto the sheets a bit about the weathering. I followed my usual approach of a wash of dark grime followed by a spray of AK interactive dark mud. This was then all sealed with Klear before AK interactive white ink was used (in various levels of dilution) to give an overall effect of clay staining. You don’t want a fully weathered wagon at this stage, try to think of it as you are aiming for about half the effect you ultimately want.
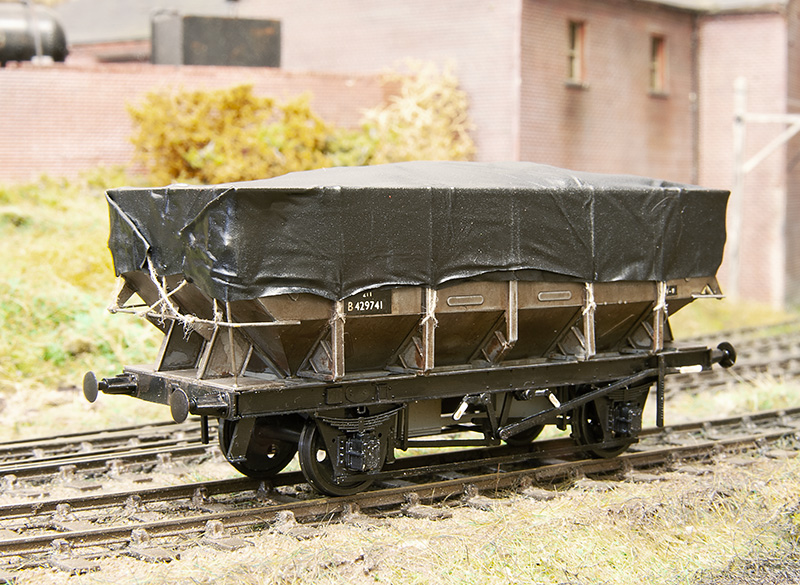
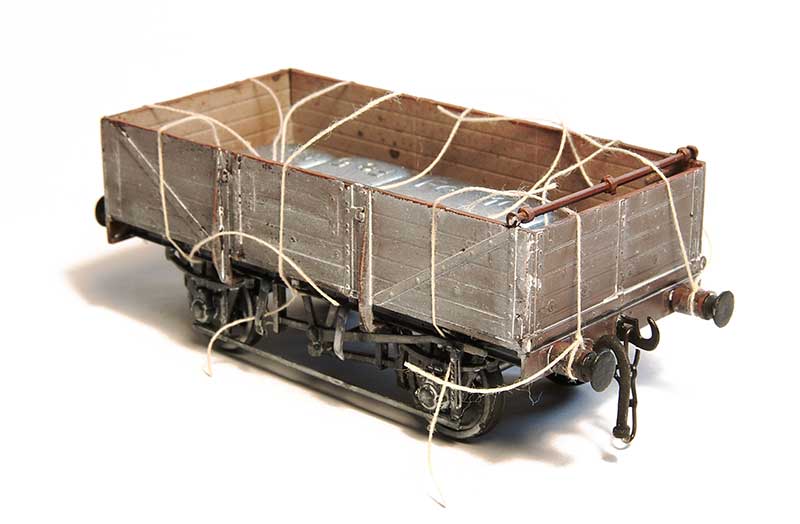
Previously when I have done wagon sheets I make the sheet up with the ropes attached to it and then attach it to the wagon. This is a bit of a faff and sometimes the glue holding the rope to the sheet can give an odd effect so I approached this a bit differently. Roping of wagon sheets is a whole topic on its own and I will leave that too someone who has properly studied the subject but I just looked at pictures and coped what I saw. So the first stage is to attach the ropes (cotton) to the wagon – Tying it on at the visible ends and gluing to the wagon top with Loctite
 This was then tided up by first sealing the knots with Zap Pink superglue. Theres no huge reason to trim the ropes inside the wagon but it pays to just keep things neat so they don’t get in the way later.

As mentioned before the sheet is made from black latex gloves (actually nitrile) and mine are a brand called Supertouch. They are a bit awkward to cut as the material tends to snag on the scalpel blade even if the blade is brand new. A method I found to work best is to stretch the glove over a bit of cardboard, make a template and to cut it using the handle end of the blade not the pointy end, pushing the scalpel away from you to cut. I don’t know why this makes a difference but it does! As i’ve mentioned in the past the material is black on the outside and a dark grey on the inside. I use the black side as its depicting wet conditions but the grey is good for a nice sunny day layout.
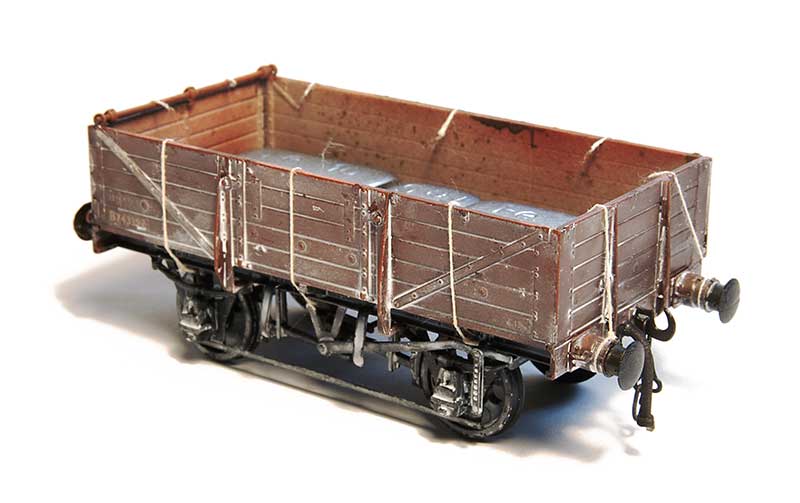
The sheet is then positioned in place, not forgetting to add weight inside the wagon and bulking it up with a bit of tissue first before gluing to the wagon tops in 6 places, about where the ropes are. Use Loctite and start in the middle (it sets very quickly) and remember to pull it taught as you glue the outer sides. This is one of those things were you probably need a bit of variation but you don’t want to force it. I find if I try to be as neat as I can, I’m not all that neat really and I get the variation by default.
Next stage is to glue the sides of the sheet to the ropes, again with loctite and again puling the sheet taught. I found holding it in place for 10 seconds was all you need. It pays to glue the sheet the side of the wagon at the ends at this stage
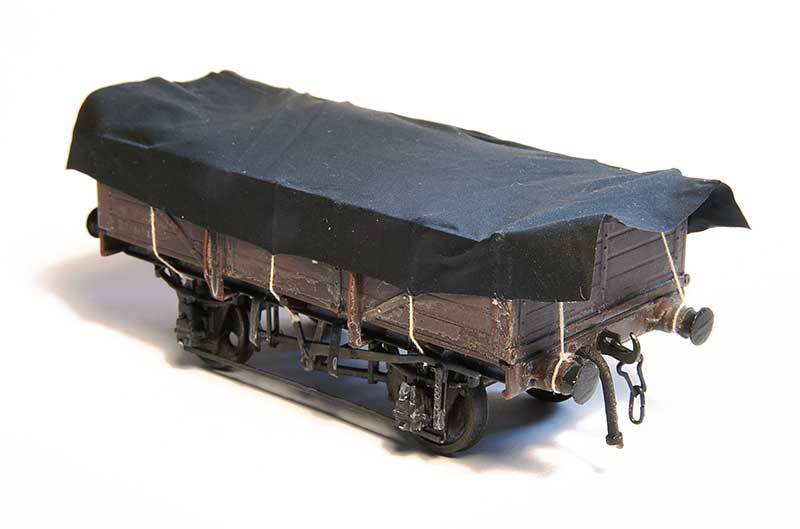
On to the ends. Another drop of super glue on the top and the sheet can be glued in place. The corners can be folded and secured in place and the last set of ropes glued into the sheet itself. 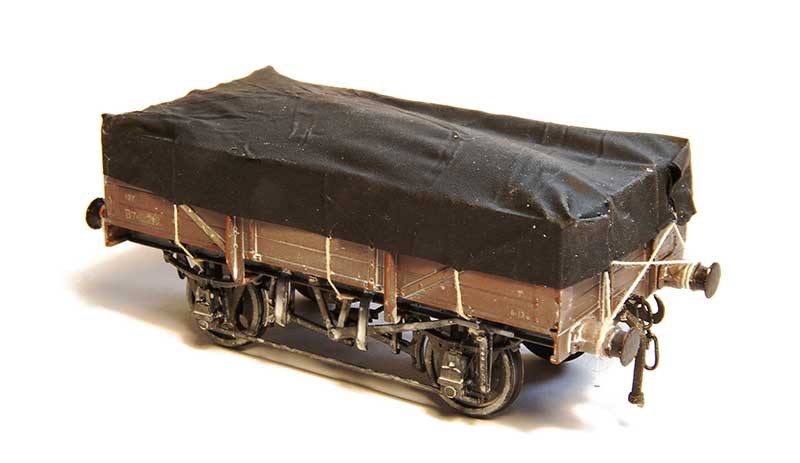
The last ropes tied into place and tidied up.
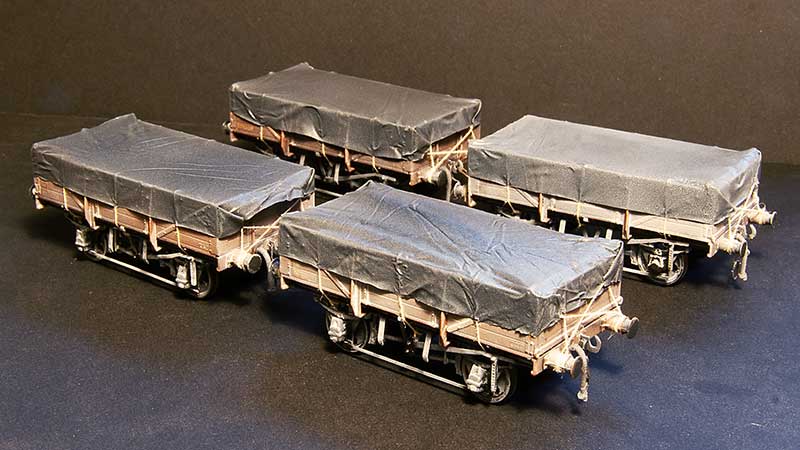
The final weathering, back to the white ink (sprayed this time) with some additional grease stains on the underframe.
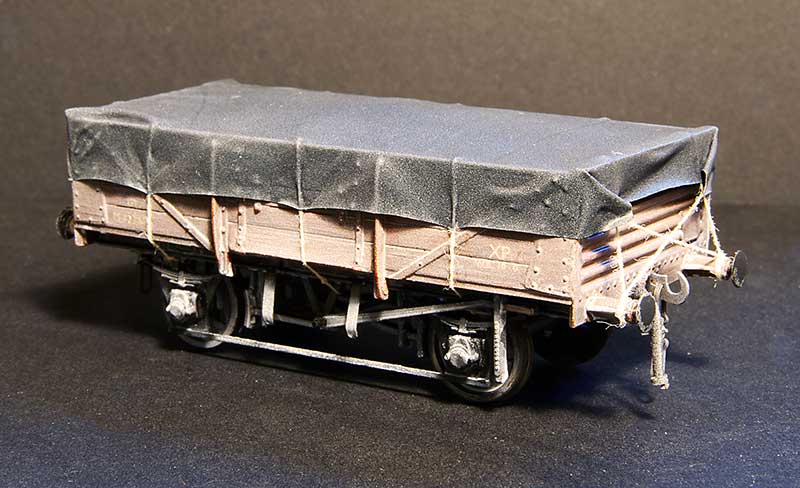 To break up the rake a bit I added a few 10ft wheelbase opens too. These are actually way more typical of the actual wagons used in the clayliners. The ex LMS Diagram 2150 I’ve featured before a few posts ago.
Likewise the ex LNE diagram 210 (although not this specific model)
A new wagon type for me is the ex LNE diagram 185. This was constructed from the body of the Cambrian kit C81 for the LNER 12ton 6 plank Open Wagon, With a Parkside 10ft underframe. Theres a few tweaks needed to the body as can be seen and theres an additional top support across the top of the door which is worth adding assuming you aren’t going to cover it over with a sheet that is!
Just need an enterprising transfer manufacturer to produce some sheet markings now.
More shockingly mundane stuff
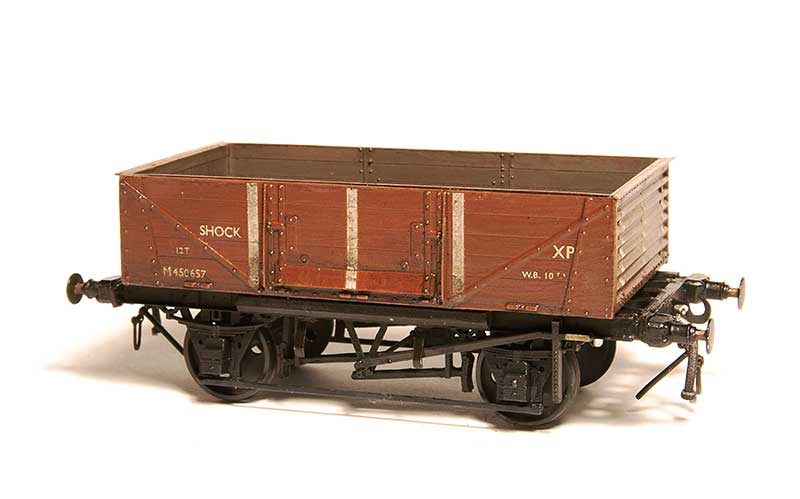
As a follow on to the last post – more every-day wagons have rolled off the workbench. This time it’s a quartet of shock wagons.
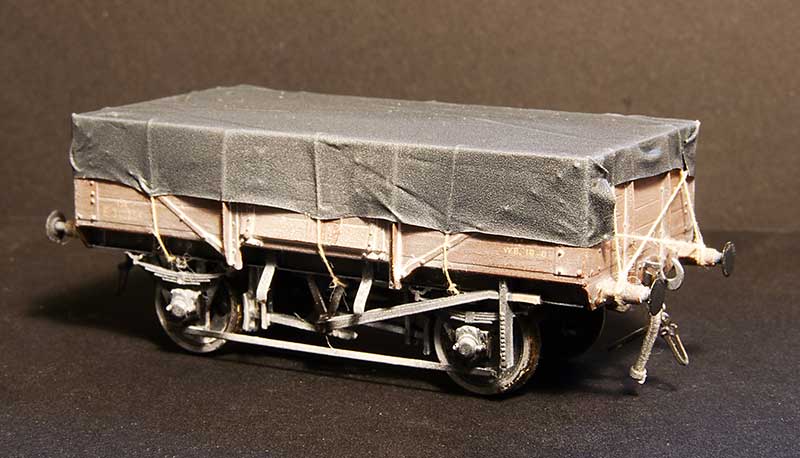
Starting with the basics – Diagram 1/040 shock open from the Parkside kit. Built pretty much as supplied with the addition of a Rumney Models tarpaulin bar and a sheet from my now standard black latex glove.
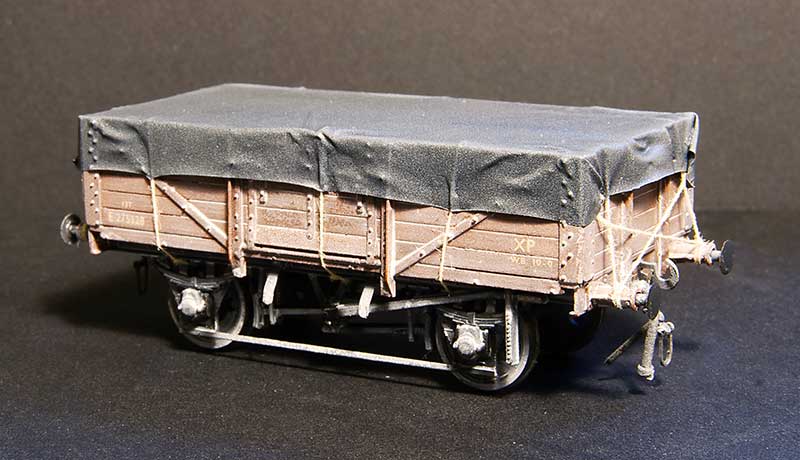
Next ex LMS diagram 1983 from the same kit as above with the additional top lip on the ends and buffers from Lanarkshire models. You cant see it in the pic but I replaced the floor with scribed lead sheet.
EDIT – More info has come to light on these wagons and this one is wrong – see https://p4newstreet.com/back-to-wagons-and-a-correction/
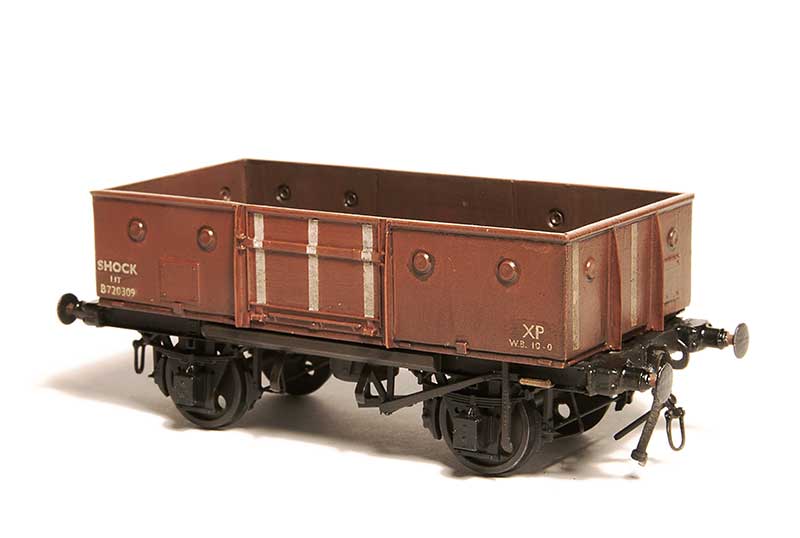
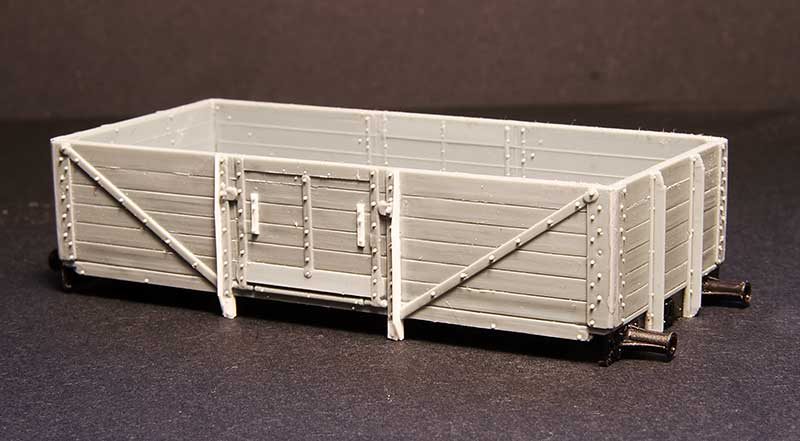
A smidge more involved is this Diagram 1/038 shock open from the parkside kit for the standard (not shock) wagon. I shortened the sides by cutting sections out next to the middle section and mounted them on a new floor as the prototype wagons had a visible lip around the bottom.
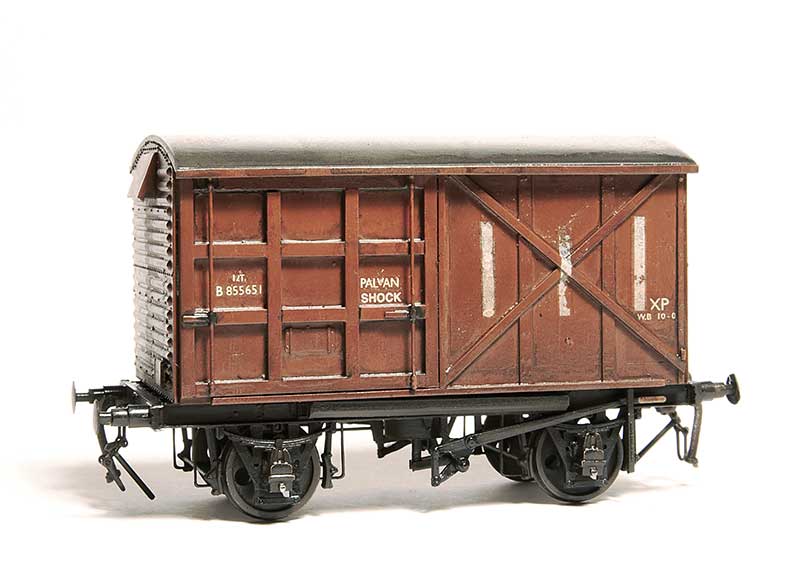
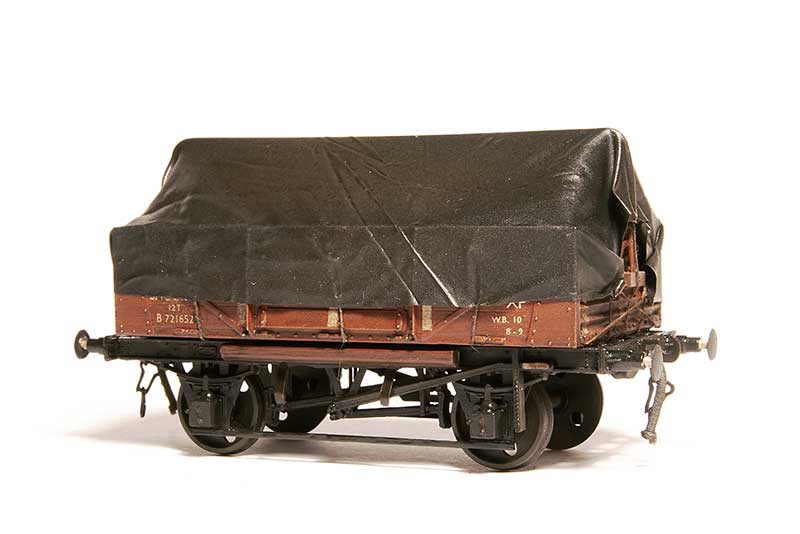
Finally a diagram 1/219 shock palvan. A bit more involved again as I could use spare ends and a roof from Parkside standard 12t vans but the sides needed to be made from scratch. The chassis is the Red Panda kit.
Just some mundane stuff.
Just one of those every day, run of the mill style posts this time but with a few little tweaks to appease the wagon buffs.
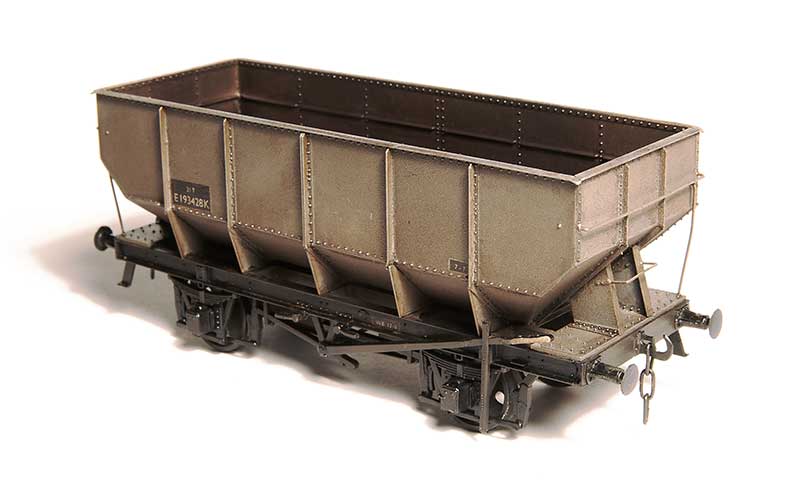
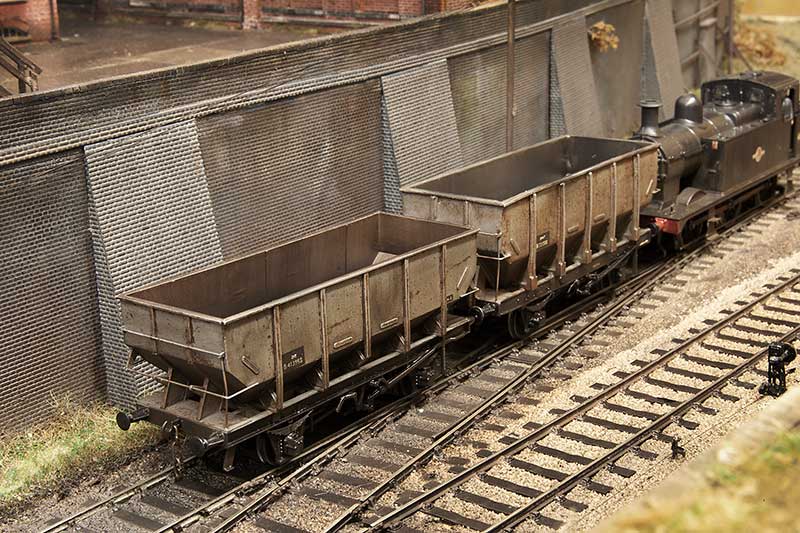
Starting with the Parkside kit for the LNER 21t riveted coal hopper. Built pretty much as instructed but I did change the side stanchion plates for 10 thou plasticard as the ones in the kit were a bit chunky.
 The spare brakes that came with the above kit were used to correct the brakes on my prototype 24.5t hopper I’ve featured before.
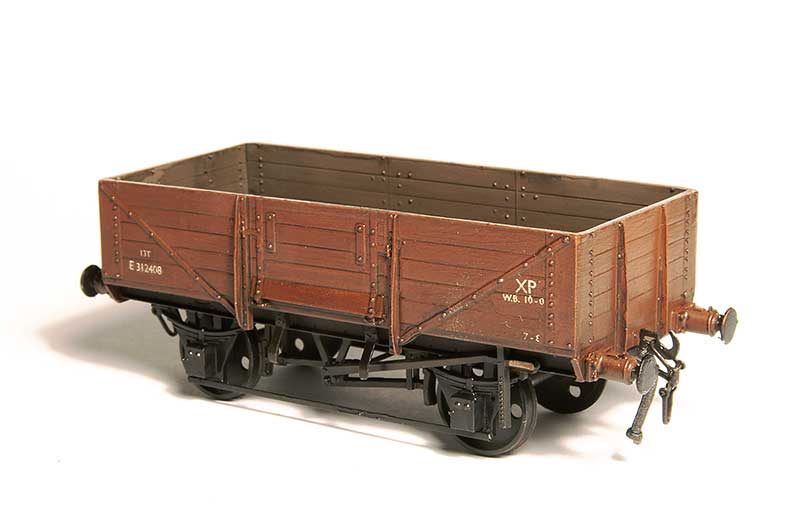
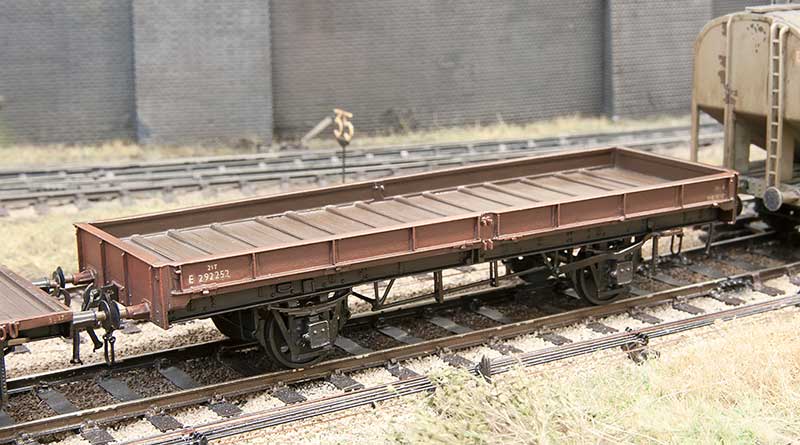
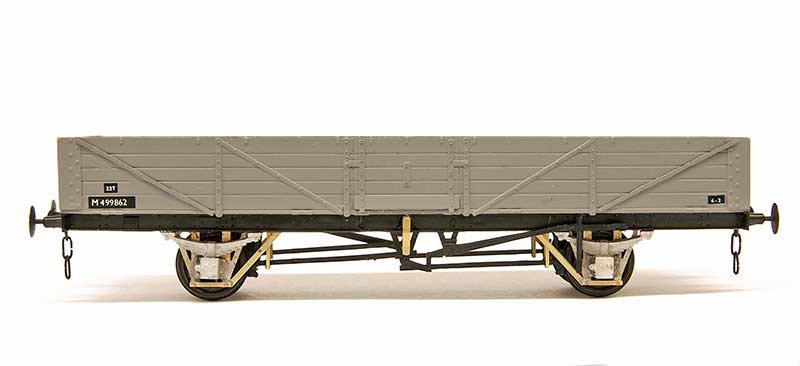
The humble D2150 13t open from the Parkside kit. The only real visual difference between these and the BR build is the small lip on the ends. A bit of 10×20 thou mictrostrip sorted that.
Ex LNER Diagram 210 adapted from the parkside kit for the Dia 1/120 wagon. The side stanchion were slightly reshaped as were the buffer beams while the chassis was replaced with spares from my scrap box.
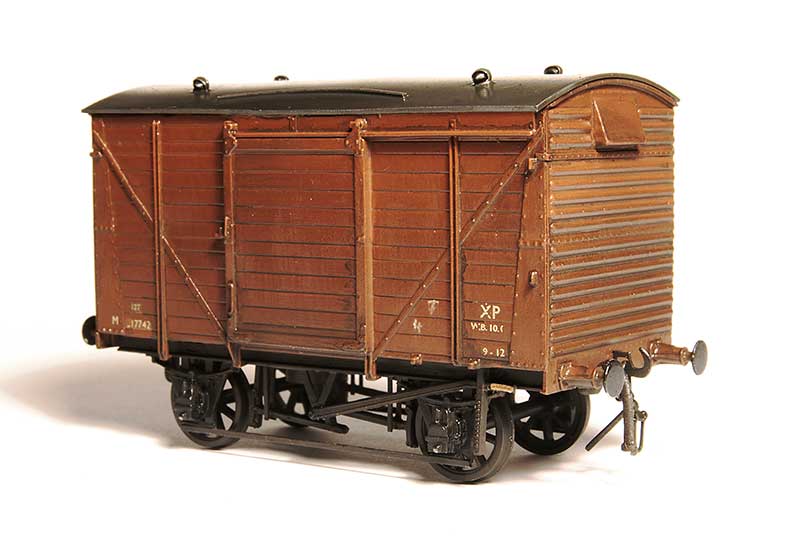
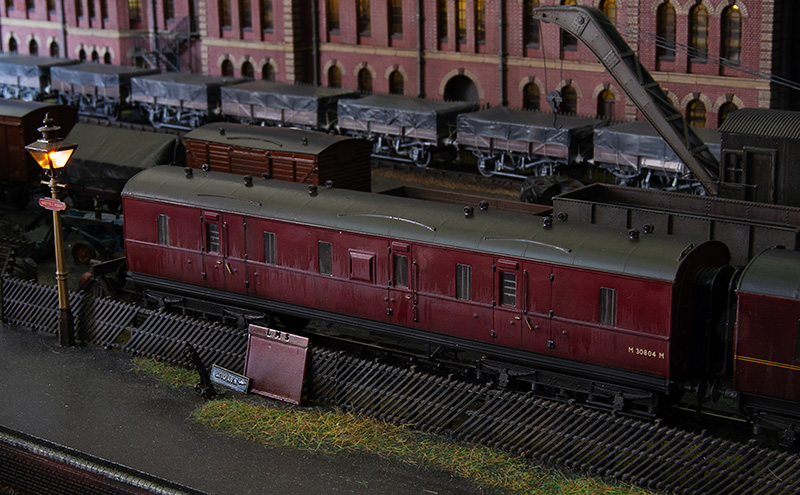
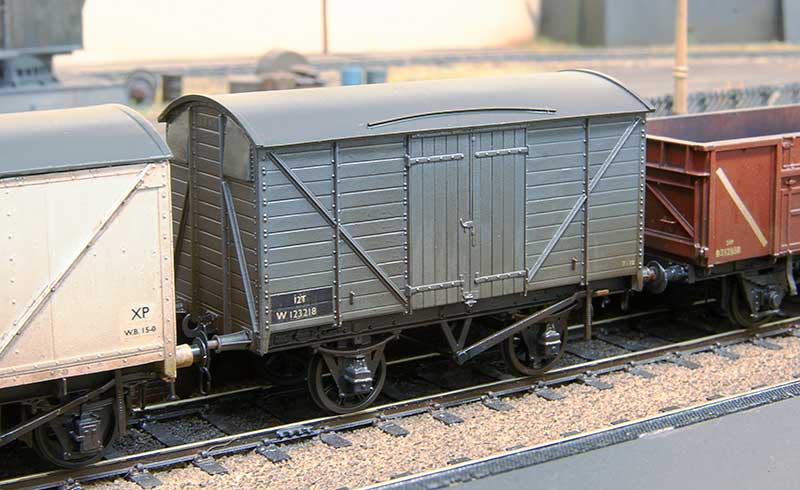
Another bog standard affair, the D2039 ex LMS 12t van. This one was built from the Ratio kit with the addiction of the Rumney Models LMS van detailing etch (B105). It features the 3 part end for a super subtle bit of variety.
Finally something a little more involved. Before and after of the sides for a D2103 12t van using the parkside fruit van as a start point. The ends were scratchbuilt.
Back to business as usual
So back to business as usual then.
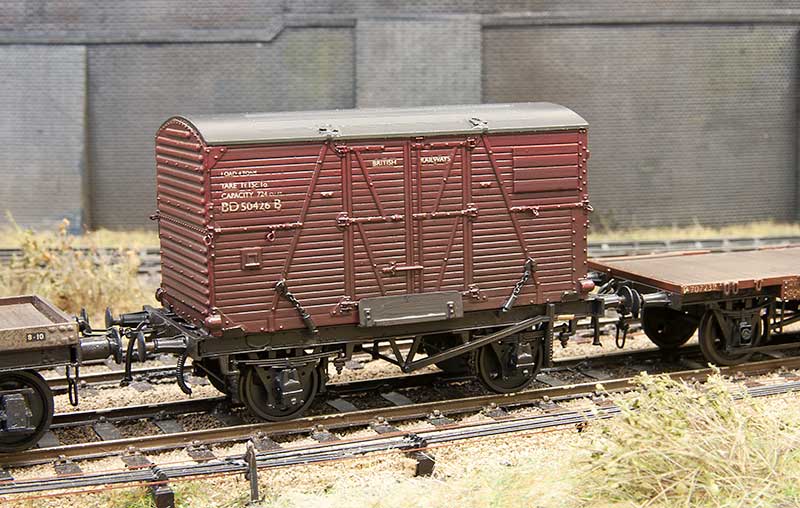
This is an ex LMS 12 ton traction truck which has recently been released by 247 Developments. The kit is a 3d print which is supplied as a body with solebars, W irons, brake gear and white metal buffers. The body was a little bit distorted (kinda like a spoon shape) but popping it in very hot water and weighting it while it cooled seemed to take most of the distortion out. The back of the frames needed thinning for p4 wheels to fit (I believe the kit has been changed to rectify this now). I replaced the sides with microstrip as they were a little uneven and added the safety loops and tie down shackles that were missing from the print. The supplied buffers were a little odd so these are Accurascale ones. Just need to do a load for it now.
 On Brettell Road I have mostly used cast white metal vacuum pipes. Generally these have been fine but I have had some of the bufferbeam mounted ones break as they are slightly vulnerable. David Roome has now produced some 3d printed ones that are rubbery and a lot less susceptible to knocks. Im not replacing them on all of my wagons just as and when a white metal one gets broken.
Links
Heavyweights done
Just a super short post this time. The wagons featured last time are done and can be released into the wild.
Is it just me or do metal kits always just seem a bit ‘meh’ once they are painted?
A couple of WIP heavyweights and breaking the golden rule.
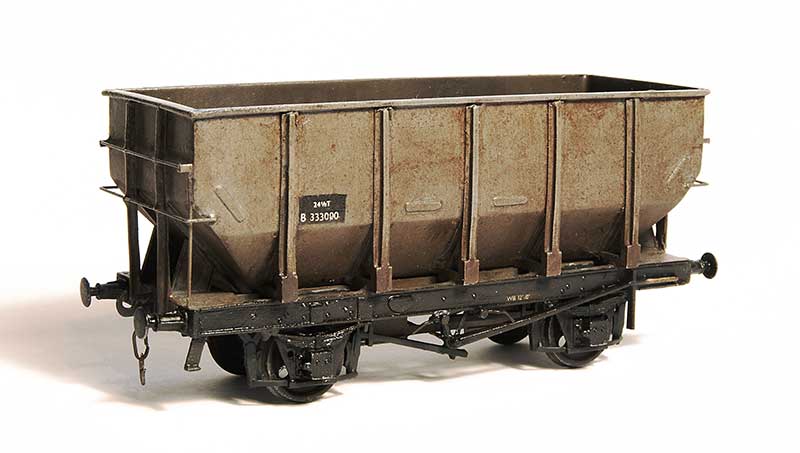
When my friend Tom kindly gave me the Ks kit for the Coral glass wagon (featured earlier) he also gave me another Ks kit for the 24.5t coal hopper. Further investigation showed that this was a kit that was based on the prototype B333000 which was not really like the production ones in that the ends were different. I suppose back in the day this was your only option however now you can buy 24.5t hoppers ready to run this strange little oddity might have a little value as something different from what everyone else is doing.
B333000 was one of 2 prototypes and was built at Shildon. The other B333001 was built at Ashford and it seems to heave been this latter example that influenced the production run. I believe B333000 was later used for experimentation of the automated doors used for MGR trains but photos of it are rare as hens teeth. Simon Bendall kindly supplied the only picture I had to work from.
So, breaking a golden rule I have had to make educated guesses about some of the details of this wagon. The underframe in Simons picture is very dark and looked to have been modified in some way. It was claimed the Shildon design was basically a taller 21 ton hopper and the lack of outer discharge doors kind of backs that up. So getting hold of a parkside 21t kit to use as a guide I set to work.
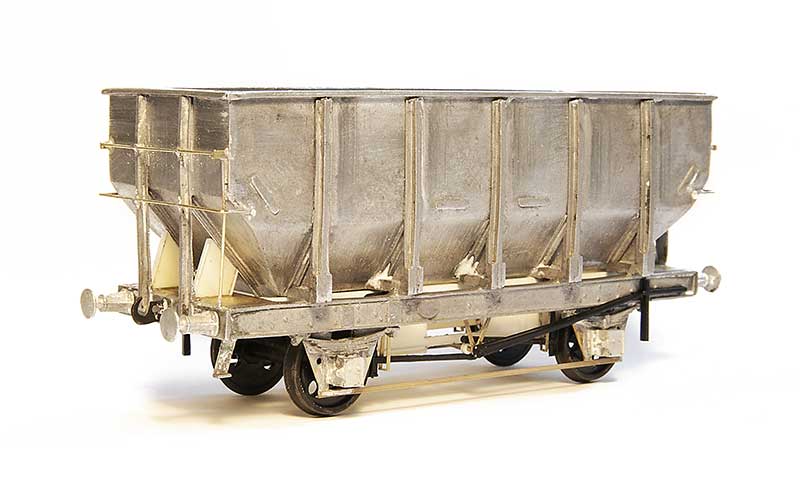
The hopper had some chunky mouldings on the inside of the corners that gave quite a positive location. But as I wanted it to be empty they had to go. I replaced the W Irons with Bill Bedford sprung ones (from my nearly depleted stocks) and Wizard model axle boxes. These were soldered in place as supplied and when I was happy everything was square the centre of the w irons was cut away to give an open floor. The end platforms were replaced with a bit of brass as the moulded ones sat on top of the solebars and were too thick. The kit had no hopper doors so these were made from plasticard using a parkside 21t hopper kit as a guide.
The finished wagon (well almost finished – I haven’t added the door mechanism handles yet) is a bit of a heavyweight in that its 78 grammes. About 50% more than my usual target of 50g.
The parkside kit built up. This is the opposite of the Ks kit as while i added some lead overlays to the inside lower hopper its a tad light at only 38g.
Moving away from hoppers I’ve also finished of the construction phase of this…
A David Geen milk tank which I was told by the man himself when I brought it was the last one! This uses a Rumney models chassis and has, to be honest, been a bit of slow burner. Its one of those kits that I just seemed to struggle to get any enthusiasm for but I’m pleased with it now it’s done. I thought the hopper was heavy but this weighs in at 88 grammes!
Steel and Glass
Let’s talk about glass. Something Stourbridge is particularly renowned for. It is believed that there has been glass production in the area for hundreds of years with a factory opening at the lower end of what is now Brettell Lane in the 1640s and production continuing in the area ever since.
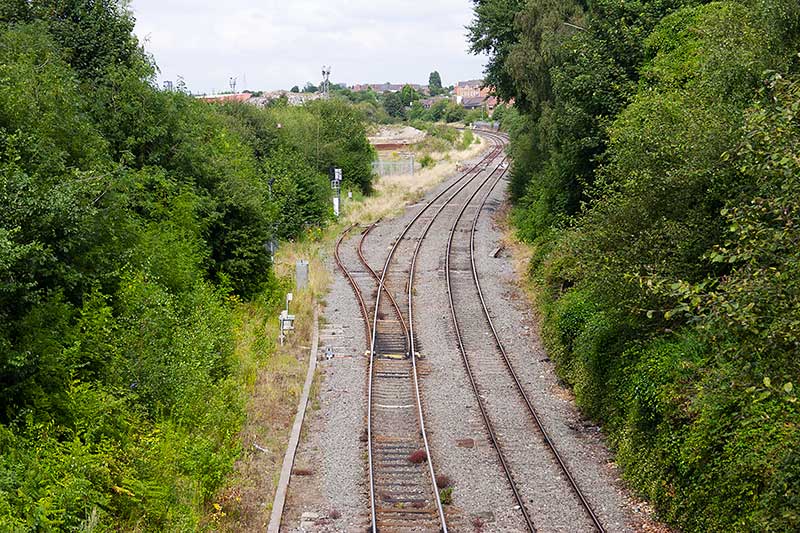 You’re going to need your imagination for this bit! Regular readers will know that Brettell Road is not an accurate model of the real Brettell lane but is inspired by it and the local area. The above picture taken in August 2014 (that long already?) shows what was left of the goods yard at Moor Lane. Brettell Lane is behind us. The line to Pensnett branched off on the left and the yard is petty much straight ahead of us. You can see the flood lights against the skyline. This was the view from the left hand end of the original version of Brettell Road and is now the view from the middle looking to the right. On the model the line is not an S curve but a continuous left hand bend. Also the main line descends from this point on the layout while the real line rises as it goes away from us.
On the right, long gone now, there used to be a siding which served the Brierley Hill glassworks. The buildings are still there and can just be seen behind the trees in the distance where the mainline disappears.
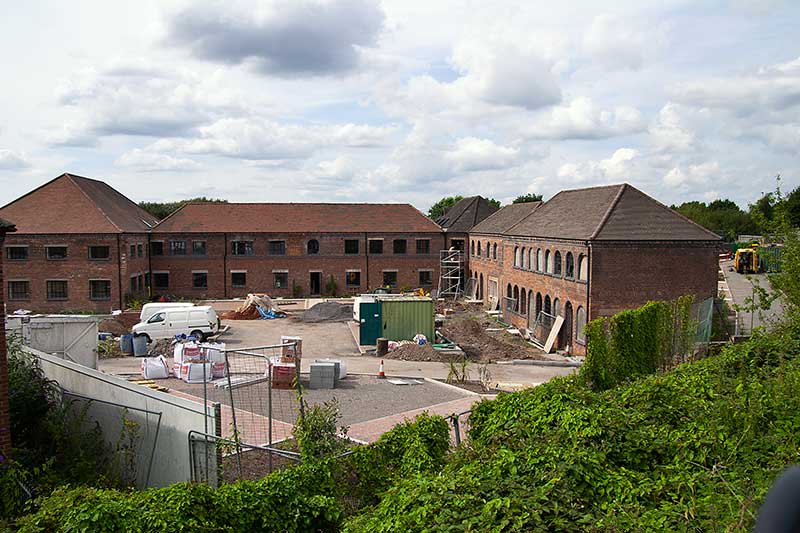 Another view from 2014 that shows the building being converted into apartments. If you stand looking at the right hand end of the layout you would effectively be standing in this building. The line runs behind it and you can just make out the ironwork of Moor Lane Bridge on the right of the picture above the yellow van. This building is represented on the layout as part of the backscene.
Brierley Hill glass was more of the decorative, cut glass and crystal type than the industrial large sheets and I have a few shockvans as a nod to glass traffic but of course they could be carrying anything so only I know that. However thanks to a gift from my friend Tom i now have something a little more obvious…
 I present you the ancient K’s kit for the GWR Coral glass wagon. These were built in 1908, to 2 diagrams, by Swindon to carry large plate glass in crates. BR briefly continued with these building 6 more examples before switching to the LMS design but even then only building 42 wagons (also at Swindon).
I decided to build one of the BR types with the main differences being (as far as i can tell) the shape of the ends of the frames, the GWR ones being more curvy, and the brake levers. The model had been started by Tom’s dad but was dunked in some cellulose thinners which dissolved the glue (but not the paint strangely) before it was reassembled using low melt solder. The kit had some nice brass buffers which were replaced with Lanarkshire models which better match the BR examples. The upper frames were cast in whitemetal and there were only 2 of them so they were replaced with brass section. A part of the original casting was soldered to the end of the underframe and reshaped to better match the BR design. I used the slotted bearing and central pivot method of compensation as previously used on my lowmac. 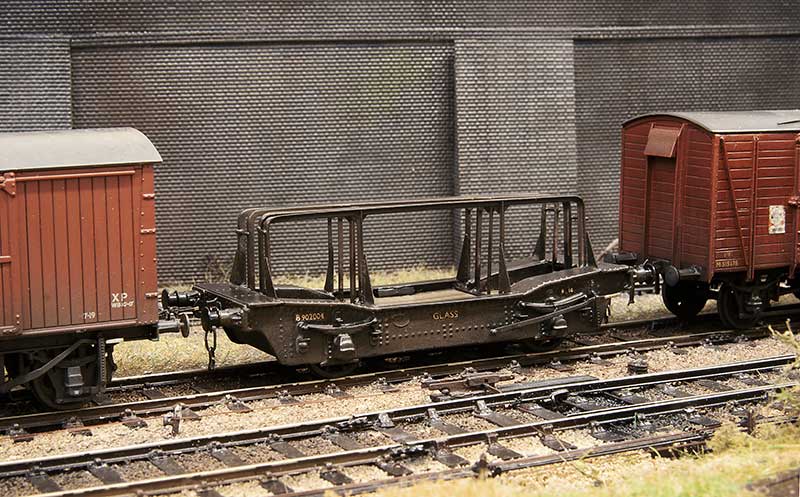 In service on the layout. As mentioned its not really the sort of glass that Brierley Hill was known for but it is a nod to the industry. Apparently some of the real wagons were transferred to the steel industry anyway so perhaps its on trial in the area for that reason instead?
Thanks go to Tom and his dad.
A couple of classics
This time we have a couple of classics from the Cambrian range
 The good old catfish. Built with the use of Stenson models hand wheels and replacement handrails. One thing with these, as supplied, is that the wheels seem a long way away from the w W-irons, even in P4 so I cut the moulded rings off the back and moved the solebars closer together. A lot of people say these are a bit tricky but the only real difference to any other kit is you just need to take a lot longer and really let things set. They aren’t really a bung it together in an afternoon style job. I found another 2 kits in my stash which i will build up for New Street and might do a bit of a step by step on how to do them.
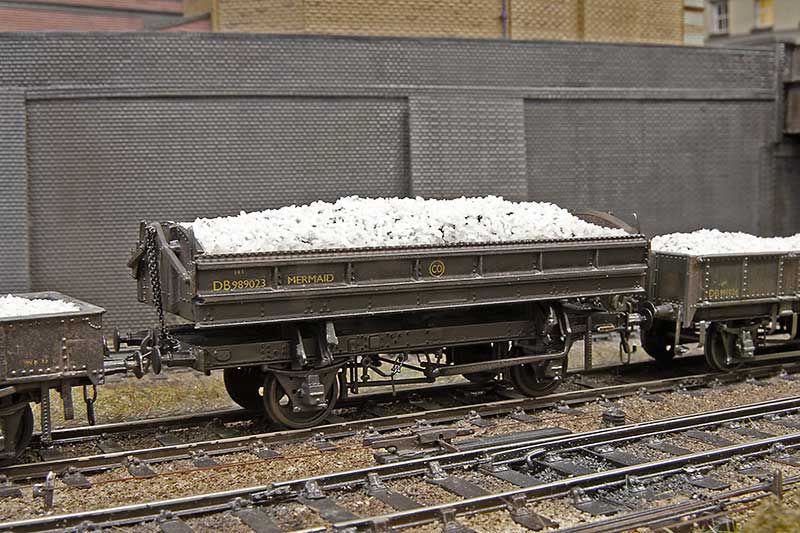 Next up the mermaid. I have built this as an early one which were the same as the original GWR builds. The main difference is push rod brakes instead of clasp, no vacuum brakes and earlier buffers. The rail clamps were replaced with Roxey mouldings shackles.
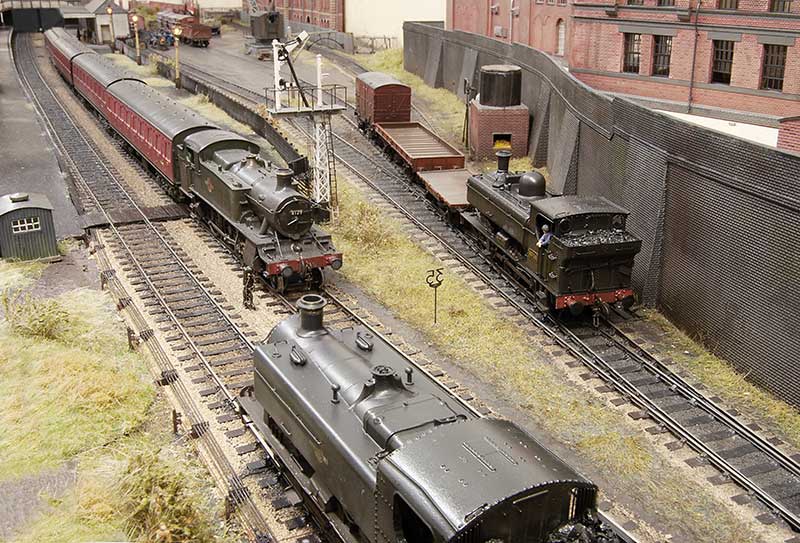
Below – It seems Brettell Road has had something of a GWR take over today!
LMS iron ore hopper
Let’s start with a little observation. Modelling railways is expensive these days, the reason for this has been discussed elsewhere but if I were starting out now I certainly wouldn’t be able to afford it. I actually think the prices are what they are but there are one or 2 things where manufacturers really are taking the mick.
Case in point is the 24ton LMS iron ore hopper. Firstly its not one, at all! Basically yes it is a hopper but thats about it. It’s a loose model of the Charles Roberts hopper with a body stretched to fit a generic 10ft chassis. When you consider that this model first appeared in the 1977-78 mainline railways catalogue charging nearly £30 rrp for a completely wrong, very old tooled model is a fictitious livery is more than a little bit dodgy, Considering thousands of these are out there in various liveries for a fraction of the price you have to wonder who’s actually buying the things?
So let’s look at what this model attempts to be.
LMS hoppers are something of a gap in the RTR market as they have been hardly touched by either RTR or kit manufactures. I believe that the model is trying to masquerade as a diagram 1893-1942 iron ore hopper. From what i can tell these were all the same except for the materials used.
D1893 – 50 wagons built in 1934 by the Metropolitan Carriage, Wagon and Finance Company out of Chromador Steel
D1894 – 300 wagons built in 1934 by the trade out of mild steel
D1941 – 450 wagons built in 1936-38 by the trade out of copper bearing steel
D1942 – 100 wagons built in 1936 by the Gloucester Carriage and Wagon company out of an unspecified material.
Many of these lasted into the BR era and were cascaded to various steel works meaning theres quite a few liveries that can be done and an enterprising manufacturer can cash in on the current rise of interest in industrial modelling.
The model
While the RTR hoppers wheelbase of 10 ft is actually closer to the LMS wagons 10ft 6 than it is the Charles Roberts 9ft wheelbase theres nothing about the model that can really give you ahead start on constructing one of these so the easiest method is just to scratch-build one.
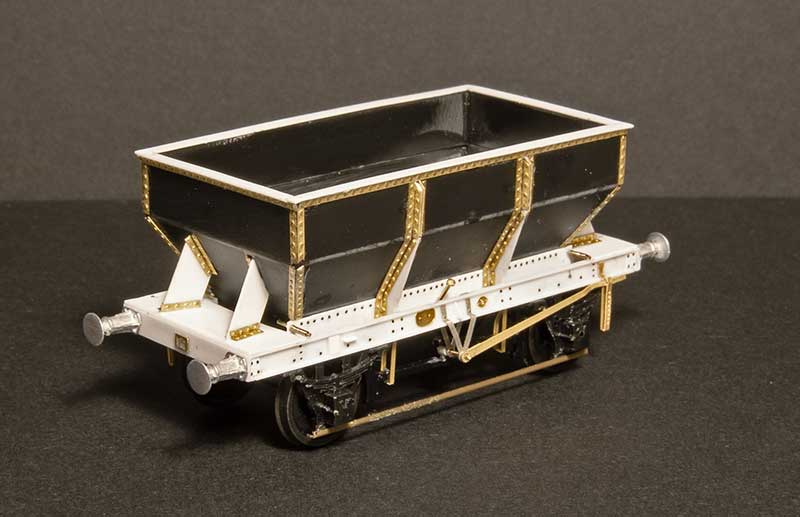 Which is what I did. Construction is plasticard with evergreen sections for the chassis and rivet strips from Mainly Trains or transfers from Archers. Buffers are from Lanarkshire models and underframe ironwork from Ambis and Bill Bedford. The axleguards, axle boxes and springs are salvaged from parkside kits. Drawings in LMS wagons volume 1 were used as a guide.
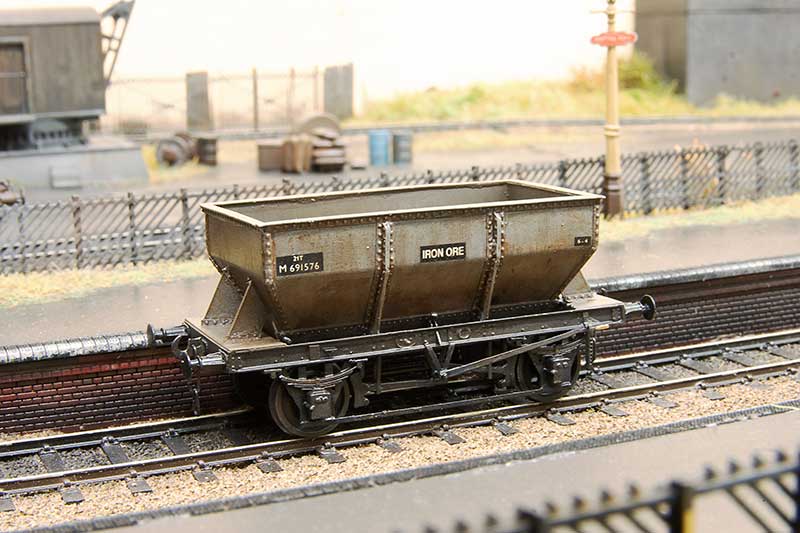 Painted up with transfers from Modelmaster and Fox.
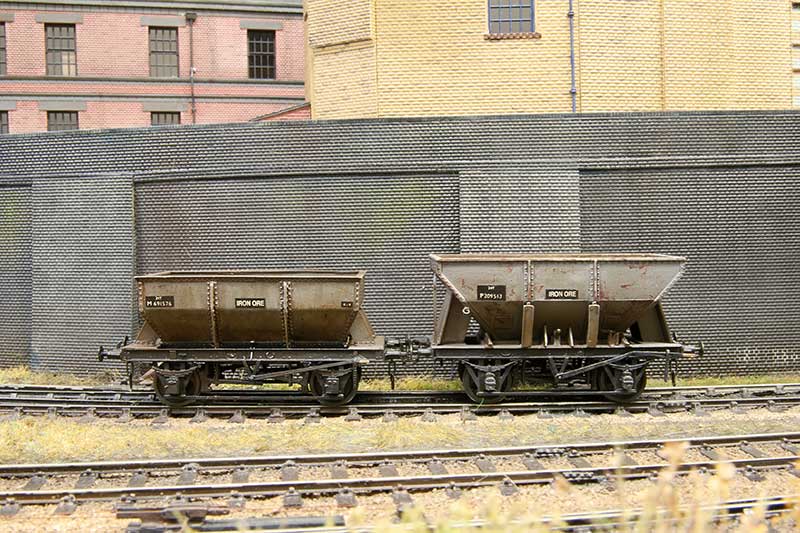 Comparison with the Charles Roberts wagon on the right. This has been shortened and rebuilt on a 9ft chassis so its not a direct comparison with the RTR model as supplied. To see what I did to that one click here)
Stretching things out a bit.
One aspect of making Brettell Road longer is that the original fiddleyards will need to be replaced. As such the opportunity will be taken to increase their length from four feet to five which means I can increase the cassettes from three feet long to four and a half. Any bigger than that and cassettes start to become unpractical and a bit sketchy anyway.
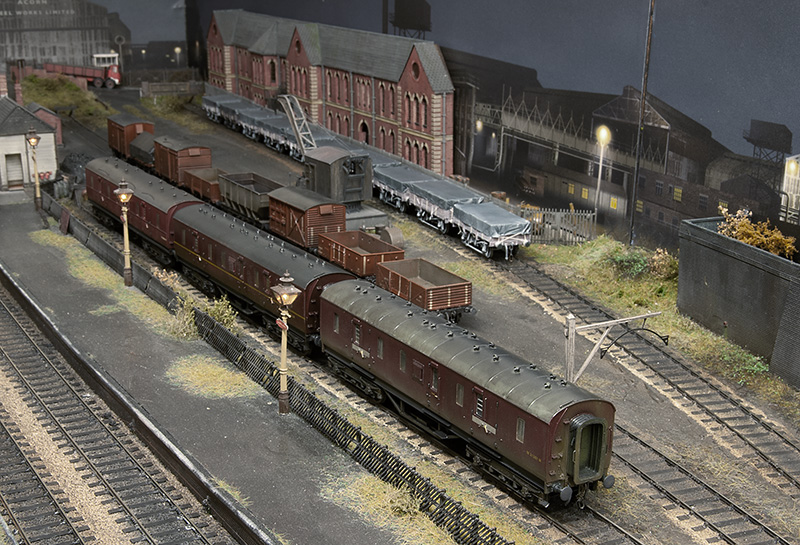
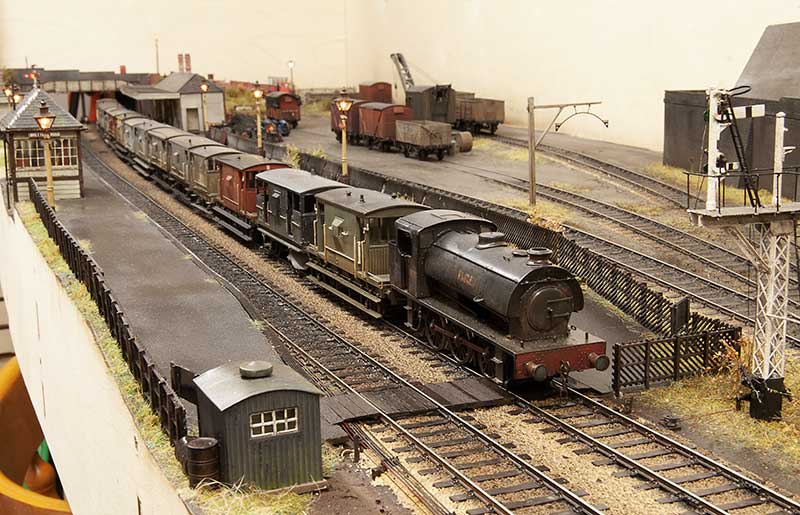
 A four and a half feet long freight train on Brettell road.
 A four coach passenger train. When I built this originally one of the (then 3 coaches) wasn’t finished as I hadn’t detailed up the underframe yet and just swapped the bogies. This was due to Brettell Road’s first outing coming up (Scaleforum 2018) and it never got moved from the ’roundtuit’ list since.
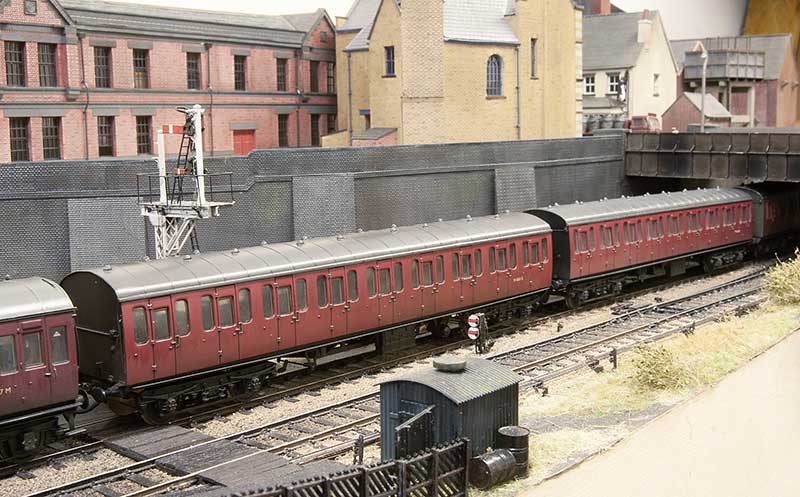 But when another cheap coach popped up I decided to get this little train ticked off so they were both detailed up together. Leaving just one thing outstanding…
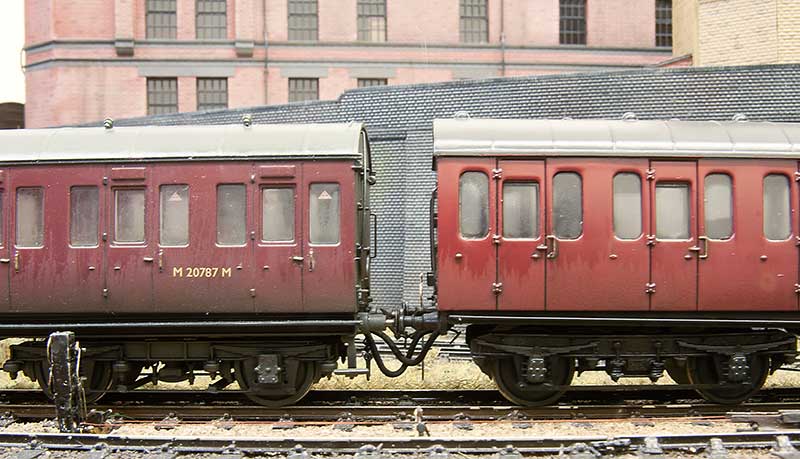 …the brake pipes. I admit to not using working ones on my wagons, as the layout is principally a shunting one, but as this is a fixed rake of coaches why not? I came up with the original idea for this back around 2005 and articles appeared in update and MRJ. The original update article can be downloaded from here. Where I have differed from my original article is to have one long pipe for the vac pipe and another long pipe for the steam heat pipe I figured 4 short pipes would just stick together in a clump! So theres a magnet on the end of the pipe that connects to a magnet in the bufferbeam. All simple stuff really but it does mean that the coaches and their pipes have to be couple up or the pipe will drag on the track and no doubt get stuck!
Another wagon diverson
Breaking away from the current building works for a moment a little wagon based diversion. As per normal mundane stuff with a few little bits of tweaking that most people will likely never notice.
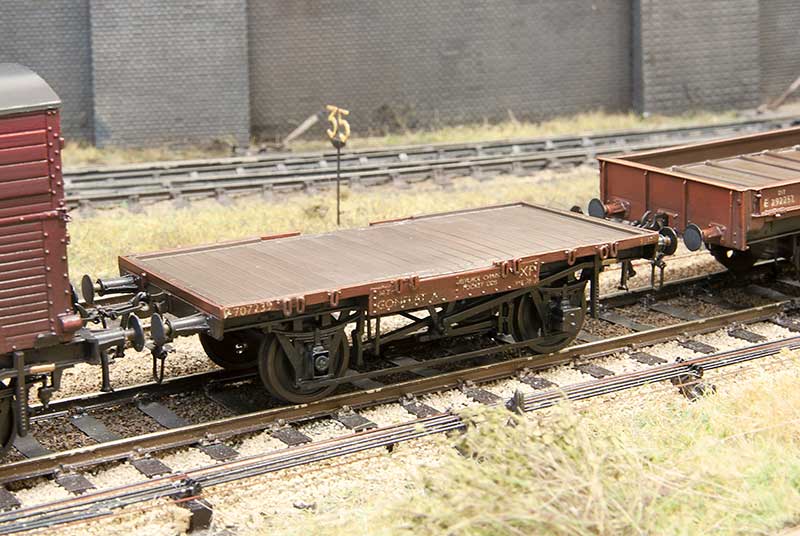 Conflat A from the Parkside kit. As per the last time I built some of these I beefed up the links a bit as I thought they were far too subtle. I fancied an empty one for a change and also added a missing (yeah sounds a bit weird that doesn’t it?) axlebox cover.
 Next up an LMS diagram 1838 container flat. Built from the parkside fitted LMS chassis kit with extra bits and bobs.
Finally an eastern region plate. When i did my fish van a few posts ago someone on the clearing house facebook group (highly recommended if you are on facebook and like wagon building) pondered if the chassis could be used to do an eastern region plate. Personally i thought it easier to go with the supplied chassis and replace the brake gear. Another Parkside kit.
Low cost modelling
 I was pleased to find that given the recent high temperatures and the layout living in a shed, that there appears to be no ill effects and all the rails are still straight and pointing in the right direction. I hope everyone reading this can say similar.
The above is a major blast from the past. Years ago when the West Midlands Area Group of the Scalefour Society was active, its organiser, Les, one week supplied us all with a parkside fish van kit. I think (memory is fuzzy if I’m honest) the idea was some sort of little competition to see what we would do with it. I don’t recall that anyone did but since then its sat in my kit stash contemplating its place in the world. As you can see it’s finally been built. I must admit the very long wheelbase produces a pretty ugly proportioned vehicle but its ready for service on Brettell Road. A note of thanks to Andy Hanson for kindly supplying the transfers.
 Above is a V33 van again from my spares box. It uses Ratio sides and a Cambrian 9ft wheelbase underframe. I don’t know how I ended up with the sides and while all the bits had, obviously, been paid for at some point I’m calling this one a freebie!
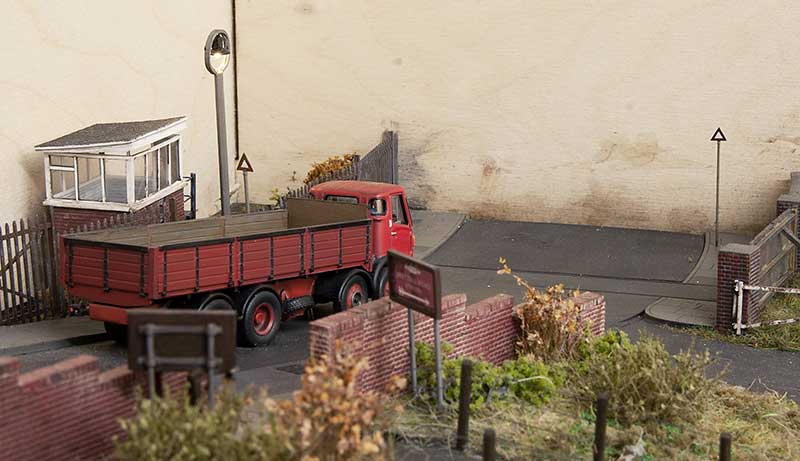 Added a couple of pre-Worboys road signs from Shirescenes. These are inspired by a picture of a Barclay tank crossing Level Street that I found. I made the furthest one about 80% the size of the nearer one to force the perspective a little.
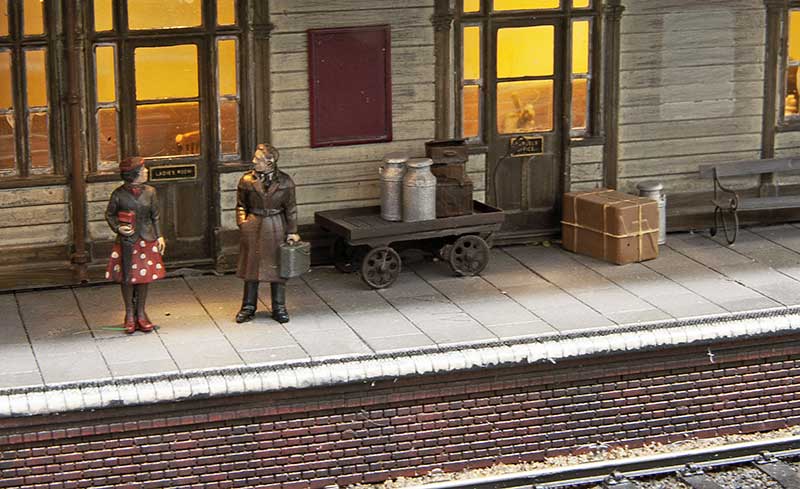 Finally a couple of milk churns from Modelu. To get the galvanised effect I painted them silver. Then a very light dusting of Halfords grey primer (holding the churn at arms length from the spray can) followed by matt varnish. I think it worked but if anyone will ever notice, who knows?
LMS long tube
Just missing out on my last post is this model
An LMS diagram 1945 Long tube. It uses a Parkside BR tube kit which has been shortened to 30ft 6in over the body (122mm) and 17ft 6in wheelbase (70mm). The corrugated metal ends have been replaced with planked ones from plasticard.
 A bit of a family tree starting at the top with an old Ian Kirk kit for the diagram 1675 wagon. The wheelbase for the top 2 are the same.
 Just a couple of pics for the hell of it!
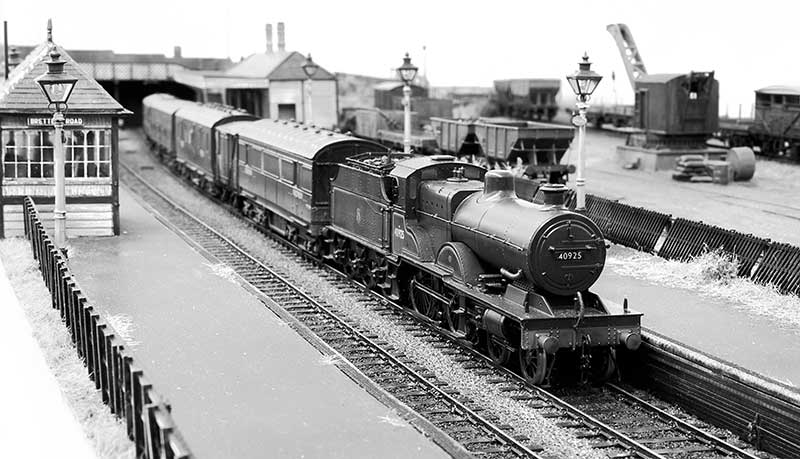
A Parkside quartet.
 The Airfix meat van I did a short while ago has peaked my interest just a smidge. There is a little bit of local interest for this (or a well sketchy excuse for me to go waffling on for a minute or two!).
Meat products moved by rail were probably most famous for the Palethorpes vans that operated out of the Dudley area but Brierley Hill was also famous for another processed meat producer, Marsh and Baxter. Founder, Alfred Marsh brought a pork butchers shop (with slaughter house) from E.J. Smart on Brierley Hill High Street in 1867 and initially started out curing ham and manufacturing sausages. By 1912 he brought the A.R Baxter factory in Dale End, Birmingham. Alfred Marsh died in 1918 and the business passed to his son Alfred Edward Marsh. After WW1 the company continued absorbing smaller firms and was eventually granted a Royal Warrant for its York Hams, which they supplied to Harrods.
In 1927 They began using their own siding at Brierley Hill Station and at their peak employed some 1500 workers and slaughtering approximately 2000 pigs per day. It was quite famous locally for an advert featuring a pig pulling a trailer loaded with sausages and the strap line ‘Drawing his on conclusion’. In 1954 a modern office building was built on Church Street, Brierley Hill which being slighter higher than the Round Oak steel works did tend to dominate the town somewhat. They also took a keen interest in investing in and promoting local sports and social interests and had both a cricket and football teams (both mens and womens).
In 1962 the company was brought out by Falstock Marketing Corporation although the Marsh and Baxter name was retained. It would survive another 16 years until December 1978 when the company was closed.
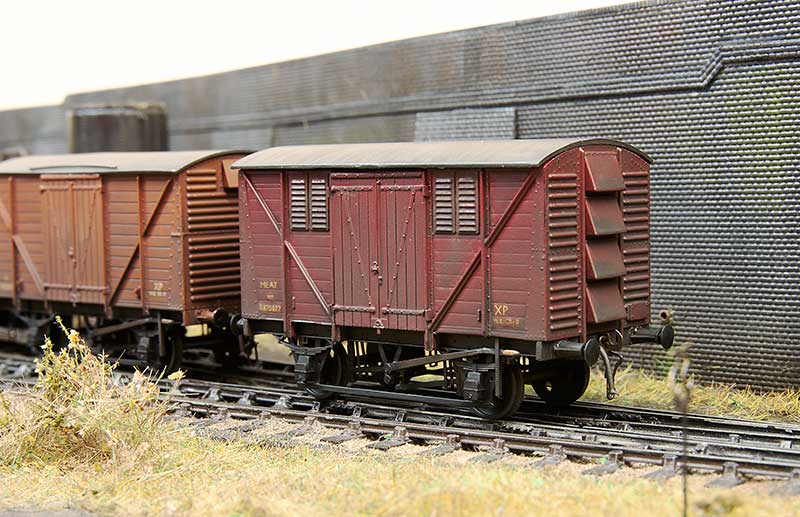
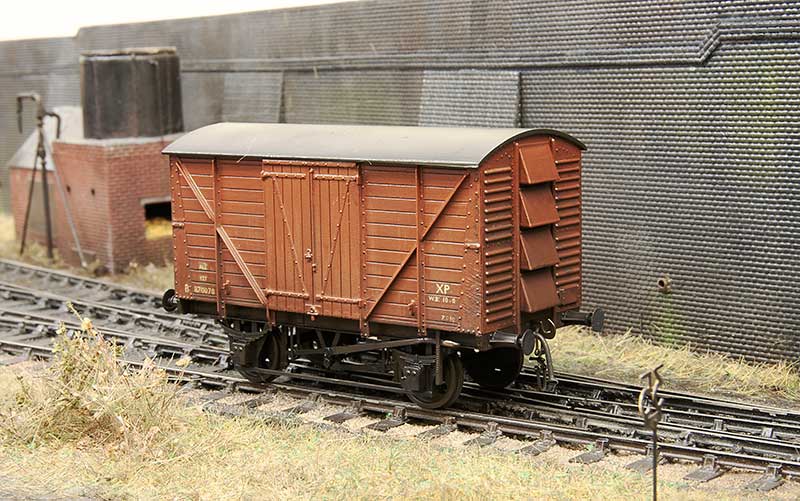 This one is a Diagram 1/250 example using Airfix ends kindly supplied by my friend Ian. Knowing what I know now it would have been better to use a parkside standard 12t van as the meat van has different doors. Luckily I still had some suitable doors in my spares box. The ens needed chamfering to 45 degrees to match the ends and the floor needed shortening a little as the Airfix ends are thicker. I also used some spare underframe mouldings to get the BR welded plate fronted axle boxes.
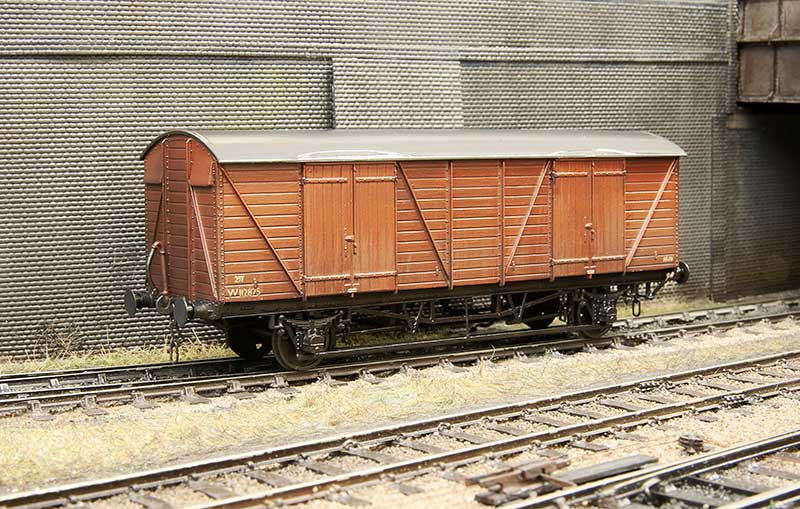 On the subject of vans I quite like these ex GWR mink Gs. Another Parkside kit with Bill Bedford springing and some other etched bits and bobs to refine the underframe a little.
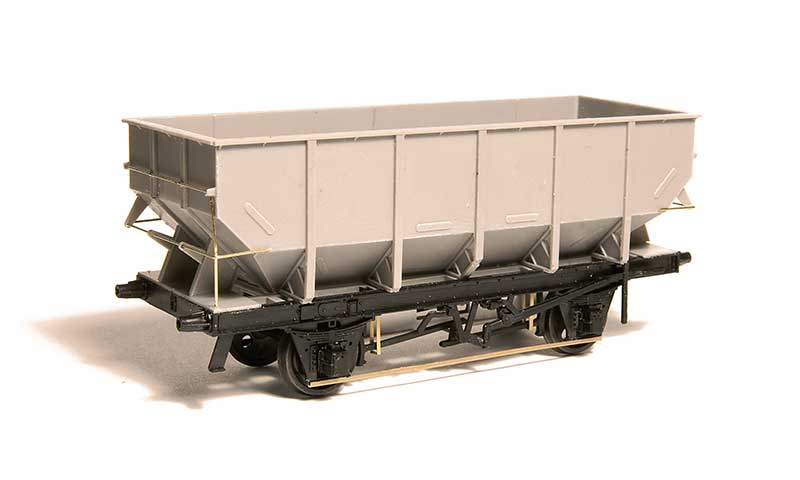
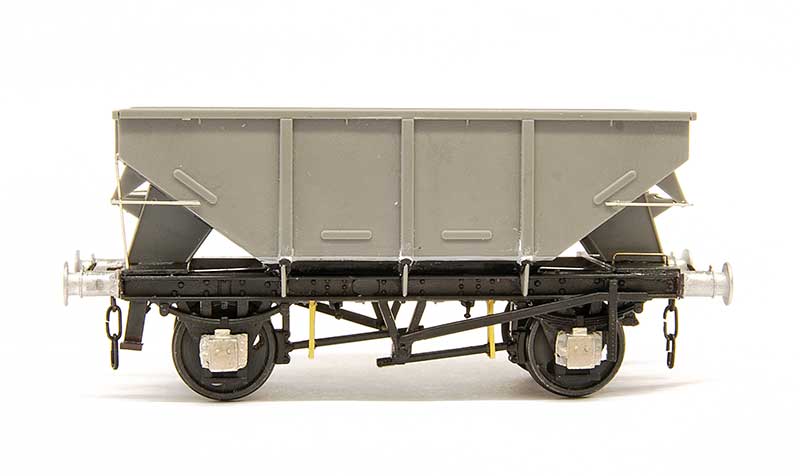 Moving on to Parkside’s latest effort. The BR 13t hopper. You can feel the Peco in this one! The underframe has similar feel (both in the way it’s done and the plastic its done in) to the old wonderful wagons tank kits. I needed to get the scalpel out to get it to fit together the way it was intended but once done it does result in a pretty solid chassis. I don’t know what happened with the supplied axleboxes but they seemed unfinished to me, almost as if there should have been an overlay as per the palvan kit. As there wasn’t I cut them off completely and replaced them with Wizard Models castings.
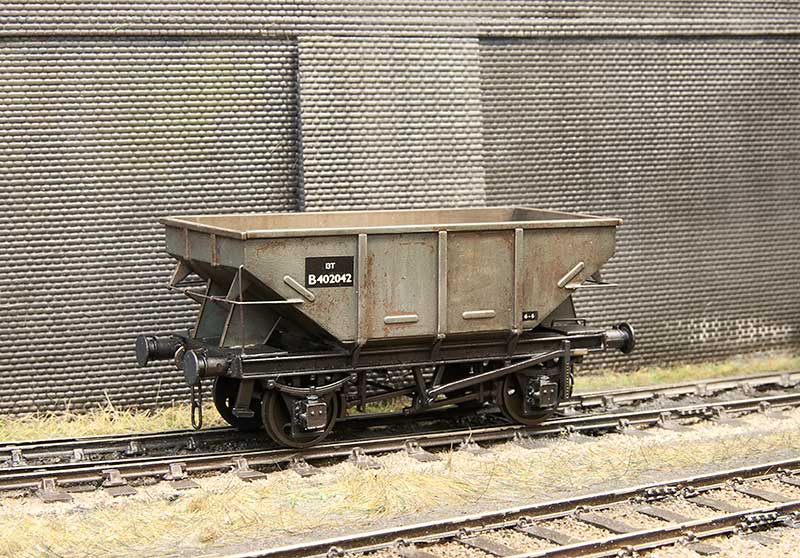 Knowing what to look out for it does build into a nice looking wagon and its pretty quick to bung one together. The model features some nice moulding on both sides of the hopper doors but with no where to really put any decent amount of weight I suspect many (like i will) will run them loaded.
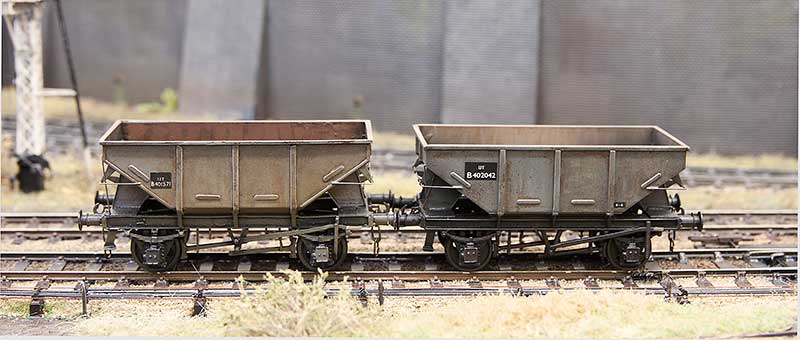 The inevitable comparison with my previous model from the Dave Bradwell kit. Draw your own conclusions.
Another classic
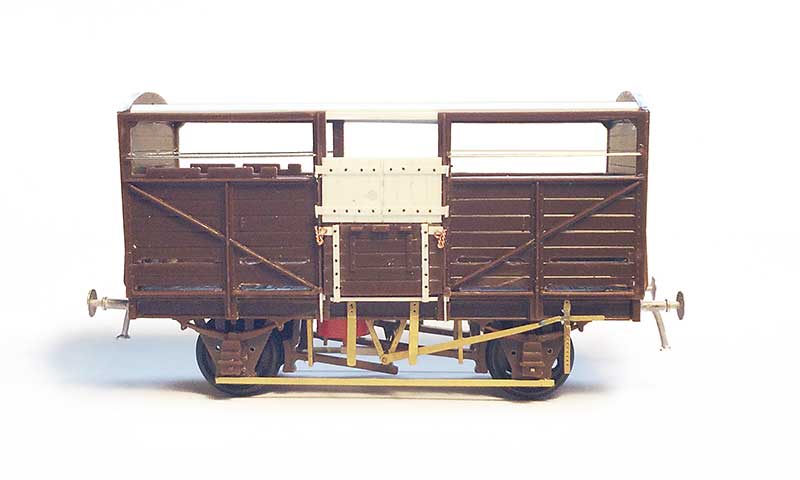 The good old Airfix cattle van. When I was a kid my dad built one of these so I decided Brettell lane should probably have one too. I deleted the opening doors (it was easier to replace the top ones completely than modify what was in the kit) and detailed the underframe with Mainly Trains, Bill Bedford and Rumney models parts.
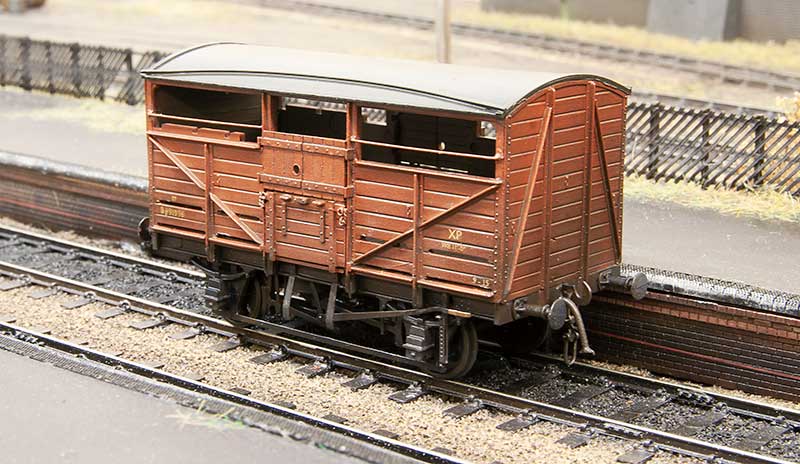 As with all Airfix kits of the time the roof was pretty clunky so that was replaced with a new one from 30thou plasticard and microstrip.
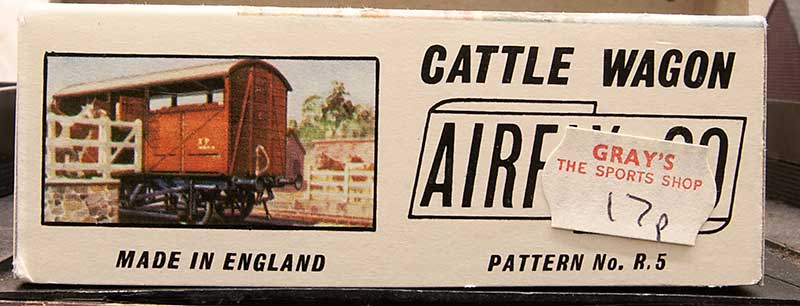 Ive no idea when this kit was first sold but even with modern eyes this looks like it was bit of a bargain!
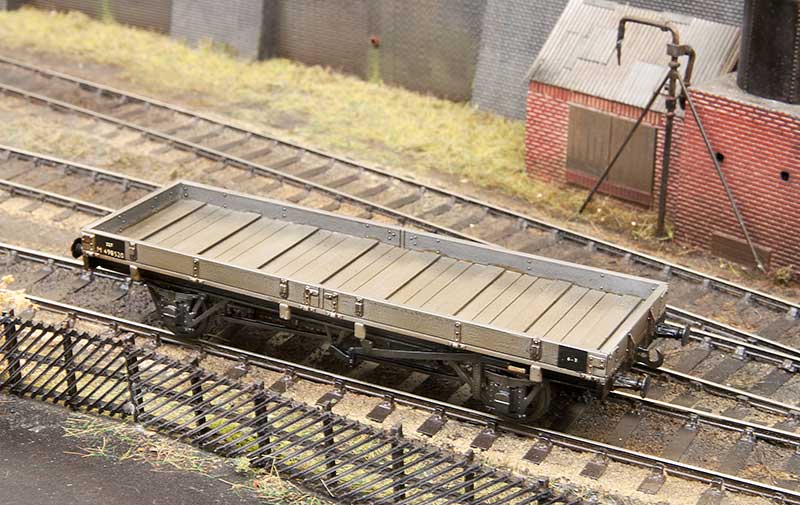 Moving on to a more recent kit. The Chivers model for an LMS long low thats been in my stash for a few years now.
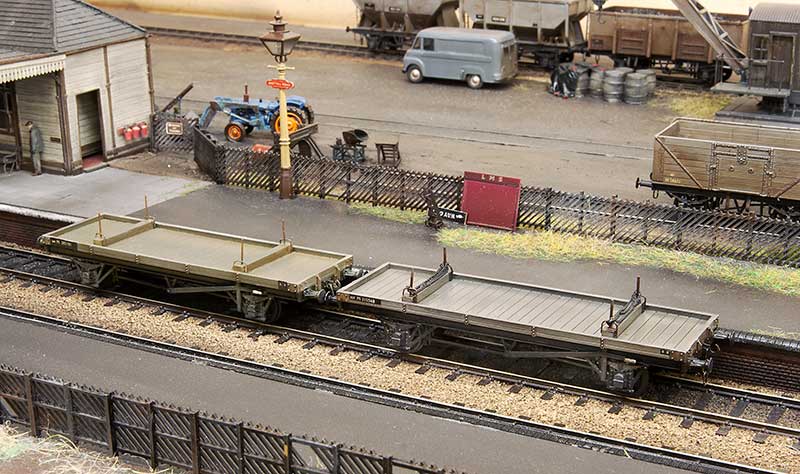 Also from Chivers, and also from my stash, I’ve finished off another LMS twin bolster. Chivers kits seem to have quite chunky underframe mouldings and while this isn’t noticeable on most of their kits I’ve built it was kind of more obvious on the first twin bolster I built (on the left). Potentially the use of sprung suspension adding to the problem I felt the underframe looked too wide and the w irons were too far from the wheels, giving a kind of 00 look to the wagon. On the new one (and the long low pictured above) I thinned the w irons to about half thickness and I’m happier now. It might very well that its only something I notice though!
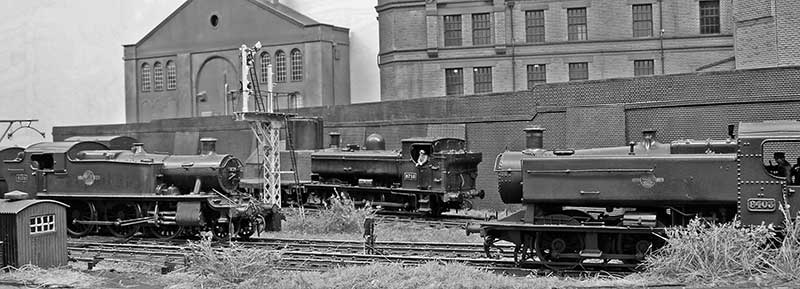
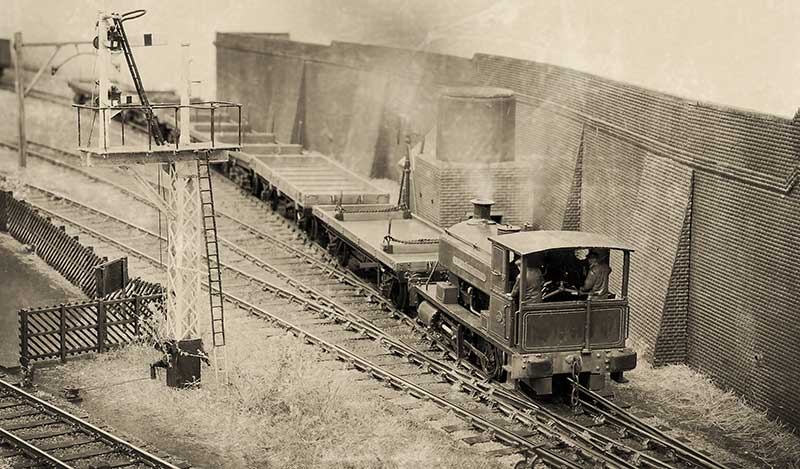 A ‘historic’ photo of the Barclay tank shuffling a steel train.
A couple of stragglers
 Pictured above is a Cooper Craft kit for a GWR diagram 02 open wagon. I found that if you use the bearing holes supplied in the kit the wagon sits too high so the holes were enlarged vertically a bit at a time, checking the wagon on a bit of glass to ensure all 4 wheels stayed square. The rail is a modified Rumney models kit and the brake gear from MRD.
 The infamous Airfix meat van. Quite why Airfix picked this and not a standard 12 ton van is anyones guess. I replaced the gimmicky opening doors and the underframe with Parkside bits from my spares box. The transfers were cobbled together from what I had and those that were white were painted with revel clear yellow (730). Buffers on this and the GWR open were from Accurascale. Basically cheap and cheerful!
 A private railway favourite and an exhibition last hour staple, the good old brake van special! I think i might have overdone it a bit!
A couple of brake vans
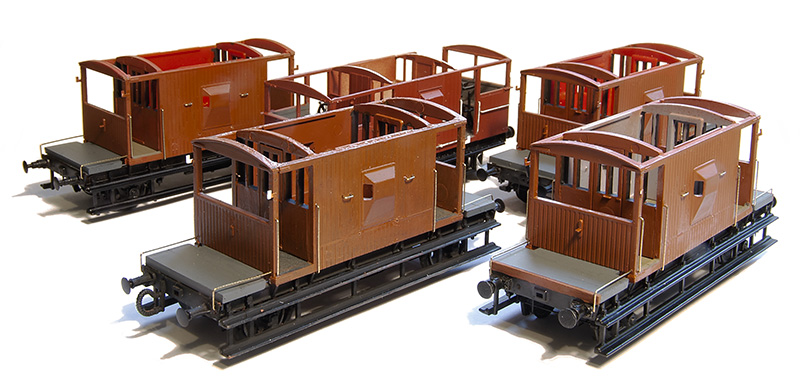
I may have mentioned before a plan to have a mixed engineers train for New Street. This will be the closest I will get to what could be vaguely referred to as a traditional goods train. For this I’ve completed a couple of the good old Airfix brake van kits. 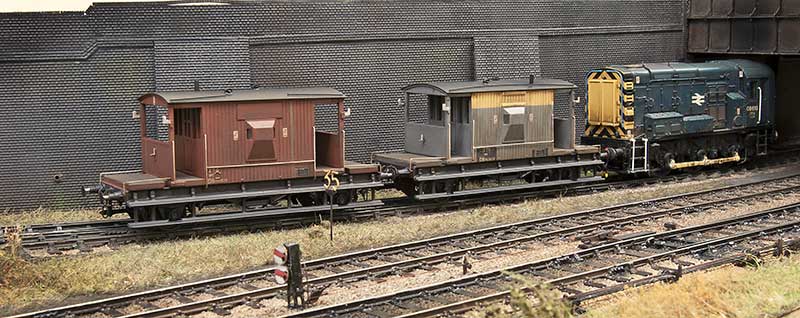
Pictured above on test on Brettel Road, the bauxite one features roller bearings left over from a Chivers kit and Oleo buffers from Accurascale. The dutch one also has Accurascale buffers (spindle this time) and plated ends. Both feature a new, thinner roof. Ive retained the original chassis with internal rocking compensation at one end and added the underframe trussing Airfix missed off. Theres an etched underframe option for those who are interested and I can direct you to this thread if thats something you fancy having a look at.
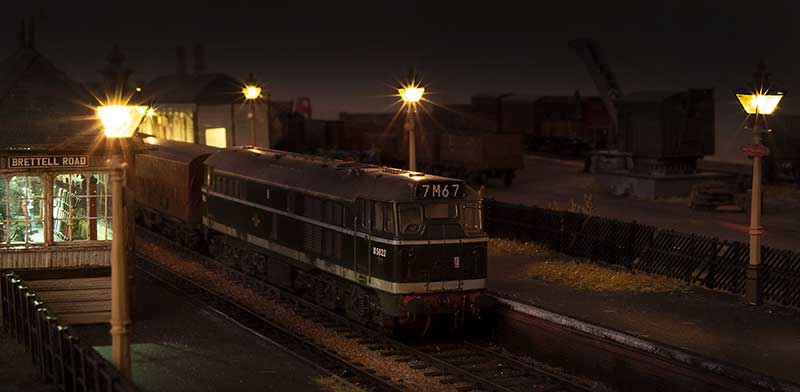
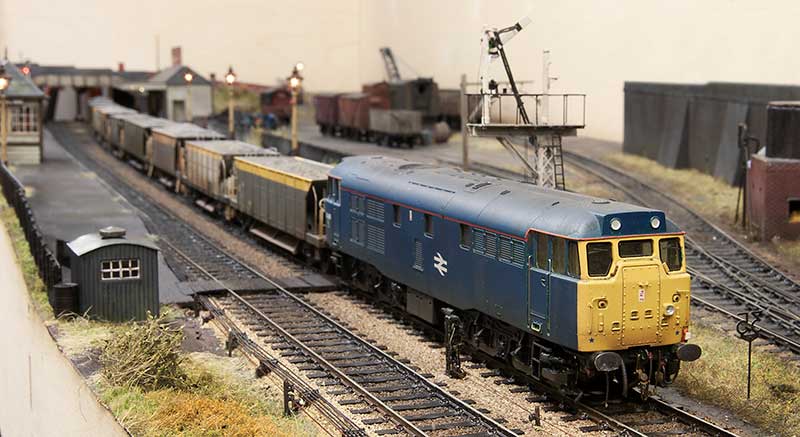 While time travelling engineers trains were ‘invading’ Brettell Road this 31 appeared!
Revisions and clutter
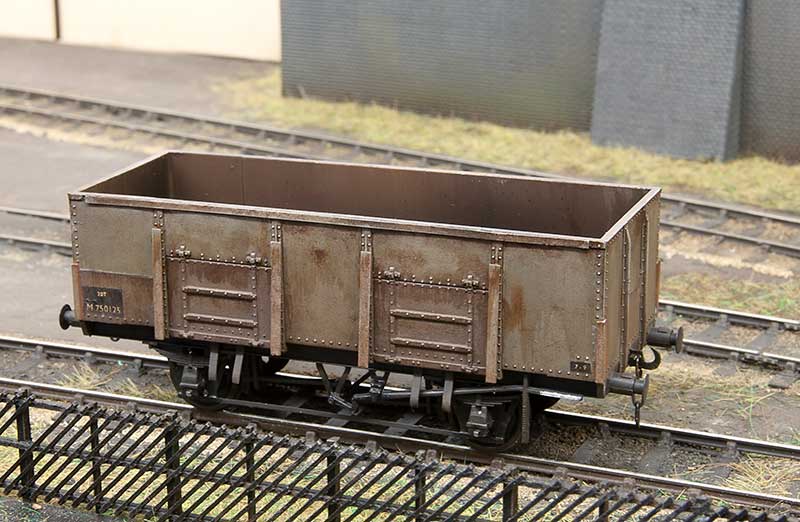
Remember the diagram 1973 mineral wagon I posted a few entries ago? Turns out I missed some of the reinforcing bits that were added after they were built. Im not sure how as they were in the prototype pictures I was looking at! Anyway thats been corrected now
 Ive finished off a few Bachmann RTR wagons too.
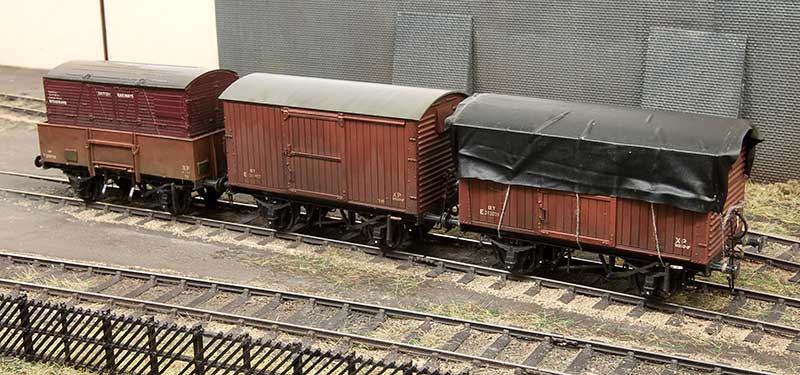 The steel high-fit was actually already done. Ive just added a container to it. The other 2 are actually 2 of the 3 vans I first brought for the layout. Discounted in Modellers Mecca bargain bin! The tarpaulin is black latex cut from a surgical glove.
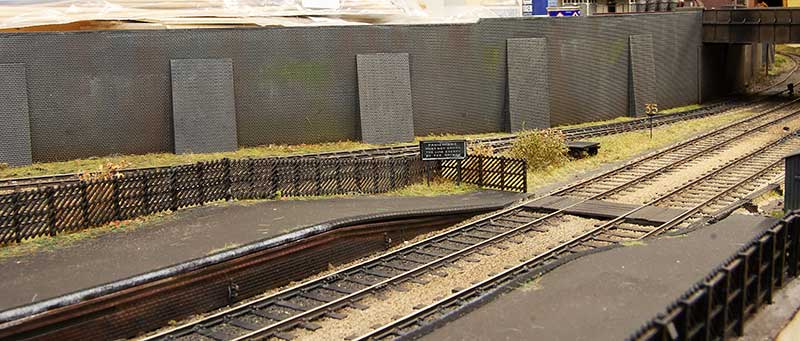 When I built the retaining wall for this side of the bridge I did intend to do something a little more substantial but decided that It would look weird if the wall was 2 different designs. However a friend mentioned that the buttresses looked a little too puny so I reverted to what i should have done originally and modified the existing wall to match. I admit I did want something more grandiose than this but for where it is it wouldn’t have made a lot of sense to have something to elaborate. I definitely don’t subscribe to that inane ‘rule 1’ idea of its your layout do what you want. There has to be some degree of plausibility in there somewhere.
Clutter – What is a yard if it doesn’t have some clutter in it? Much like the retaining walls though you don’t want to go too mad. At the end of the day this is someones product and they aren’t all that likely to leave it lying around on the floor.
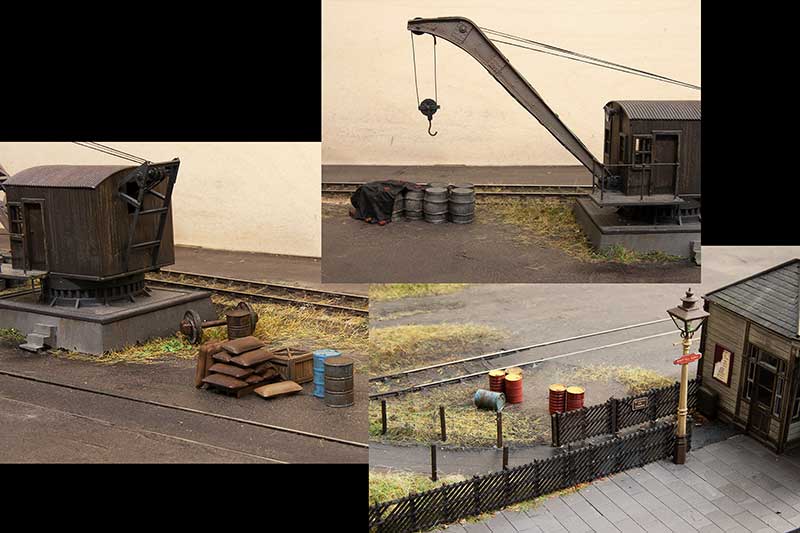 So I opted for 3 small groups of stuff as can be seen above.
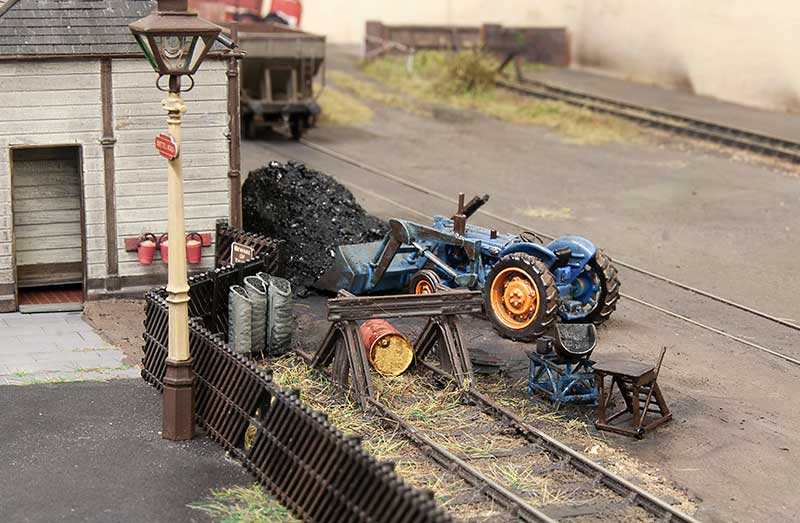 I always wanted some coal facility and I had this in mind when I built my tractor. Again nothing too posh, no coal staithes or anything like that – just a few piles and some more clutter. The steps, scales and the conveyor (behind the tractor) are 3D prints kindly donated by my friend John.
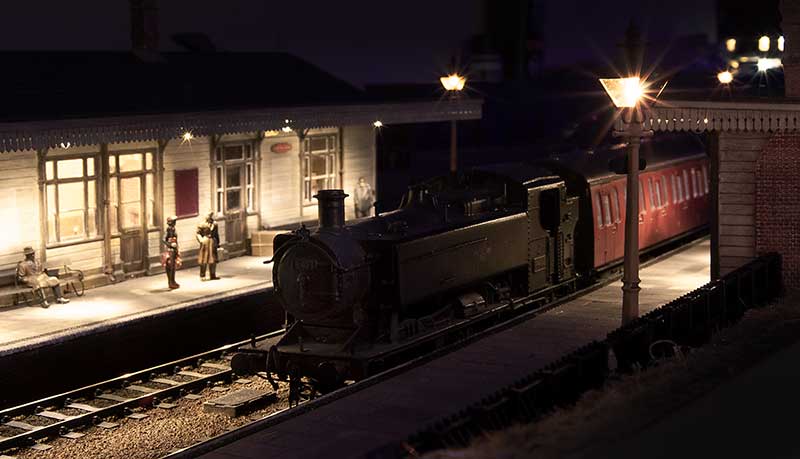
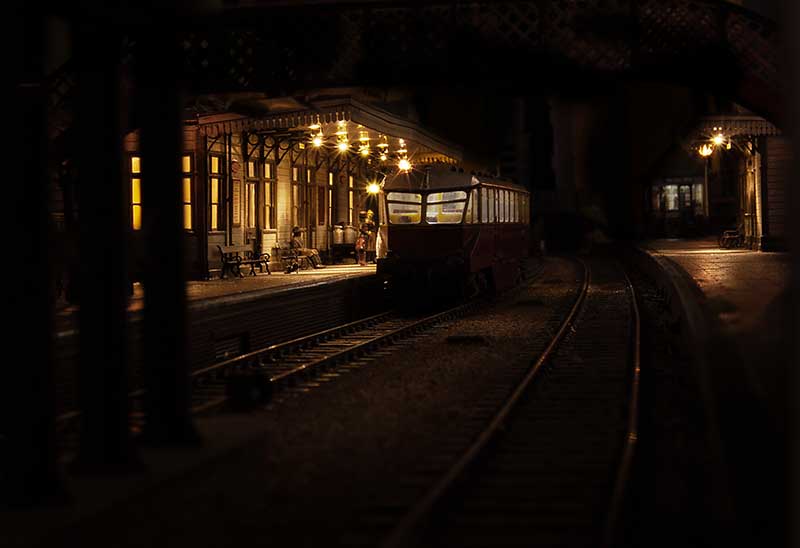
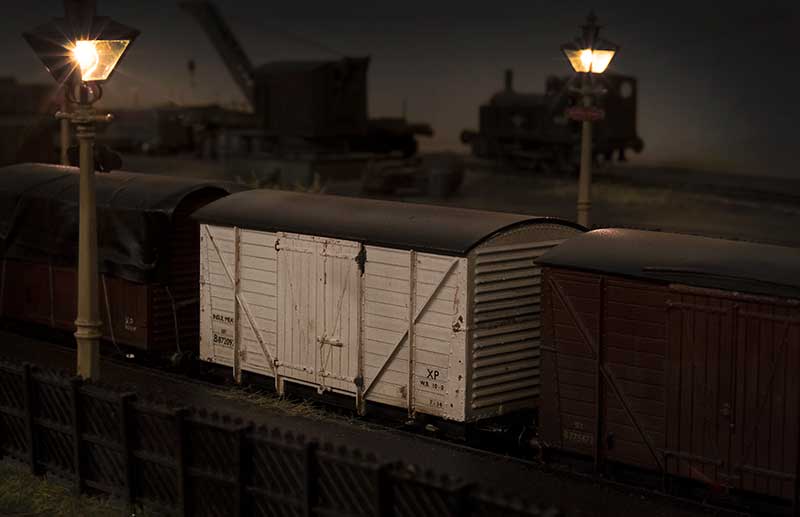
Finally a couple more evening shots.