a small side project
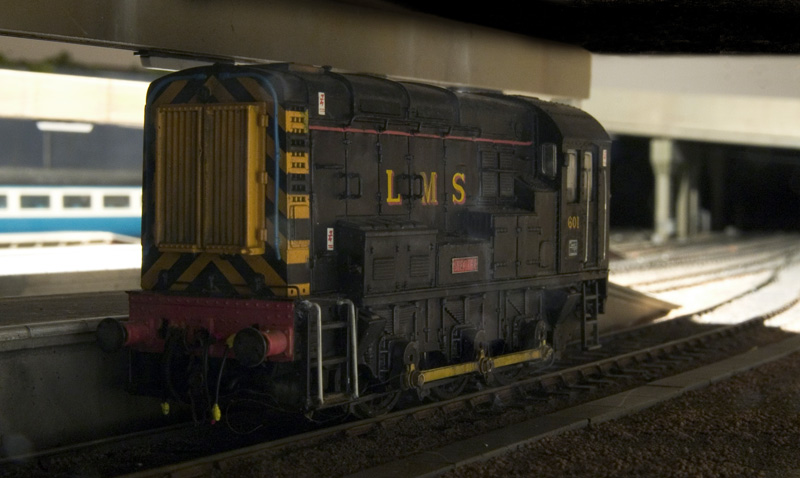 The above picture really highlighted just how flat the Bachmann class 08 spring detail is, so I started looking at them with a view to laser cutting an overlay when I next visited Tim’s as a little side project.
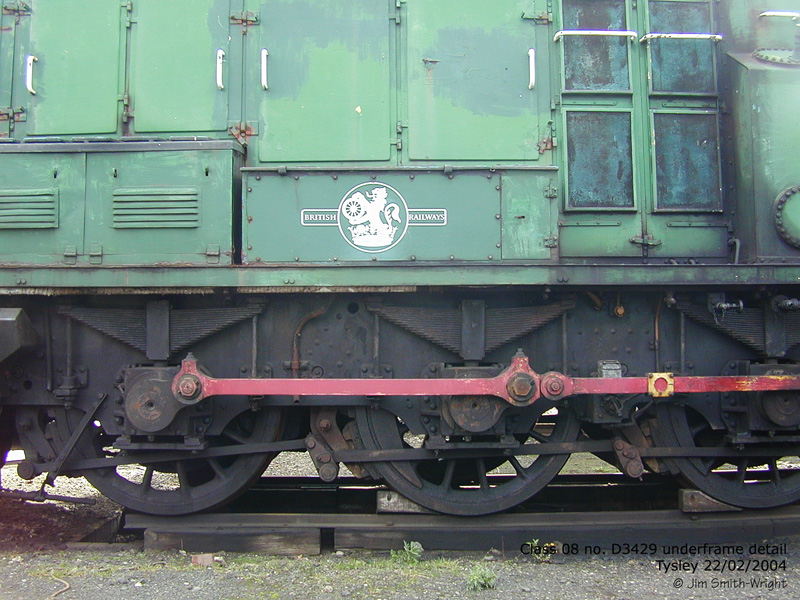 Looking at the real thing they are not only flat but bear only a passing resemblance to the real thing with only about half the number of springs represented, the vertical rods could also be improved by shaving them off and replacing with wire.

Above the final result, it needs the weathering to be blended back in but im pretty pleased with how it turned out.
Ready to Plonk
I do understand the simple pleasures of Ready to Plonk stuff (RTP). The idea of opening a box or packet from your model shop and adding to the layout without anything to do. It’s where we all started from I guess. Building New Street RTP had been a rare occurrence on the scenic side and actually comes down to just 2 instances so far where I have used something as supplied without having to modify it or scratchbuild.
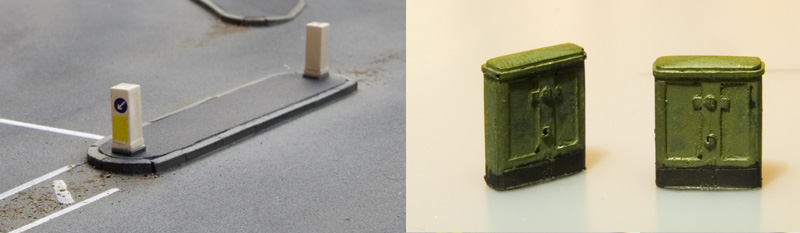 On the left the Bachmann traffic bollards and on the right GPO relay boxes from Unit models. In last years new releases from Bachmann I thought there might be another opportunity for some more RTP activities with the announcement of the humble grit box. With no rush on these but knowing I needed some I decided to wait and see but sadly what emerged seems to be a design I havent seen before and certainly not the sort found on the platforms of new Street. (hey there was a chance it might have been, admittedly a slim one!) Bachmann’s commercial skip bins were another potential but the design is too new sadly.
So armed with a few bits of plasticard and some yellow paint and some dimensions from the website of a company that supplies the real thing. I set to work to make my own. The results are below.

Variations on a theme.
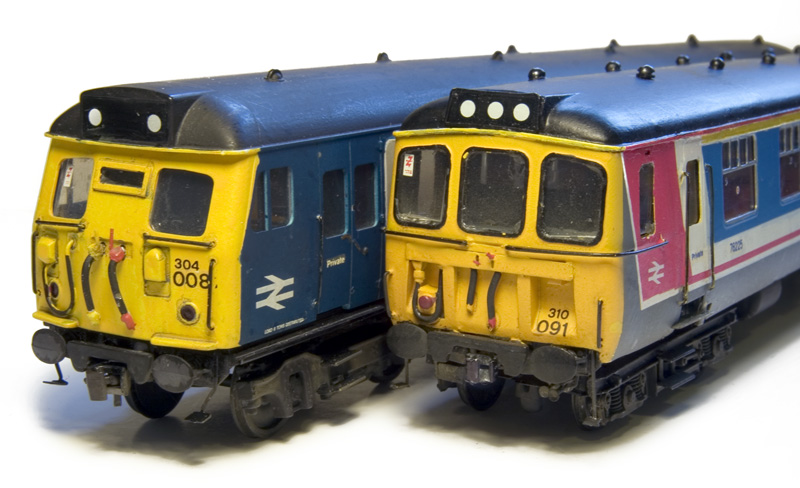
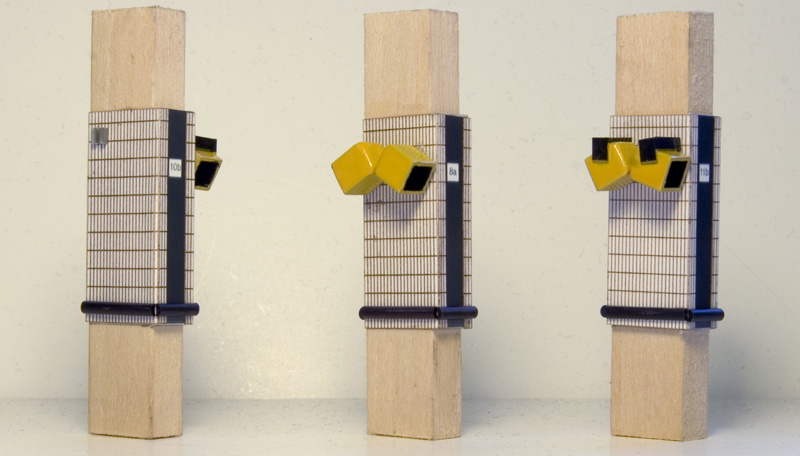
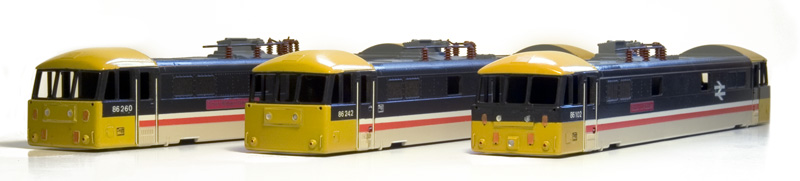 With 3 more class 86’s working their way along my workbench some thoughts on variety might be worth sharing. Eagle eyed folk will spot that the one on the right is a class 86/1 while the others are class 86/2 but I have omitted the chassis for this exercise as that’s the big difference between the sub classes. It’s not even about the detail differences (TMD cables, headlights, extra door handles) but what I want to focus on this time is the livery. All three are, of course, Intercity livery and yet all three are different. The obvious difference is the amount of yellow on the fronts but the more subtle difference concerns 86260 and 86242. Aside from the front 86260 is actually the same as 86102 with the numbers the same size, data panels and nameplates in the same place and the double arrows on the bodyside. 86242 however had slightly smaller numbers, data panels behind the cabs, nameplates mounted centrally on the body, over the white stripe, and no double arrows.
Things get even more tricky if you consider that a year or two before the period my layout is set 86242 had the same livery treatment to the front as displayed by 86102. All this goes to show that you should really work from a photograph of the loco you are modelling taken at the time you are modelling. As I have said before, model what you actually see, not what you think you know.
Sticking with variations on a theme some thoughts on couplings.
The good old Kaydee, reliable easy to use and most importantly faff free in use. I use them between coaches and multiple units. Problems to my mind are as follows
- If you want them to work as intended (with magnets under the track) then you need to mount them too low for 4mm scale – this looks awful and to be honest from a visual point of view not much better than the current crop of smaller tension locks. By that I mean it jarrs to me that the coupling is kind of floating in mid air and not really attached to the vehicle in a way that makes any sense.
- Not a lot of UK stock uses buckeye couplings for coupling locos to trains, or should I say not a lot of uk stock used to use them. In my era it was pretty much EMUs and class 33/1’s and 73’s (the latter not completely unheard of at New Street but very unusual.
- Now this last one is the one that modellers have been ignoring for years – they don’t actually look much like a real buckeye coupling.
The first one is easy – dispense with the hands free and mount them through the bufferbeam where they should be. Mid rakes it not a problem to use Kaydee as, like i said at the start they are reliable and faff free but on the front of an EMU there has to be something better. There is and its called the Sergent coupling.
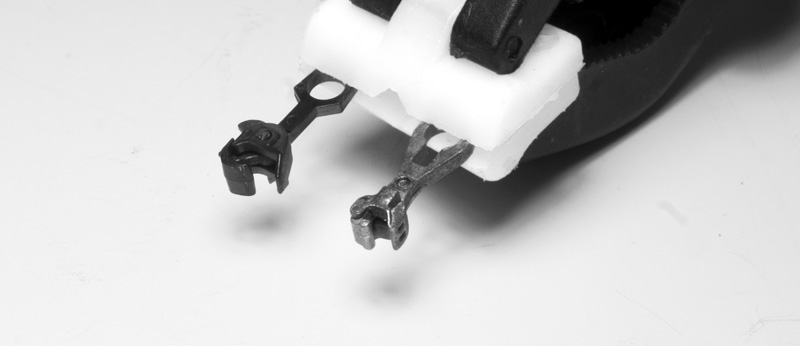
I have been aware of these for a few years now but only just got round to getting hold of some. The difference is, to me at least, like chalk and cheese with the Sergent coupling looking like a copy of the real thing. The Kadee looks almost toy-like by comparison. For those wondering they are not compatible and the way they work is different – the Sergent has a tiny ball bearing inside which holds the knuckle shut. This is released by using a magnet on a wand (from above) but in reality as I am not planning to do a lot of shunting with EMU’s I am using them purely for their cosmetic benefits.
Revisited locos part 2
Progress continues on my class 25’s. I cut out a little jig for the triangular panels on the sides of 25059
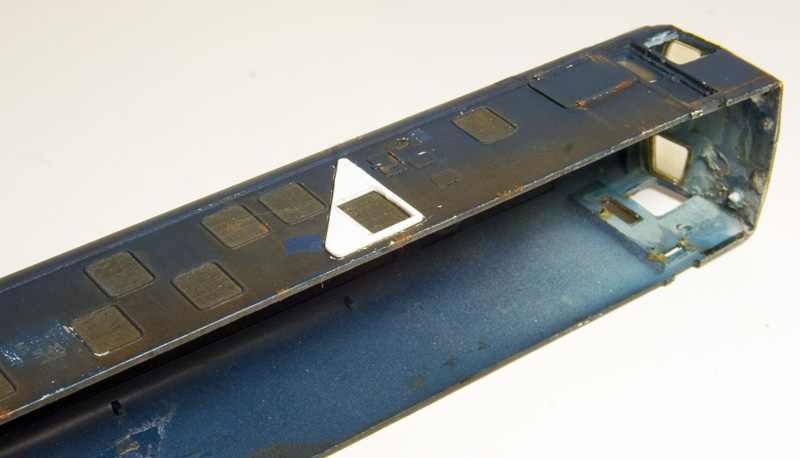 It was then a simple case of scoring round it for the panels (1 on one side, 2 on the other)
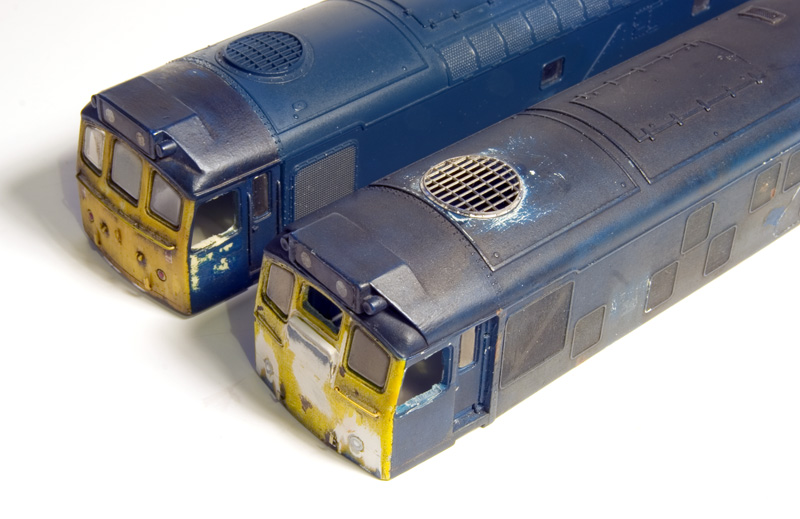 It’s not that the Bachmann roof fan is course as it’s not too bad for what is quite an old RTR model. It’s that it’s so small compared to a scale one. I’ll need to order some more from Brian (and some for the 45 too while I am at it.)
 Progress on 25059. The window has been deepened and the top of the gangway door raised by 20 thou. The bodyside grill hinges are 10×40 thou strip and are only on this side. I re-did the tail lamps, lamp irons and handrails while I was at it.
Extreme etches – Apt I think!
 Some companies in the world of model trains are very aptly named such as Extreme Etches (Masokits is another one). The above example is Hood’s crest which is a 3 part etch for something only 3.5mm high! (I think i need to buy a magnifying glass if im honest)
That said just because something is small and fiddly doesn’t mean the design or thought process that goes into it is poor, quite the opposite in fact. There are many examples of add on bits that are, on the surface, easier but in reality due to poor design are a struggle. Things that don’t fit, are not the right shape or are nigh on impossible to put together (or stay attached to the model). Those who were around in the 1990’s will remember the craze of hacking great big holes in their models to stick on etched bits that if you took a step back and look at properly were worse than the molded stuff you had just sent to the bin. Sadly there are still companies producing stuff like this but at least we have a choice that if we are going to do something, we can do it properly!
Some more thoughts on puddles.
Thanks to everyone who commented on the last entry about the weather. I have been looking at puddles (ok that sounds REALLY weird I grant you) and have done some more experimentation on a scrap bit of card (sprayed to look like tarmac).
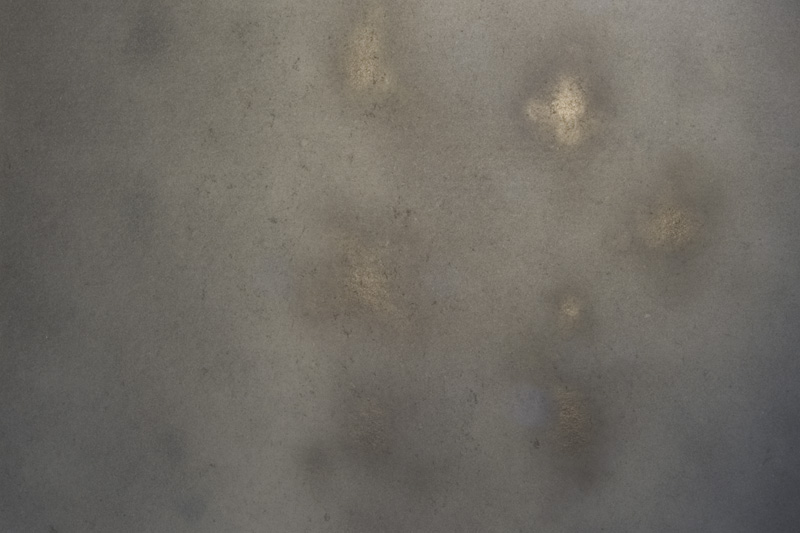 There’s 3 rows here, on the left just Klear and in the center and on the right I sprayed a very light coat of black first (the Klear was applied with my airbrush in all cases)
 The pre darkened areas look much more like the real thing I think.
Dont forget the little guys
Although a fair way off yet I can see the light at the end of the tunnel regarding the platform. What this means though is that some serious thought needs to be given to the subject of people. It goes without saying I’m going to need a lot and that’s going to get expensive. However the more there are the more they merge from an individual person to a crowd and the more confused they get. It also means the more corners can be cut. An example of this can be seen below.
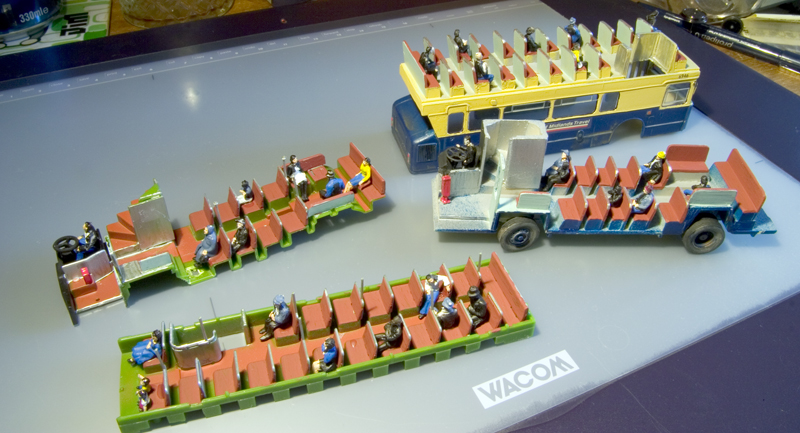 The more observant will notice that some of the passengers on this bus are black. Observation of people inside things like buses and trains leads to the realisation that sometimes you really do see little more than a shadow or a dark shape. There’s no need to paint some 4mm scale chaps tie if he is sitting inside a model. The fact that he is there is often enough.
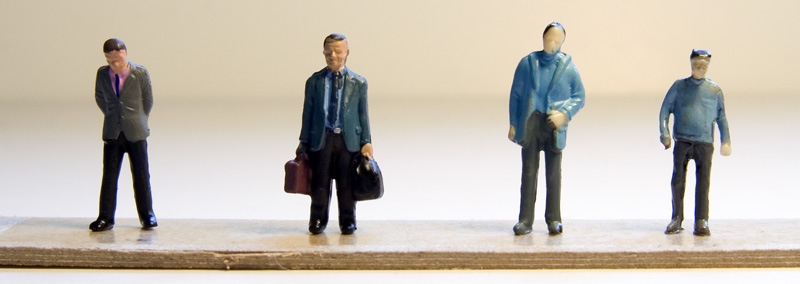 Other than the sheer cost of lots of little people the other thing to consider is the repeats. No point buying 20 packs of the same figures. The 2 chaps on the left are from Bachmann the 2 on the right cheap Chinese figures from ebay. The difference is obvious but the Chinese figures still have their uses. Before I come to that some thoughts on paint. A lot of modellers follow the way the military guys paint larger scale figures but is that the right approach? Most large scale figures are the point of the model but not only that they are highly stylised, kind of like a style in a painting but do they actually look real? More importantly do the same methods scale down to to a figure that’s only 24 mm high?
Its my opinion that they don’t and that we can easily fall into the trap of modelling what we think we know and not what we actually see. For a real person to look about an inch tall they need to be a good few hundred feet away and you cant see detail from that far away. Figures 2 and 4 in the picture above have had a light wash of black applied to bring out the shadows a tad but that’s it. The other thing I quite like about the mixing of figures is that they are not all the same height.
All this talk of distance and what we actually see doesn’t mean that the 2 chaps on the right are OK, Far from it they are crudely moulded and crudely painted but all is not lost.
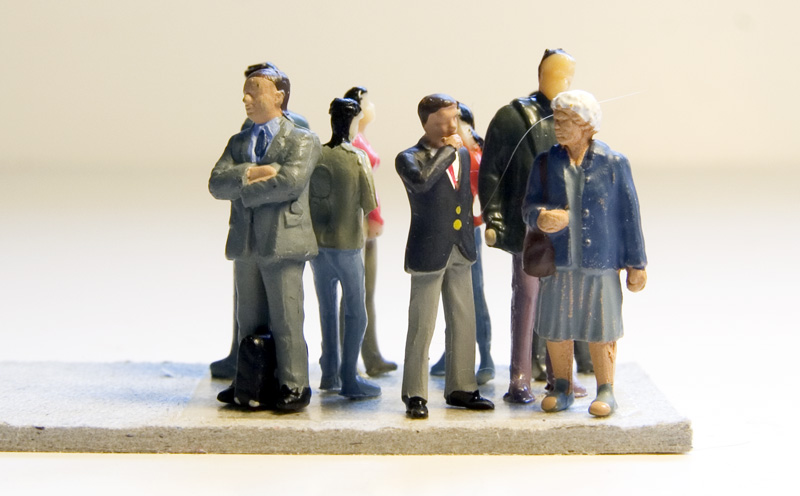 By mixing the figures and putting the better ones at the front a crowd is born and for a lot less money than using all higher quality figures. If you could try to imagine how I think the platforms will look they will be reasonably dark, what light there is will be a horrible colour and the ceilings are low with a lot of stuff in the way of a lot of the views. The people need to do what all the other details on the layout do and that is kind of disappear into the scene, They shouldn’t scream out at the viewer but just simply ‘be there’
1, 2, 3, 4,… …38, 39, 40!
Thanks to some helpful feedback on a forum I have redone the pillars so that the bumpers are higher up (thanks again to Tim for re-lasering me some) and continued with building more. I dunno how I missed the bumper height as I had set them at the right height on the walls.
The title of this post refers to me building a batch of 40 TV monitors for the platforms. A simple enough task with a bit of Evergreen square tube, some strip sections and a spot of glue and a file but the numbers mean it took a whole afternoon! The reason why the middle one doesn’t have any brackets is the monitors are on the none viewing side of the pillar. That’s true for the one on the left too but being on the first platform I thought you might see the brackets from some angles.
Below is how they look in situe

Gangways for DMU’s
Hi All
I’ll get back to the oddball DMU in the next entry but this time (and still related) I have been looking at gangways. The ones Bachmann supply with their first gen’ DMU’s are quite nice and correctly feature the double scissors that most DMU’s carry. However it doesnt really matter how nice they are if there is still a gap between them.
The easiest way to fix this is to use something like these (or make your own) and while not super accurate, lets face it no one is going to notice anyway! However I have for a long time been a fan of the Masokits gangway (see here for Masokits) which while perhaps a bit OTT and a bit tricky to build are well worth having a go at.
Basically it still works the same way, essentially folded paper but surrounded by etched ends and that all important scissors framework. The etchy bits when assembled look like this.
 There are some extra brackets in the kit (which i left off) and it also caters for different types (GWR or LMS). You can even lock them together as per the prototype if you want too! I pretty much followed the instructions with one deviation. The instructions suggest soldering the backs of the pins with a oiled Rizzla (other makes are available) paper acting as a barrier. I chose to solder the pin to the outer arm and crimp it when assembled to old it all together. In reality the paper pushes the arms outwards keeping everything in place anyway.
One painted (carefully!) the paper is folded up and popped into place and a small peice of crepe paper (supplied in the kit) is glued over the top to represent the tarpauling. (you could easily add this to the ones mentioned earlier to improve them if you wanted too.)
 The finished result on a class 108 DMU. I only fit one as the exhausts tend to interfere with them working. A light dusting of weathering is all thats needed. As I said at the start, no one is going to notice anyway but thats not the point!
14th April 2010

Several updates this time, starting with my work on producing parts to help people model Scale OLE. Go to the layout section to see more.

Updated a few of the stock galleries too with classes 08, 25, 50 and 87 all having new pictures. There is a new gallery for class 86 too.

There is a new area in the scenic section for things that don’t really fit in the other sections or warrant a section of their own. Its in the scenic section under miscellaneous.
4th December 2008

Work progresses on the retaining walls and they are not far from finished now. Just the laborious task of picking out different bricks in various different shades. Go to the scenary section for more pictures of progress so far.