
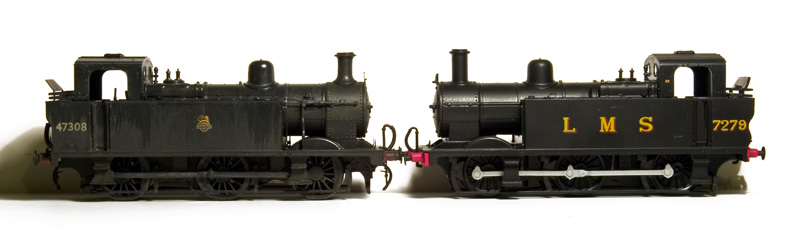
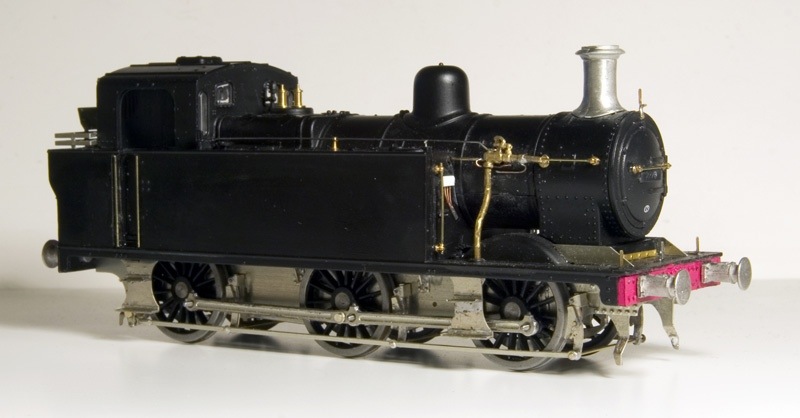
A pair of panniers
I must have had a Lima 94xx tank for over 30 years and its languished in the loft for a large part of that time. I was never a huge fan as with its protruding smoke box it never really looked like a proper Pannier tank to me. Its horrible chassis didn’t help it but as time marches on things change and today its kind of gawky look appeals to my sense of wanting to portray the less pretty railways of the UK. Its extreme cousin was the 15xx tank, which is a particularly ugly monster of an 0-6-0 tank engine, appeals even more.
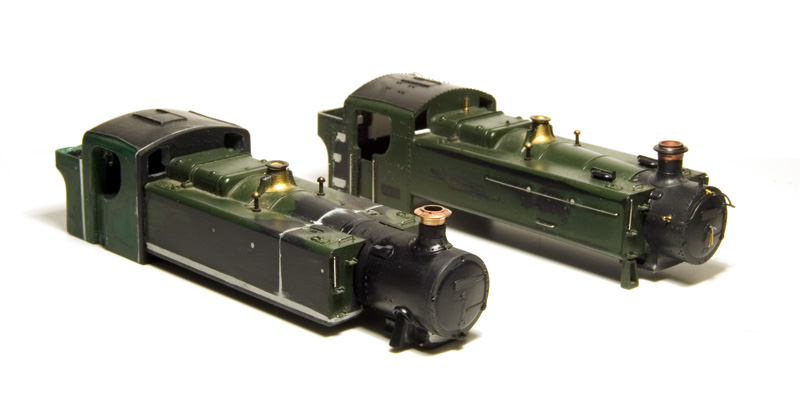
These pair are a little bit chalk and cheese in a way. The 94xx (at the back) is hoped to be a quickie while the 15xx (at the front) will be a very slow burner indeed.
The 94xx
The Lima body isn’t bad at all, the tanks and boiler are a mm too long but over all its pretty accurate. To my eye the chimney and safety valve were too tall so I have reduced them a bit and the cab doors seemed a bit to flush to the cab side so they were cut out and remounted further back. Lima moulded bunker steps on both sides (which is wrong) so they were filled in on the side you can see. The handrails and smokebox dart have been replaced with wire. I plan to mount the body on a Collett chassis from High Level Kits.
The 15xx
I said slow burner earlier because I don’t even know what i’m going to do about a chassis yet, but I’ll worry about that later. The body is a combination of a Hornby cab lengthened by splicing in a 1mm section in front of the bunker and grafting another 1mm section to the front to which the windows were cut out using the originals a guide. The tanks (from another Lima 94xx) have been shortened and made deeper by adding another 1mm section of plasticard to the bottom before filling and shaping. The smokebox and first section of the boiler come from an old Airfix Prairie tank kit with the front of the lima smokebox grafted back on.
First stock for Brettell Road, finished
I’ve been busy finishing off some stock for Brettell Road. Starting with some wooden opens.
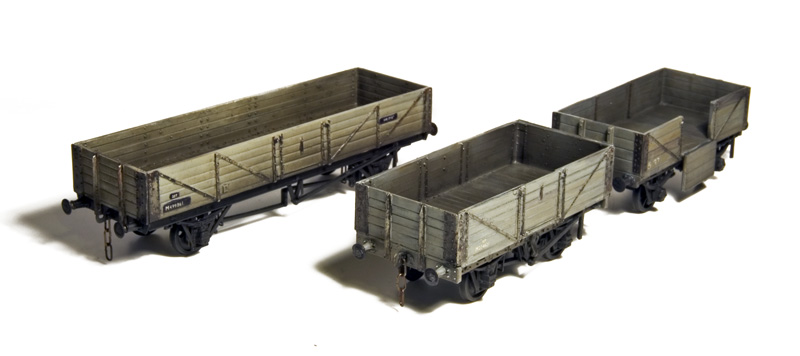
The Tube is an old Colin Ashby kit and is sprung with Bill Bedford springing units. I think you can get a kit for these wagons from Chivers now. These wagons have been weathered to look wet but you cant see it in the picture.
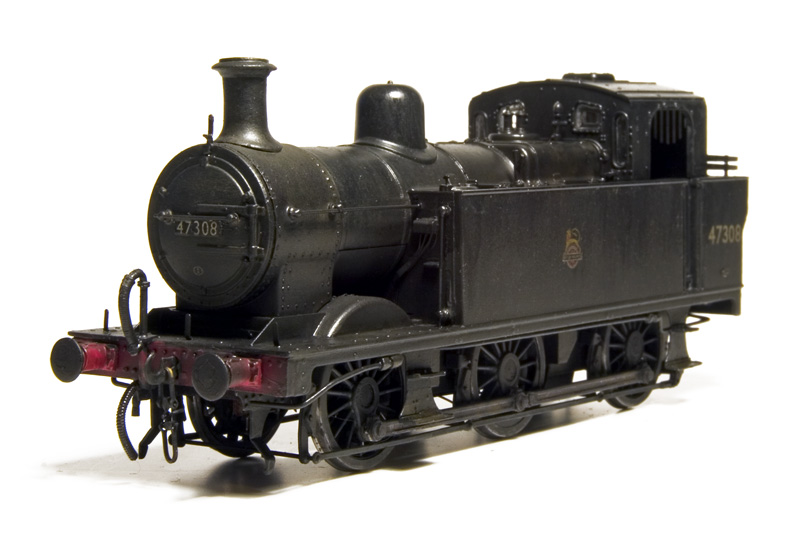
Back to the loco that started the whole project my GBL Jinty. I’ll let the pictures speak for themselves.

Look mum, no glue!
Dear Customer (the letter reads). We are aware then many Falcon Brassworks kits have a reputation for being difficult to build or simply ‘aids to scratchbuilding’…
…If you feel this kit is not what you had expected or you are not confident about completing it please return it to us in its original condition and we will be happy to offer a full refund.
You cant say fairer than that really and given my liking of ballast wagons and the way I get a lot of enjoyment out of making things that are difficult I have been building the Falcon Brassworks Kit for the LMS 25T Ballast hopper or Gannet as they became under BR.
108 of these wagons were built to Diagram 1804 in 1932 by Metropolitan Cammell, and further wagons of the same design (with slight detail differences) were built by BR to lot 1/518 in 1949. Usually branded as Gannet under BR some were also branded Trout and they lasted till at least 1976. Apparently they were unpopular with workers as you basically had to stand next to the falling ballast to operate the handwheels.
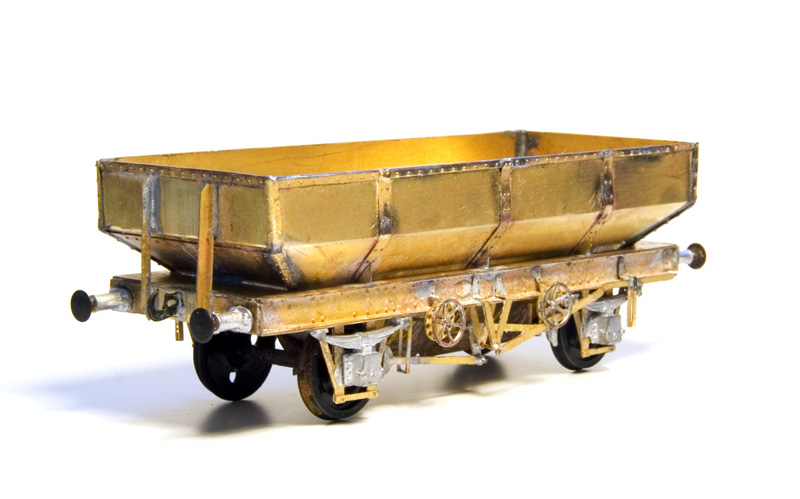
The kit wasn’t too bad, some of the parts were not etched cleanly and there were no tabs to help with assembly but it all went together reasonably well. The W irons were replaced with Bill Bedford sprung ones and other parts such as handwheels, brake hangers and lever guides were replaced with better parts from other suppliers. The Brakes themselves had no detail on at all so these were given a bit of a work over with bits of brass.
Other than that quite an enjoyable little project. I don’t know if id want to do a rake of them and its worth pointing out that the clearances between the hopper doors and the wheels is very very small. Some modification would have to be done for EM and i’m not all that convinced it could actually be built in 00!
RJ Essery’s book on LMS wagons shows one in 1965 with a caption saying that it is in BR Livery. As the image is black and white i am guessing that means black but if anyone knows for sure I would be grateful to hear from you.
For some pictures of BR ones see http://paulbartlett.zenfolio.com/brgannet/h58ef291#h15e03d3e
Soldering on
I’ve had an enjoyable few days soldering stuff. Not random bits of brass to make bits of overhead but proper kits, designed by someone else!
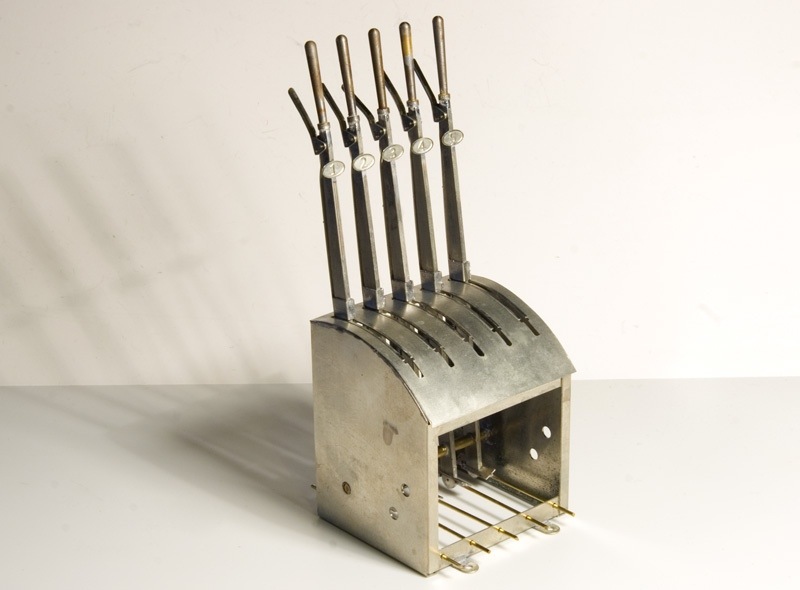
Starting with this rather nifty lever frame from the Scalefour Society. One of these can often be found on their stand at shows and it’s pretty hard to resist having a play with it. At one point I thought of getting one just because it’s nice! Now with Brettell Road I have an excuse!
It’s build as per the instructions. The kit allows for additional micro switches to operate point motors but in this case I’m planning a purely mechanical system.
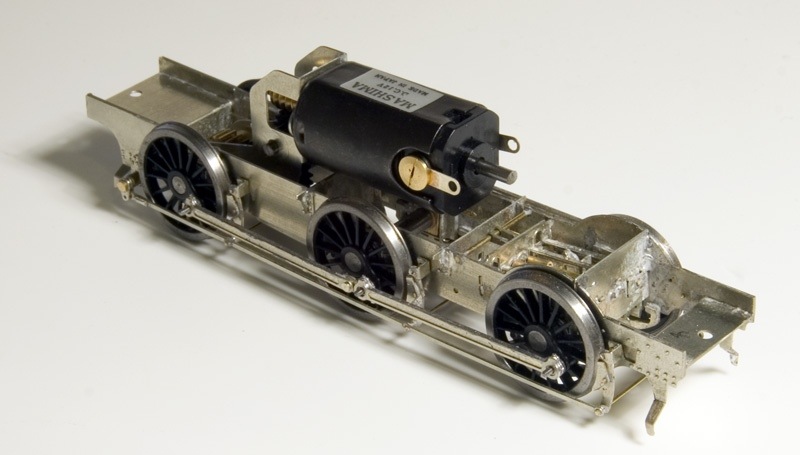
Next up the High Level chassis kit for my Jinty. As supplied the kit is designed for traditional compensation but I wanted mine sprung. The current fad for continuous springy beams seems like a lot of faffing about (I admit I’ve never tried it) and doesn’t really replicate what I see on real locos. The idea of equalised beams seems a whole lot more simple, uses less bits and is what the real thing does, (ok not a Jinty but think of a class 47 bogie).
Other than that I followed the instructions and for my first ever etched chassis I was surprised that it only took 2 afternoons to get it all together, I’m not sure why I thought it should take any longer to be honest. Obviously there’s a bit more to do yet, balance weights and pick ups.
Above a quick mock up of how it all looks. The steps don’t come with the kit and are from the Brassmasters detailing kit I used earlier. It’s something a bit different for me and it’s really nice that someone has done the thinking about it stage for you. Makes a change from assembling a load of unrelated bits and having to figure out what to do with them!
Point rodding and hints of the past.
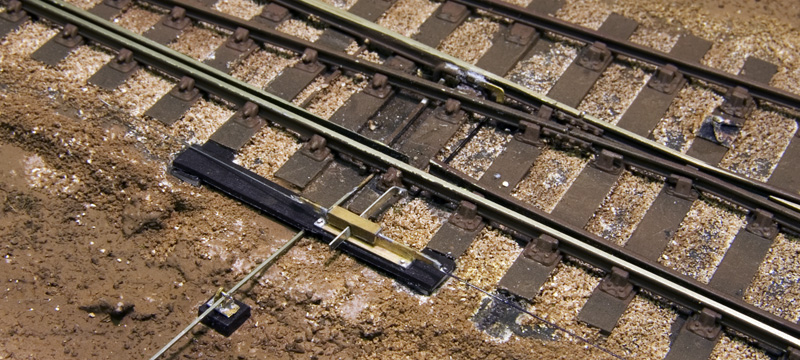
What you see above is a representation of a detector for the ground signal on Brettell Road. It was knocked up from scraps of brass using photos and Steve Hall’s articles in MRJ 113 and 115. I always enjoy fiddly details like this even though I know it will go unnoticed to most people.
There’s only going to be 1 point on Brettell Road that’s operated by the off scene signal box, the rest being operated by hand levers. However I wanted to include remnants of what was there before meaning the double slip would have been operated either end with facing point locks. Also given the distance a couple of compensators will be needed so while it’s not exactly complicated stuff it is worth doing.
My chosen route is the Brassmasters etched bits with rodding from MSE. I have also included the odd rodding stool where the rodding has been removed to help with the idea that it’s not so much added to the layout as taken away.
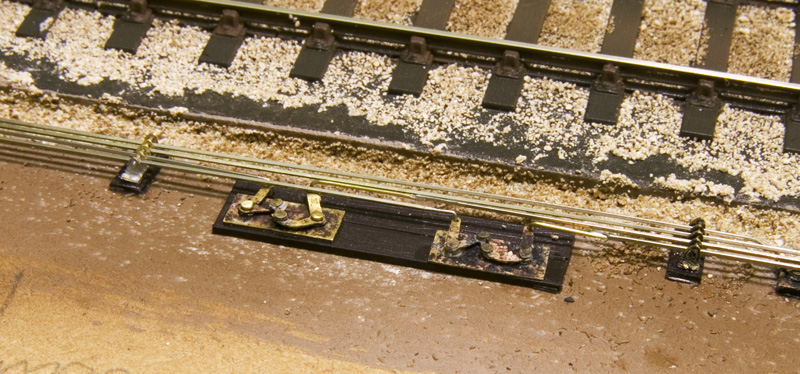
Most of this stuff is quite basic if a bit fiddly. Above are a couple of compensators. The ones supplied are cosmetic and don’t move and that’s fine for the disused rods as per the one on the right however with only 1 run that does anything it would be rude not to make it work. Ok it’s driven from the point rather than driving the point itself but let’s not worry too much about that. 2 Brassmasters compensators were used to make the one on the left with the centre arm from one and a few brass pins meaning it will move when the point it thrown.
All in a fun little project.
http://www.youtube.com/watch?v=5QrJsLczids&w=600
Signals
I’ve always liked mechanical signals, the ones on Moor Street are great fun to play with but for New Street I wont get the chance to have any. However for Brettell Road there are 2 (one of which is abandoned) so I have got to have a go at making some from MSE kits.
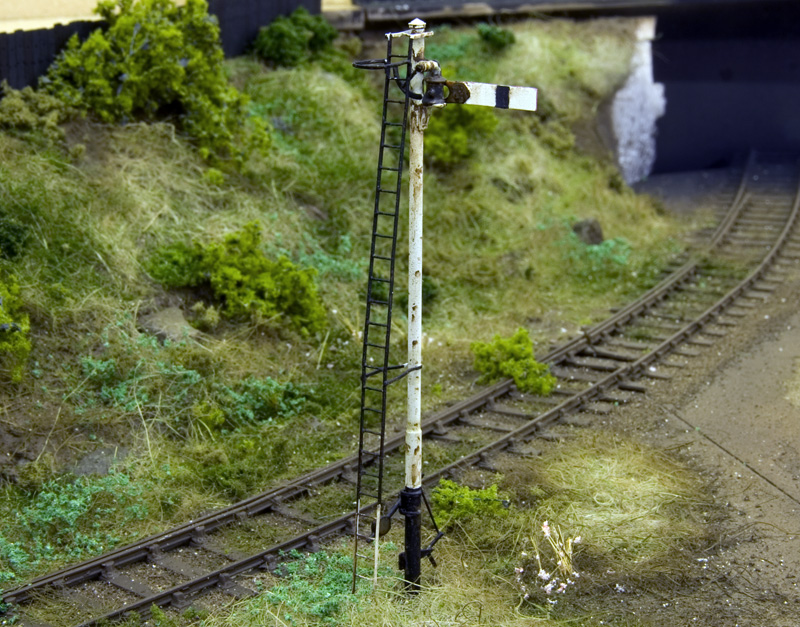
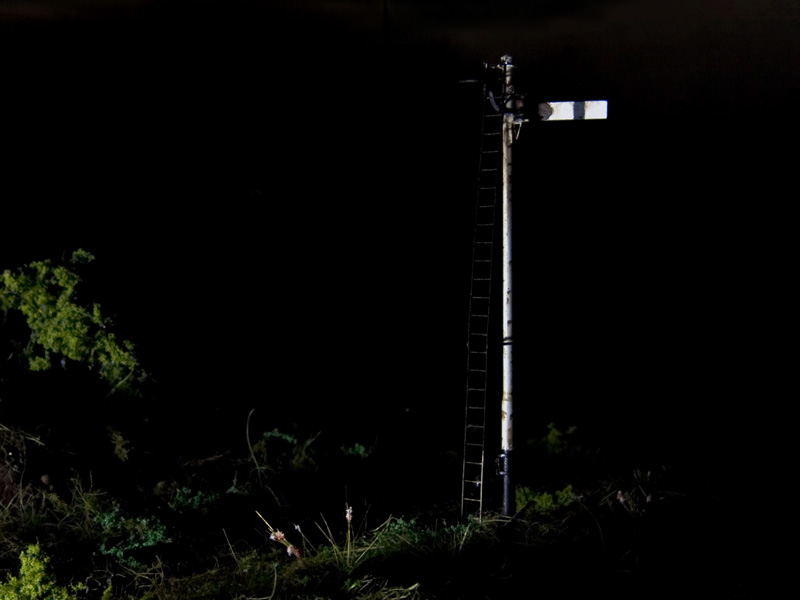
First up the disused one, based on a photo I found. This one would actually be a repeater for the main signal the other side of the bridge due to sighting problems. Weathering is done with gouache. I replaced the supplied ladder with one of Colin Craig’s.
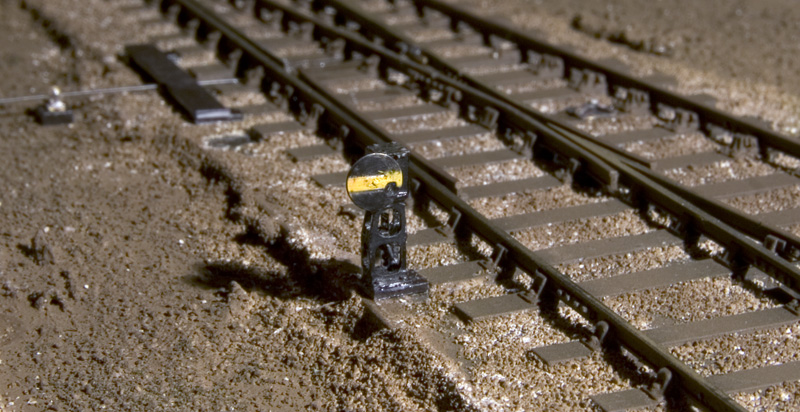
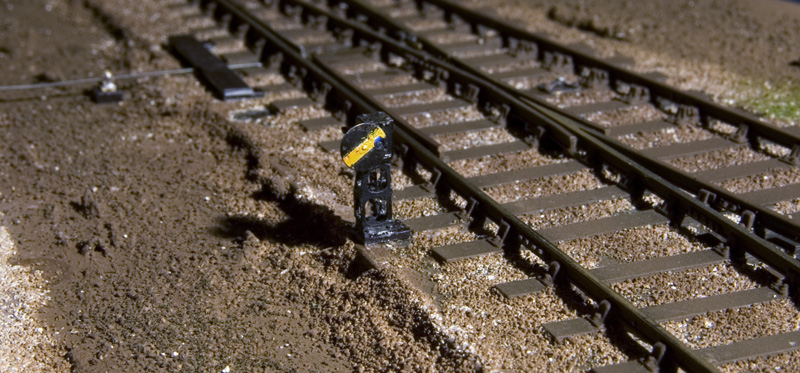
The other signal is this little ground signal (yellow so that the headshunt can be used when its set to danger) I deviated from the MSE instructions by making the counterweight arm work too. Theres a fibre optic in the lamp but its a bugger to photograph – you can just make it out in the second picture. It looks a bit blue but I was using a white light source – changing it to a yellow one should correct this.
Finally as I was tidying up I left a pack of LED’s lying on the layout and purely by chance it illuminated the signal. Thinking it looked quite nice I took the image below – I’d like to claim it was carefully planned but nope – this was just lucky!
Click here for Model Signal Engineering’s website

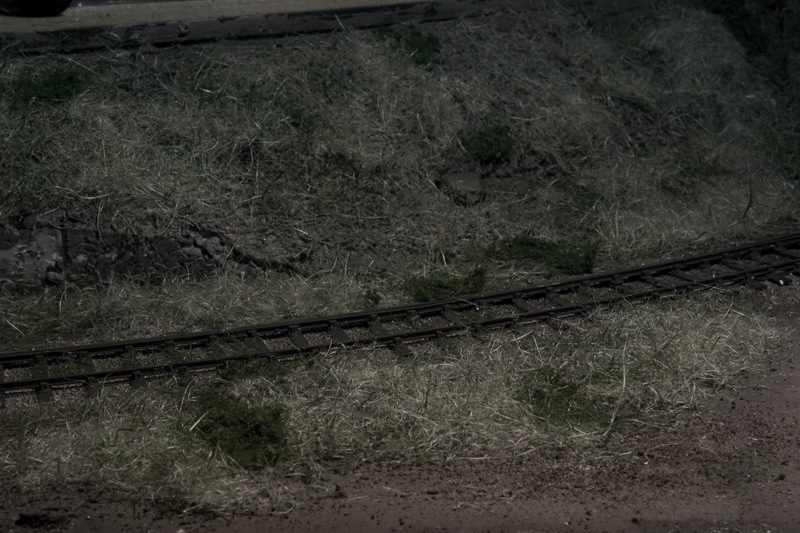
The image above shows progress on the embankment section. I can’t claim any expertise in modelling nature as it’s not something I’ve come across much before however a while spent looking at local plant life for the “what” and Gordon Gravetts book on the subject for the “how” has produced something I’m quite happy with although I am undecided if the nettles are a bit bright. I drew a quick fencemade from sleepers and Tim kindly laser cut it for me for the top of the bank. I guess it does mean that Brettell road will be set in early October mind you. If you haven’t got Gordon’s book yet then its well worth finding a copy.


I’ve made a start on some wagons. From the left are a Cambrian 5 plank open for which I found you need to remove a bit of material from the base of the w-irons for P4 wheels. Then there’s a Ratio Van and open (I’ve never built Ratio kits before) The open is really too old but I have a plan for an off scene steelworks (sort of Round Oaks ish ) so I will use this as an internal user. Followed next is a Parkside 7 plank open, simplicity itself and a Bachmann RTR van- this was supposed to be a quick win picked up from the bargain bin at Modellers Mecca but conversion to p4 was a bit more than just sticking wheels in with material needing to be removed and new brakes added from MJT. Right at the end is a Peco wonderful wagon tank. Quite advanced for their time with working buffers and springing. In reality the springing is a bit too hard to be of any real effect so I will fit some Bill Bedford sprung W-irons.

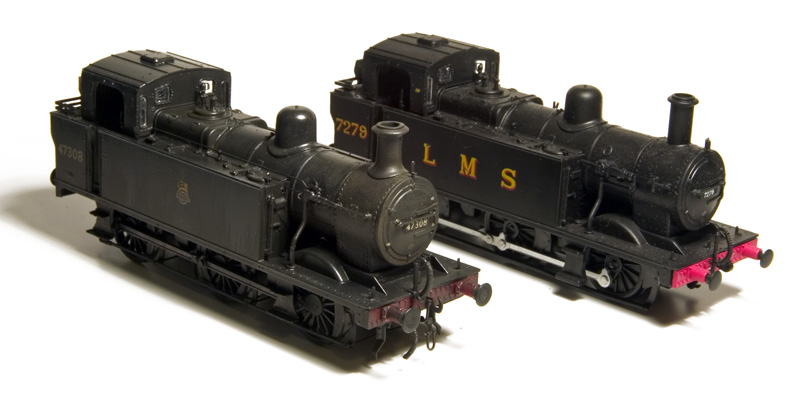
Finally back to where it all started , the GBL Jinty. The body has been detailed with bits from the Brassmasters kit, some parts from Markits (and London Road Models as well as some home brew parts such as lamp irons from brass strip. I haven’t done any work under the footplate yet as I need to look at the High Level chassis next.
Tanks and Trucks
Not the sort with tracks and a large gun sticking out of the front but storage tanks
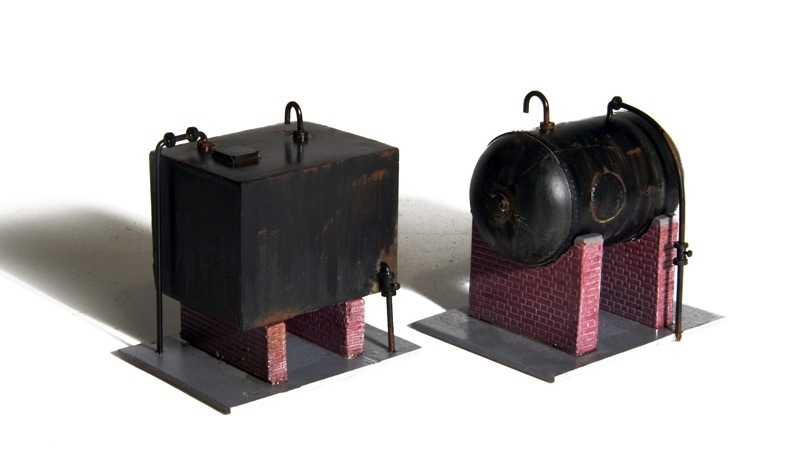
These are resin kits from Unit models with a bit of extra detail added. If you are not familiar with Unit models they are a little company with an extremely useful range of bits and bobs for scratch-builders – well worth checking out their site.
A pet peeve I have is really nicely modelled layouts with ever so shiny road vehicles that are clearly tipped from the box. These are usually done by quite skilled modellers who wouldn’t accept such a thing if it was a rail vehicle but are happy too for cars, trucks and vans. Odd then that I’ve just done a lorry for Brettell Road that is deliberately shiny!

You may have thought that the tanks look shiny too and you would be right. Part of the plan to model Brettell Road is to model it in the rain. I’ve seen layouts that depict snow but never rain which is a tad odd when you consider that in the UK on average it rains for 1 in every 3 days! This lorry is effectively a freebie, using left over bits from lorries done for New Street.
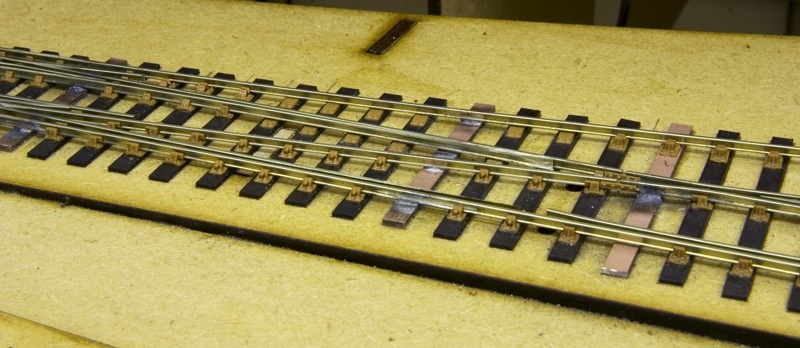
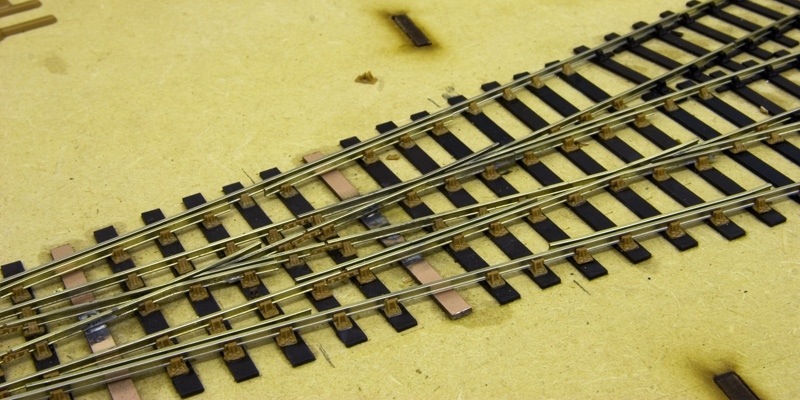
I realised that the picture of the double slip that isn’t in an earlier post is a bit confusing. However once a spot of paint is added it becomes much more obvious which bits are used and which bits are not.
Finally a start has been made on the scenic side of things. Its early stages at the moment but the below picture gives a good idea of the effect I have in mind for the layout.
Buffer stops
Despite Brettell Road being a fraction of the size of New Street it needs a lot more buffer stops. I’ve had my eye on the growing range from Lanarkshire Models for a while but up until now I’ve not had anything I can use them on.
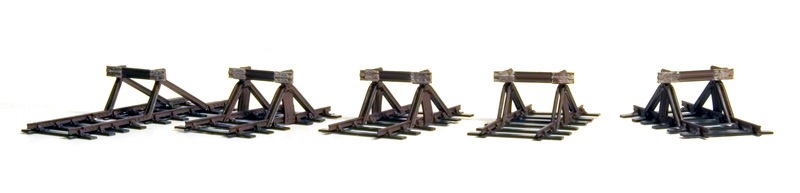
I decided to go for the Midland type but with an LMS/BR one thrown in for a spot of variety. The kits cater for 00 or EM/P4 by the virtue of 2 different bufferbeams. There’s only 5 parts per kit and all are very cleanly cast with only a tiny bit of tidying up needed. You will need to add sleepers and chairs of your choice. I found for some reason my usual brand of superglue (zap with the pink label) didn’t want to grab the white metal so I soldered the sides and just glued the bufferbeams (with a piece of tracing paper sandwiched each side for insulation). You can judge the end results for yourself.
Lanarkshire Models growing range of buffer stops can be found here.
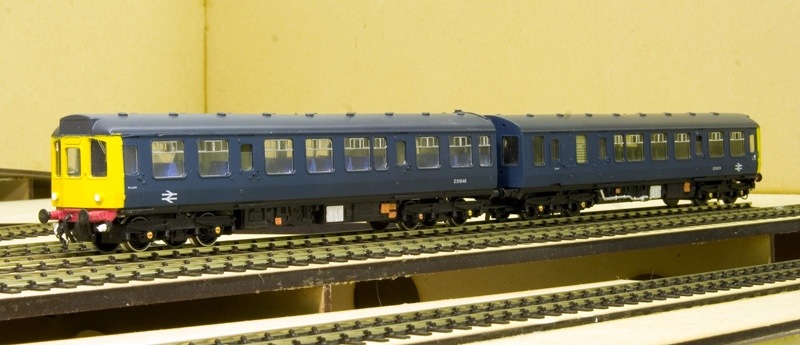
It’s alive!
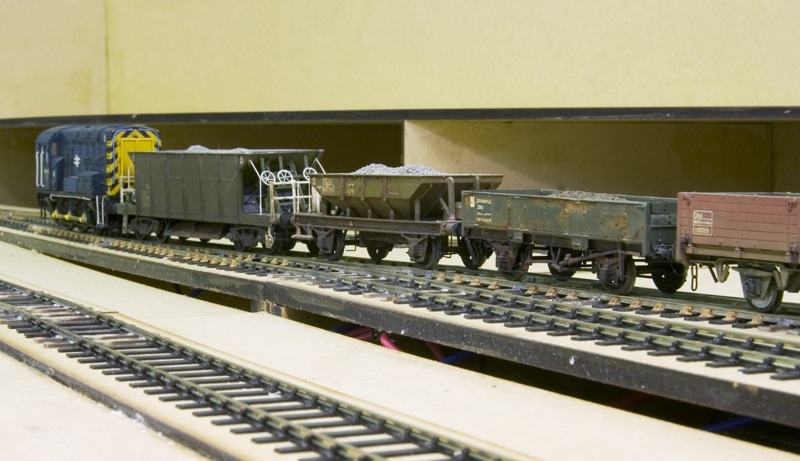
With the track finished and wiring done the first train has had a run round the layout. Surprisingly for a first running session, nothing fell off! In the absence of suitable stock 08610 and a short rake of modern wagons did the honours!
I think my fascination with chopping up hornby class 110 DMUs is turning into a bit of an obsession! A quick browse on EBay saw another victim picked up cheaply (although this is the first time I’ve ever had a complete one). Question is what to do with it. Looking at some early ’60s pictures there’s a couple of options and I present the case for each below.
Class 100
For.
Seemed to be quite common in the area.
I’ve done one before so I know what to do
It appeals to my function over form tendencies.
Against.
I’ve done one before!
Class 103
For.
Quite an attractive looking unit
I haven’t done one before
Against.
Less common than the class 100s
Perhaps I need to ask my audience what they would prefer to see?
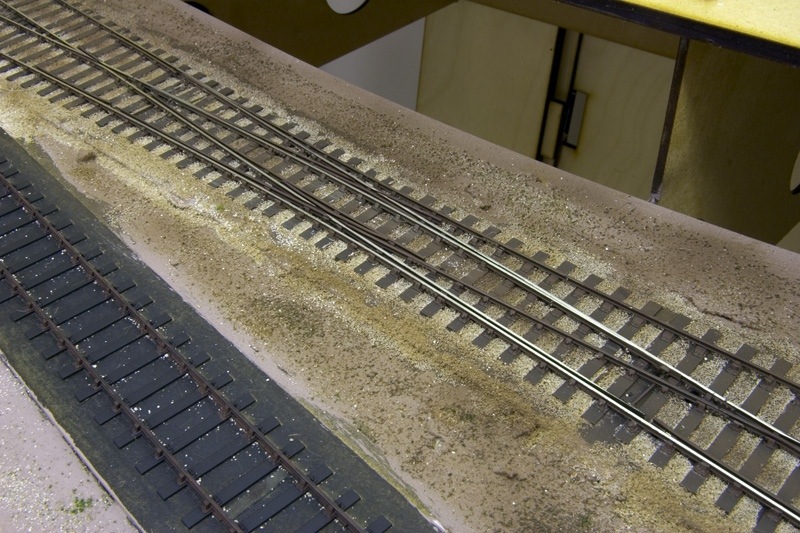
Track laying done (well the tricky bits)
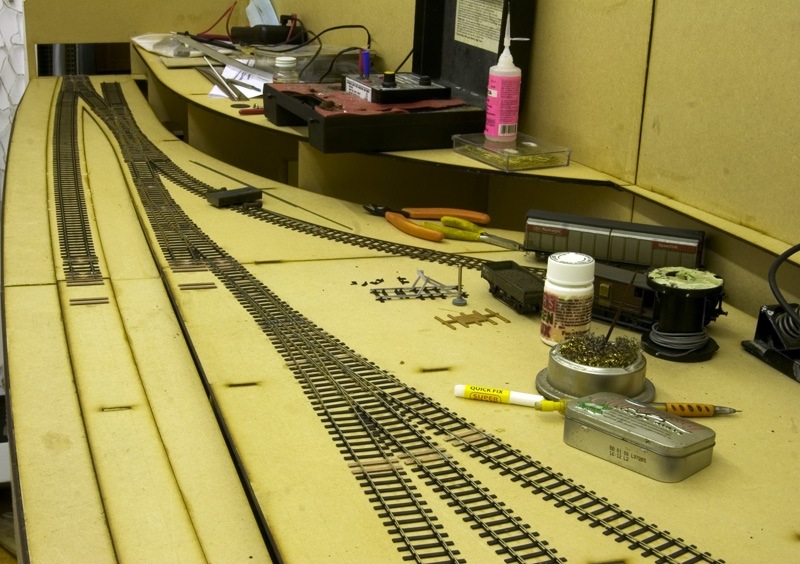
I must admit I’m a bit out of practise with this track building stuff and this took a bit longer than I thought. Above is an overview of the trackwork so far with just some plain track still to do.
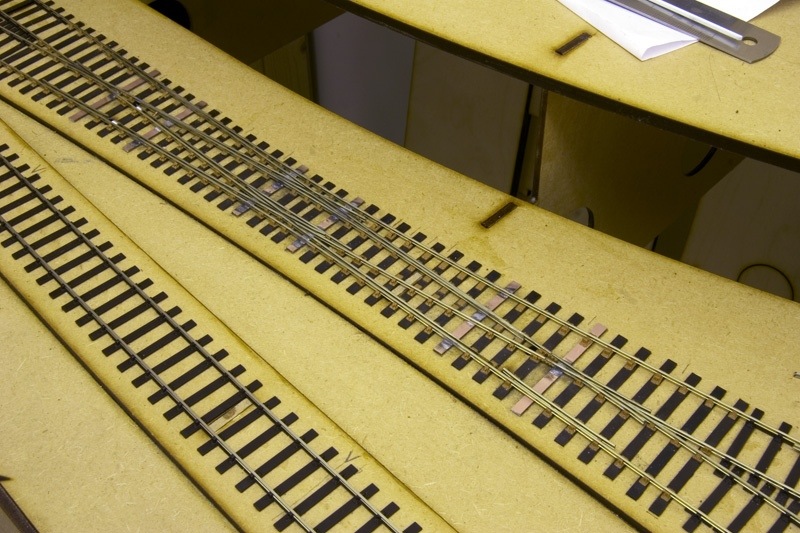
First up is a double slip that isn’t! It’s actually just a normal turnout from an operational point of view with one end blocked and clamped so it doesn’t move.
At the other end I’ve removed two of the point blades to depict that the line it leads too is out of use.
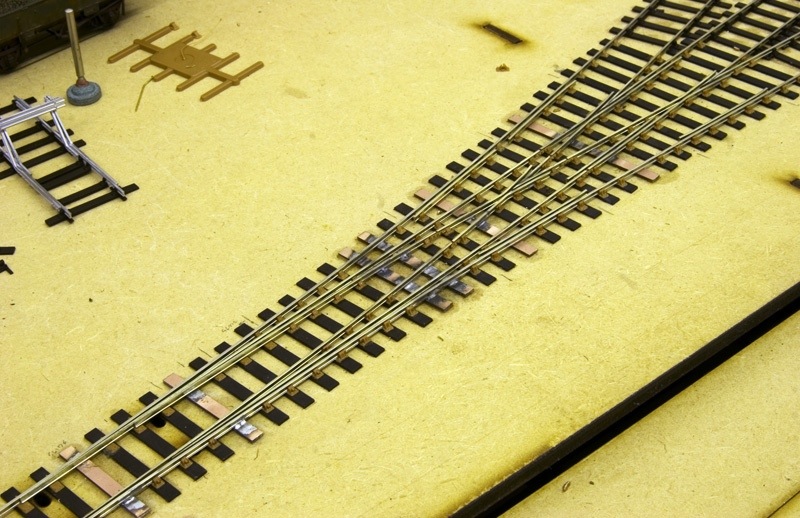
On the other board is a 3 way point. I’ve always found these more tricky than double slips although they are less work.
It’s the way the 3 vees have to interact that makes them tricky. I also messed up the first set of blades and got one in the wrong place so I had to do it again. It was only once I’d done it that I remembered I might have done exactly the same thing last time I did a 3 way!
Introducing Brettell Grove
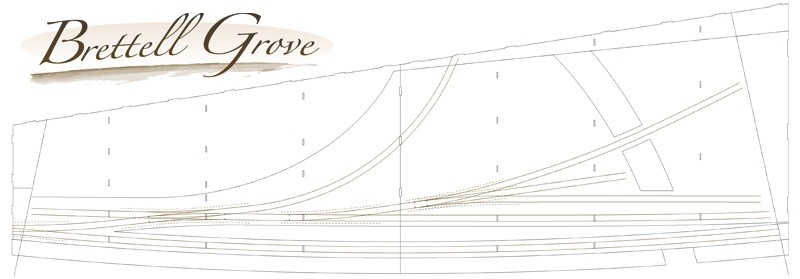
Regular readers will recall that I was quite taken with the GBL Jinty. Well after wandering around the area where I live (both online and in reality) I decided a small plaything based loosely on the sidings at Moor Street might be worth looking into. A day or so in Illustrator and the above plan was formed.
When I say loose I mean very loose. For a start Moor Street yard was firmly in GWR territory and I prefer the Midland. The yard at Moor Street was much longer and double ended and the canal is in a different place. Plus the mainline is double, not single and flat, mine is neither. The real location wasn’t, to my knowledge, as hemmed in by buildings as I wanted. The name is based on the nearby Brettell lane.
There’s also the opportunity to practise a few things I will be using on New Street, mainly laser cut baseboards and buildings. Plus it’s a bit more ‘railway’ than my shopping centre, which will be quite a long term project.
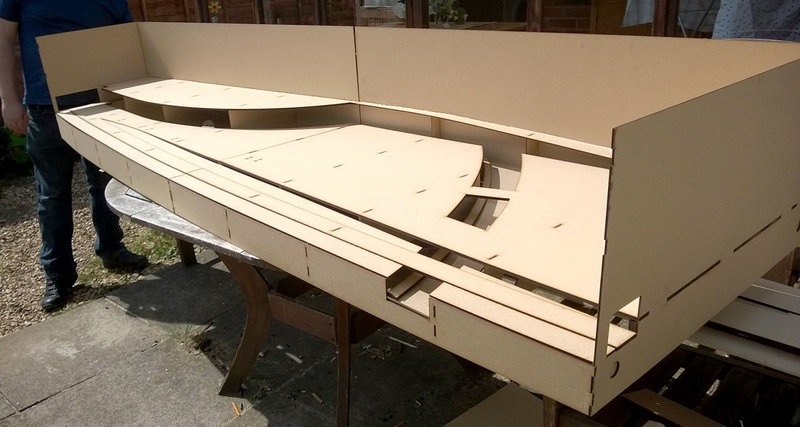
So with the help and guidance of Tim and a couple of days at the controls of his laser cutter a couple of baseboards were cut and assembled. A few mistakes were made but overall I was pleased with how they turned out.