Filling the stock box.
Perhaps its a bit of OCD but I find if there’s a gap in a stock box I have an urge to fill it with something. In this case I have a gap next to my TTA’s and the easy option would be to buy a Bachmann one, fit springs and a new walkway and bobs your lazy uncle! However things don’t work like that and while browsing Paul Bartletts wagon site I came across these!
Something a bit different and yet not in a stand out “look at me” way. A couple of cheap Hornby TTA’s were found and cut in uneven halves to make the barrel 3mm longer. I know I have gone on about the Lima Mk2′ s being too short and how I’m not all that bothered and yes the difference is about the same but it pays to think of these things in terms of context and percentages. Context , I need a lot of Mk2s and I don’t see a huge gain for the effort in a large fleet, where as I’m only doing one of these. Percentages – 3mm over a coach is a lot smaller percentage error than 3mm over a wagon that’s less than half its length.

The chassis is scratchbuilt (it’s not exactly complicated) from evergreen section with suspension from Wizard models, Buffers are from the Southern modellers group.
Also in progress is another Mk2 transit van. I’ve been meaning to do a LWB high roof bus for a while in BTP livery to park outside the station (that’s where the BTP offices were and there were always police vehicles parked there). However an out of the blue request* has led me to a short version instead . The ingredients are the usual mix of Corgi Mk1 van and ABS fronts with a hefty bit of drilling and filing.

*More about that in a later update.
15th September 2014

In less than 2 weeks, Calcutta Sidings will make its third appearance at a show, This time Scaleforum. For more details of the show please click here.
On the subject of shows I have added an upcoming shows page that lists upcoming appearances for Calcutta Sidings, Birmingham Moor Street, New Street and any demos we might be doing. You can find it in the other section or by clicking here.
Finally some of you have already found it but I have a new workbench section for a little side project I am working on. Much like the plank, it’s really a glorified test bed for stuff I want to try out for new street but this one will be more black country, more early 1960’s and (whisper it quietly) more steam! After a few name changes it called Brettell Road and you can find it in the workbench section.
Buffer stops
Despite Brettell Road being a fraction of the size of New Street it needs a lot more buffer stops. I’ve had my eye on the growing range from Lanarkshire Models for a while but up until now I’ve not had anything I can use them on.
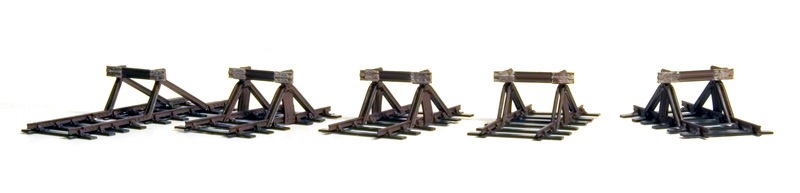
I decided to go for the Midland type but with an LMS/BR one thrown in for a spot of variety. The kits cater for 00 or EM/P4 by the virtue of 2 different bufferbeams. There’s only 5 parts per kit and all are very cleanly cast with only a tiny bit of tidying up needed. You will need to add sleepers and chairs of your choice. I found for some reason my usual brand of superglue (zap with the pink label) didn’t want to grab the white metal so I soldered the sides and just glued the bufferbeams (with a piece of tracing paper sandwiched each side for insulation). You can judge the end results for yourself.
Lanarkshire Models growing range of buffer stops can be found here.
It’s alive!
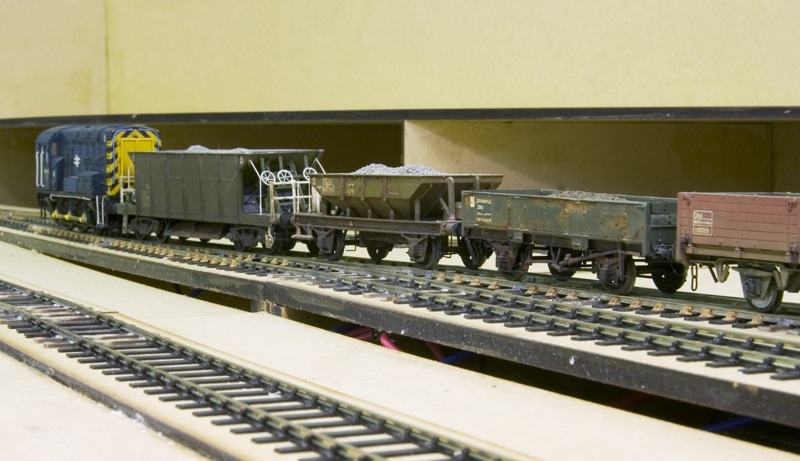
With the track finished and wiring done the first train has had a run round the layout. Surprisingly for a first running session, nothing fell off! In the absence of suitable stock 08610 and a short rake of modern wagons did the honours!
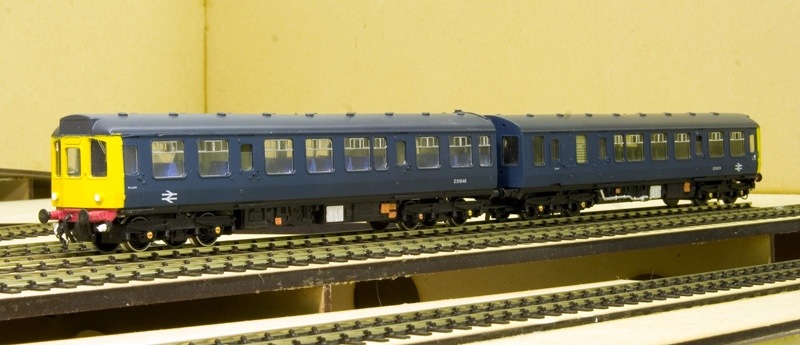
I think my fascination with chopping up hornby class 110 DMUs is turning into a bit of an obsession! A quick browse on EBay saw another victim picked up cheaply (although this is the first time I’ve ever had a complete one). Question is what to do with it. Looking at some early ’60s pictures there’s a couple of options and I present the case for each below.
Class 100
For.
Seemed to be quite common in the area.
I’ve done one before so I know what to do
It appeals to my function over form tendencies.
Against.
I’ve done one before!
Class 103
For.
Quite an attractive looking unit
I haven’t done one before
Against.
Less common than the class 100s
Perhaps I need to ask my audience what they would prefer to see?
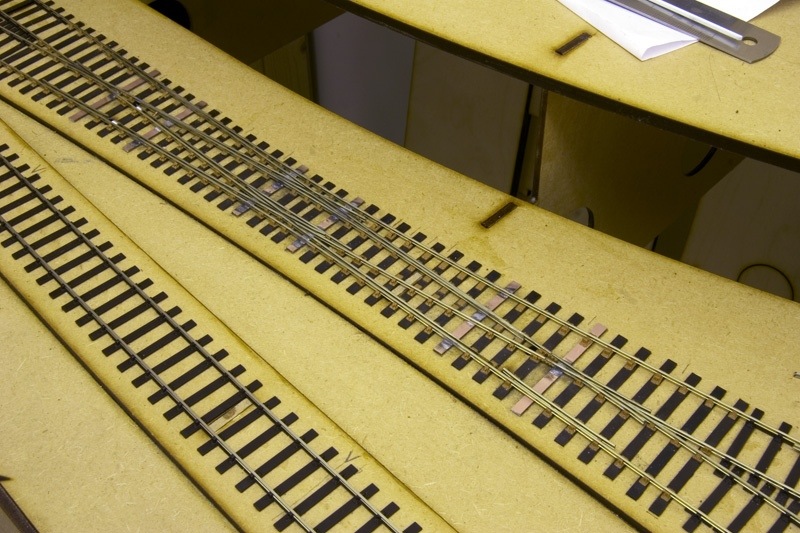
Track laying done (well the tricky bits)
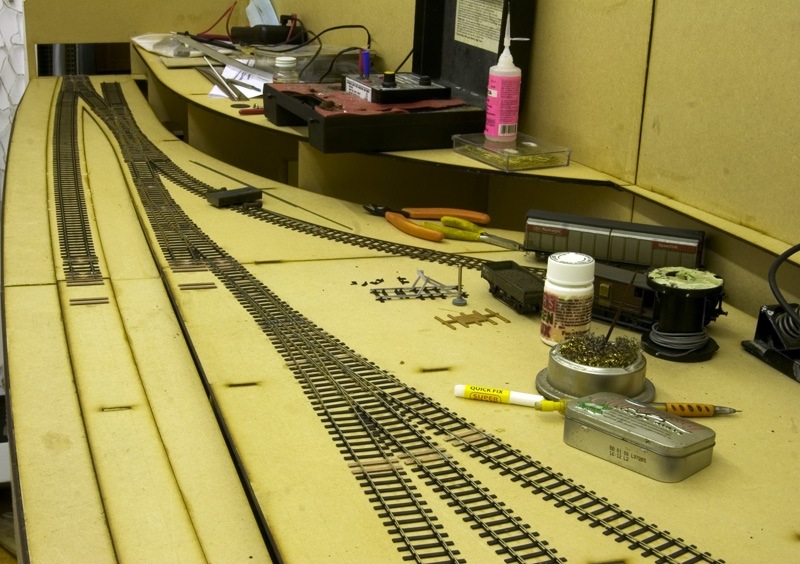
I must admit I’m a bit out of practise with this track building stuff and this took a bit longer than I thought. Above is an overview of the trackwork so far with just some plain track still to do.
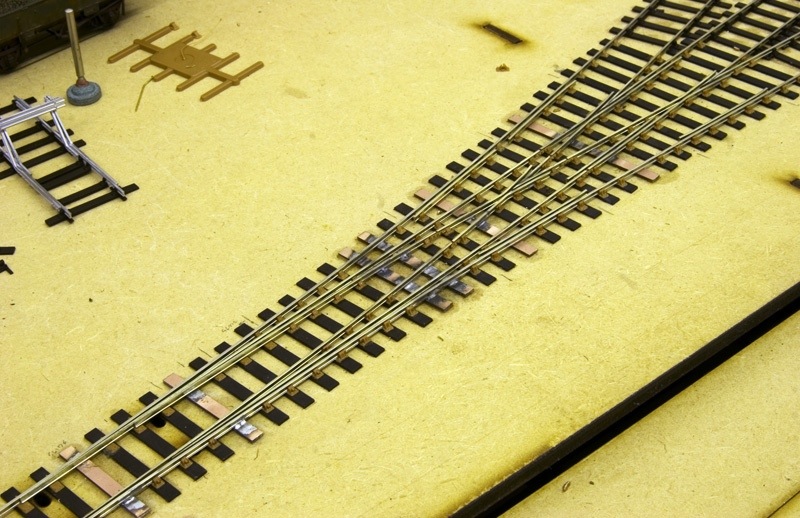
First up is a double slip that isn’t! It’s actually just a normal turnout from an operational point of view with one end blocked and clamped so it doesn’t move.
At the other end I’ve removed two of the point blades to depict that the line it leads too is out of use.
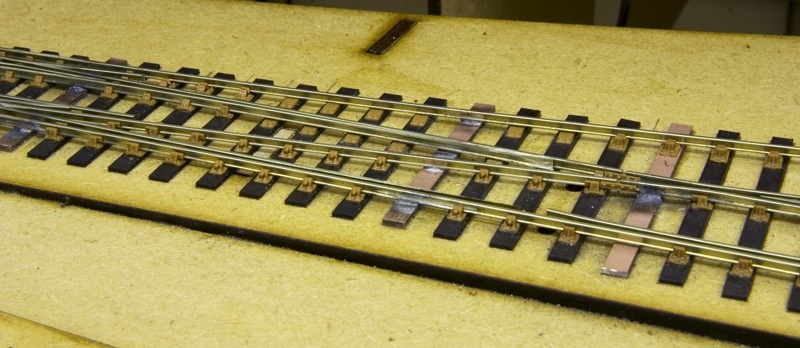
On the other board is a 3 way point. I’ve always found these more tricky than double slips although they are less work.
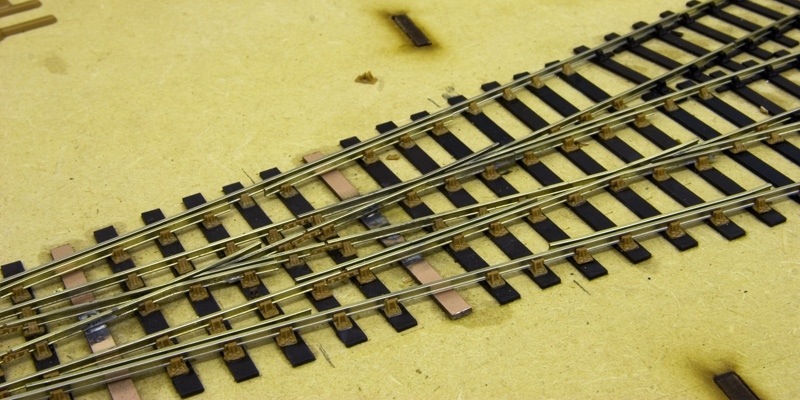
It’s the way the 3 vees have to interact that makes them tricky. I also messed up the first set of blades and got one in the wrong place so I had to do it again. It was only once I’d done it that I remembered I might have done exactly the same thing last time I did a 3 way!
Introducing Brettell Grove
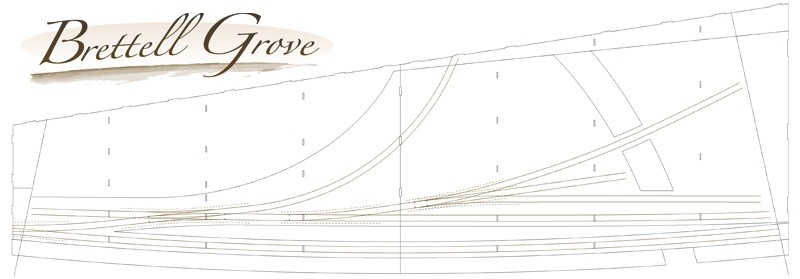
Regular readers will recall that I was quite taken with the GBL Jinty. Well after wandering around the area where I live (both online and in reality) I decided a small plaything based loosely on the sidings at Moor Street might be worth looking into. A day or so in Illustrator and the above plan was formed.
When I say loose I mean very loose. For a start Moor Street yard was firmly in GWR territory and I prefer the Midland. The yard at Moor Street was much longer and double ended and the canal is in a different place. Plus the mainline is double, not single and flat, mine is neither. The real location wasn’t, to my knowledge, as hemmed in by buildings as I wanted. The name is based on the nearby Brettell lane.
There’s also the opportunity to practise a few things I will be using on New Street, mainly laser cut baseboards and buildings. Plus it’s a bit more ‘railway’ than my shopping centre, which will be quite a long term project.
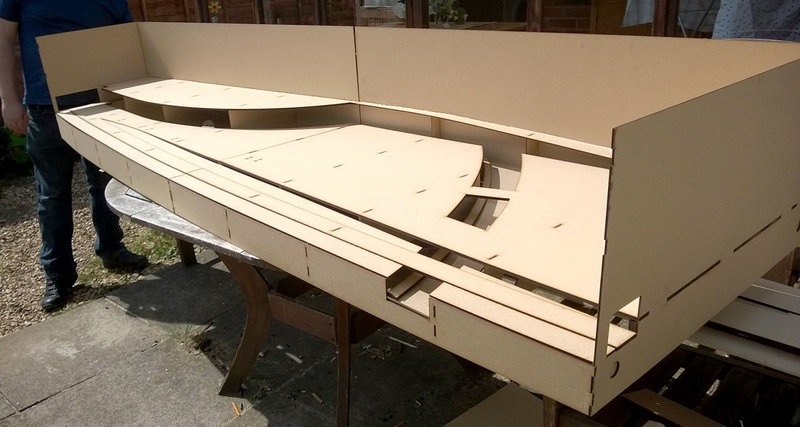
So with the help and guidance of Tim and a couple of days at the controls of his laser cutter a couple of baseboards were cut and assembled. A few mistakes were made but overall I was pleased with how they turned out.
A spot of reading

Been doing a spot of shopping, first up are a couple of new(ish) books by Kevin Derrick and published buy Strathwood. I’ve always liked class 25s and 45s so the these books are right up my street. A4 hardbacks and full colour they are essentially picture books with a very brief intro. That’s fine with me as other books dealing with the technical sides of these locos are already out there and do we really need a repeat? Besides pictures appeal to my, ‘what does it look like, I don’t care how it does what it does’ approach to things.
What I like about these 2 books is that effort has been put in to showing different livery variations and in the case of the Peaks nameplates (including the painted ones). Add in there’s some nice New Street shots in both and I’m more than happy.
£19.99 each website
Sometimes an impulse buy can lead to a whole load of trouble. In this instance I’ve always liked Jintys and indeed I scratchbuilt a body for an n gauge one as a kid. It was a bit rubbish to be honest, ok a lot rubbish and the fact that it was scratchbuilt couldn’t save it from the bin! However the Great British Locomotives collection have just done one and for less than a tenner I couldn’t resist!

This is how it came out of the packet although I did reattach the bufferbeam so that it was straight. The magazine isn’t really one, more of a stand alone article but I was surprised that it’s quite well done with some good images and illustrations.
In the real world steam wasn’t allowed in New Street in my era so the above would never have happened but it’s good for a little flight of fantasy.
The problem is I’ve found myself looking at the Brassmasters detailing kit, as well as the High Level chassis kit. Also thoughts of a small diorama based on some sort of industrial setting and set at night (and in the rain). This is not a good thing!
25th July 2014

Not had an update in a while but I have been busy working on a few more wagons. Click here to go to the wagon section.
Room for a 101?
So far Bachmann have done quite well with their first generation DMUs. OK the mould lines on the 108 cab were not ideal and the oversize metal chassis block is a poor design decision but they fill a much needed gap in the RTR market place. Not so their latest offering offering as the 101 is already available and given its Lima origins isn’t bad at all. Of all their DMUs the 101 is the the one that Bachmann could least afford to drop the ball on but sadly it seems they have. Given that this is the first DMU thats a victim of the new price structure it’s a bit of a double clanger!
I feel I must take some responsibility for some of the online fuss as I may have been the first to point out that the bottom of the main windows and the door windows all line up on the model when they shouldn’t. One online commentator went to great lengths to draw lines on photos of the model and the prototype that show the error very nicely (although in a bizarre piece of manufacturer brown nosing he then try’s to convince us that the model is right)!
On its own the window error isnt much but it’s one of those relative errors that just screams out at you. Lima themselves seemed to have a good understanding of this and while literally everything on thier earlier 117 is wrong it all works together so it looks ok. Correct one thing and suddenly it looks worse than when you started!
A few years ago the obvious thing to do would be to combine the strong points of both models to produce something accurate. Lima body on the bachmann chassis and while that’s fine for something like a class 25 where your outlay can be less than £50 do we really want to be forking out close to 3 times that for a DMU?
So given that fixing the bachmann 101 is going to be quite difficult, the easy route this time is just to fix the Lima under frame. People have remarked for years that it’s bad because it’s just a box with surface detail but lets think about this for a second. What is depicted is about right it’s just that the holes are filled in (you can see where this is going can’t you?)
Option 1 the quick fix

Ok this is a total bodge but all I did was weather the chassis and repaint the ‘holes’ in matt black. It was only ever meant to be a temporary fix but it’s stayed like this for a good few years now. I have also replaced the undernourished Lima bogies with spares from the Hornby 110.
Option 2
It’s not actually much more effort to just drill out the holes and tidy them up with a scalpel or circular saw in a mini drill. I’ve re-added the tanks from bits of plasticard. With hindsight I was never going to replace my Lima 101s anyway but if I were to buy another I’d definitely be looking at buying a cheap second hand Lima model than feeling the need to have the latest thing.
Back to the PGA
Regular visitors will remember a while ago I looked at springing a Lima PGA. Since these wagons tend to operate in bulk trains I had no intention of doing another 30 or so. However the covered bulk salt version seemed to crop up in WCML speedlink trains so one of those is ideal. First impression is that they look the same as the Lima one however they are longer so after picking up a cheap one on EBay a start was made using Phil Eames article on PGA’s in DEMU Update as a guide.
 The 2 wagons were cut into unequal halves before gluing them back together. Extra details were added to the under frame and the ribbing added to the hopper sides using plastruct strip. The end platforms were made from a combination of wire, some scrap walkways from an old A1 models TTA walkway kit and ladders from Colin Craig. The internal formers were kindly cut for me by Tim.
 After paint, the tarpaulin was just baking foil sprayed blue. The transfers are a mix of fox ones I already had and some home brew ones drawn up in Illustrator and printed on Crafty waterslide transfer paper.
Some more wagons
Despite not really getting caught up in the rush for the latest thing when it comes to RTR I do find that the new wagon announcements have an effect on what I’m up to. It’s because most of the new stuff actually isn’t. It’s been available before as a kit and if it suits what I’m doing there’s a good chance there’s an example or two in either my unbuilt kit pile or half started in a box somewhere. I’ve had to admit I’ve never really understood the clamour for new stuff we already have especially if the example is something simple like a 4 wheel open wagon. I mean you will see comments on forums that it’s the greatest thing ever, that someone has wanted one of these for years etc etc. I just think they can’t have wanted one that badly or they would have built the kit! Don’t dare suggest it though as such people seem to rejoice in explaining that they are so inept that they can’t stick 2 sides and 2 ends to a floor, or even better puff their chest out with pride when they tell you they have never even tried! And yet after all this time waiting they will absolutely buy 3 dozen of them just on a written specification, yeah right!
Getting back to the point, this time it’s Bachmanns tube wagon which so far does look nice. If starting from scratch I’d probably buy a couple but I’ve had the Parkside kits half done for many years. Having said that I would be surprised if Bachmann manage to match Parkside’s lovely thin sides.
 Here is one of them after changing the w-irons for Bill Bedford ones, adding brakes from MSE and a few bits of wire for linkages and safety loops.
 Above is a Bachmann VGA also done with Bill Bedford w-irons. The original axle boxes look nothing like those on a VGA so it’s worth changing them for slightly cut down hooded roller bearings, again from MSE. the break gear is from microstrip and wire but you can’t see the wire when the wagon is the right way up. The end steps are from DEMU member Martyn Normanton. I thought they were a bit too long so moved the top fold along by 1mm to reduce the height. Martyn also does steps for BAA and BBAs.
 One little tool I’ve had for years but never really used is this, which is like a temperature controlled hot glue gun designed for sticking etched details to plastic. It’s kind of like a soldering iron for plastic because if you get it wrong you can over heat the part and the glue breaks down and just rubs off. More faff than using superglue but the joint appears to be stronger.
29th May 2014
 Those who take an interest in my random scribblings might be interested to know that I have an article on my class 317 EMU in this months MRJ. Its an all D&E theme and also features Tim Horn’s Bass canning line building he built for Phil’s Calcutta Sidings.
On the subject of D&E this weekend is DEMU’s showcase in Burton on Trent where I will be doing a demo on multiple units, Hope to see some of you there.
13th May 2014
Just a quick update to say that we shall be at Expo EM this weekend with the second outing for Calcutta Sidings II Pic ©Tim Horn and used with permission.
I shall be supplying a small amount of Stock and doing my best to fill up Phil’s car parks so please stop buy for a chat if you are going.
An urge to build in brass
Sometimes I just get an urge to do something new or something that I haven’t done in a while. This week I had a bit of a hankering to do something with brass, not like bunging a few CCU’s together but something more creative, something from scratch.
 My intended victim, an isolation mast from the Eastern end of platform 12. I suppose I could have built a standard (ish) mast but ive done those before and fancied something a bit different, something that’s a bit of a crowd pleaser I suppose. So a drawing was made, some section picked up from Modellers Mecca and the soldering iron and mini drill fired up for a couple of sessions at my workbench.
 Heres the result of my labours. It went together surprisingly well and despite the use of Colin Craig’s insulators and my own etch for the registration arm it’s all good old-fashioned fabrication work. I have to admit im pretty pleased with how it turned out.
 Close up of the handles and brackets for the isolation gear.

A typical ‘platform enders’ view of the interesting bit!
Question is now, is the urge satisfied or have I just made it worse?
more coaches ticked off
 The Bachmann/airfix Mk2c is now done. Additional parts coming from Southern Pride (Roof Hatch, extra underframe box, and GM roof vents), Replica for the bogies, MJT for the dropped buckeye and retracted buffers and ABS for the extended ones.
 Also complete are my other 2 newspaper GUV conversions. I tend to like to do a one off prototype and then batch build the rest but there in lies a question. What size batch is best? OK a batch of 2 as in this case and the case of my Mk3 pullmans (shown below) isn’t much of a saving but large batches seem like too much of a mountain to climb. Take Mk2 coaches for an example (and probably the most extreme one on the layout) logically it would make sense to do them all together. It would be easier, and the results would be consistent but just working out how many that number is, is a job in itself. I’m sure I can get way past 50 without any effort at all and even 100 is only approximately 10 trains.
Such a number is enough to drive the enthusiasm out of even the most dedicated person but what about doing them train by train? For some trains that might just work. The Brum to Norwich train springs to mind as it’s just 6 early mark 2’s, 4 of which are TSO’s. That seems manageable but most trains are longer – some a lot longer. I have found video of a class 87 hauled motorail train at New Street that’s 15 vehicles long. Not that many of them are the same type either. This is the problem. I’ve identified a need for at least 5 Mk2D BFK’s, 2 of which are in the same train but these are a bit of a faff (not horrendous mind you). Doing them train by train is not efficient at all. So whats the answer? Does anyone else build in batches? If you do how do you approach it?

10th April 2014

Those who follow the workbench section of the site will know that I have been converting a Hornby class 110 into a class 114. Well its nearly done now (just a few tweaks to do) and a new page has been set up for it in the units section.
There are also new pictures in the coaches section and a new page for steel wagons (admittedly with only two to look at so far).
The smart little car with all the extras…
…is what ford claimed in a 1988 advert for their Fiesta. In 4mm scale the Oxford Diecast Fiesta has been out for a while now (and is an earlier version but it’s still very suitable for New Street.
First Impressions
Looks like a Mk1 fiesta to me. Comes with the usual manufacturing compromises of 2D printing on a 3d object and the now standard oversize wheels. I kind of hoped that Oxford had stopped doing this when they abandoned the separate tyres and produced the Marina model and while the fiesta hasn’t got separate tyres either the wheels are way too big. On the upside it’s probably easier to fix now.
 On the left, out of the box and on the right after a few easy tweaks. The model is held together with a screw and the rear licence plate as a sort of plug in wedge (bit weird!) so disassembly is a doddle. A spot of black paint on the widow frames and bumpers and a coat of matt varnish is all that’s needed. I decided this one would be parked so didn’t fit a driver. The wheels were pulled off the axle (you need to do this to get them out) and then remounted one at a time for turning down in a minidrill with some sandpaper. Take your time as you need to avoid them getting too hot.
 Finally a very light weathering and its done – I’ll change the registration at some point and add a tax disk. Reading up on fiestas the Mk2 version was essentially a facelift mk1 rather than a new car. They seem to look about the same proportions, any Ford experts care to advise if that’s the case?
A glipse of the future provided by memories of the past.
When I was a kid, standing at New Street I only had a little brownie camera that took 110 film (remember that?) and couldn’t really take a decent picture of anything, not that I could afford film anyway so while I was there at the location and period I am modelling I never took any pictures of my own. It’s somewhat taken for granted these days that we can just have access to images of whatever we want due to the internet and sites like Flickr but unless people were there at the time to take the images and today give up their time to upload them for no reward we would really struggle to get even basic info on our chosen subjects. It is these unsung contributors that play a vital role in our hobby and its worth now and then taking a moment to stop and appreciate the efforts they go to.
Recently I found a video I hadn’t seen before that featured New Street, just a few months after the period I intend to model from Brian Hancock. His Youtube channel is well worth checking out and with his kind permission I can share with you his video.
This look back at the past is a prediction of my future. It is scenes like these that I am ultimately trying to recreate.
Theres a bit of Marston Green before and Reading after but these are still well worth watching, so if you have a spare 25 minutes – make your self comfortable and enjoy.
Some thoughts on the video
The first thing that stands out (because it’s the first train) is how un-colourful freightliner trains were in the 80’s with mostly white, blue and red boxes. The class 31 apparently rescuing a failed 47 (2.46) seems to be putting in a good performance.
The New Street stuff starts at 3mins 33 seconds and its interesting to note the lack of uniform rakes of coaches, there’s a set of nearly all Mk1s in blue and grey at 7min 50 though. Also worth noting is that none of this set is running on B1 bogies. In fact there’s an awful lot of Mk1s throughout the film.
The Class 158 test bed, class 154 puts in an appearance just before 12 minutes as does the yellow 312, albeit in the background. Is also worth noting the high number of light engine moves the highlight of which is a lash up of a class 56 and 2 class 58s in the 14th minute. I have no idea what the markings on the side of the DMU seen at 14.40 are but its worth noting that these 4 car 115/116 hybrids were common place at the time.
Theres an awful lot of platform enders throughout the film and this reaches a peak in the 15th minute as a class 45 generates much interest – I must remember to add the various bags they seem to leave lying arround to the model! At 18 minutes there’s one of the Express Parcels liveried 128 DPU’s which is causing much frustration on one of the Model Railway forums at the moment due to the new model apparently being in the wrong colour. The last train seen at New Street is a bit of an oddity with a class 31 hauling a rake of what seems to be mostly first class air cons. Perhaps an excuse to use up some of those cheap Airfix Mk2 FO’s that we all seem to pick up as the years go by. It would certainly give the exhibition critics something to get excited about.
Theres a few highlights in the Reading bit too with 50027 (Lion) making a nice getaway, a class 56 storming through the station and one of the class 210 DEMUs.
Thanks to Brian for uploading it but as mentioned before thanks to anyone who uploads videos and pictures, the hobby would be all the worse without your efforts.
Welcome to spring
If you listen to some forum ‘experts’ if you are going to model in P4 everything has to be compensated or sprung or it will all fall off and everyone will point at you and laugh! Of course the closest that these people get to regarding springs are the ones in their oh so comfy armchairs that they never seem to get out of.
The reality is somewhat different but before I go into that it’s probably best that I share my finding of how model railway vehicles run. Of the three options Sprung vehicles do run best, then compensated and finally rigid when it comes to trackholding. Visually though the order is a little different as while sprung still looks best, I find rigid vehicles look smoother than compensated ones where due to a single solid axle all the track imperfections are transmitted to the body.
It seems then that Compensation is perhaps outdated and I certainly wouldn’t bother with compensating a wagon these days. Leaving sprung and rigid as 2 viable options. Sprung being best but not always necessary. I have a theory that any form of flexible chassis is primarily there to compensate for us not building things square in the first place and when it comes to machine produced RTR wagons most of the time you can just pop some new wheels in and they will work as can be seen here –
So before we fix anything we should really see if it needs fixing at all, however some RTR is a bit more tricky and the prime culprit here is Lima with their underlength axles. So using a lima PGA as a victim here’s what to do.
First thing is P4 wheels just wont fit. However Lima did mold a boss on the back of the axle guards so one option is to carefully cut this away with a circular saw in a minidrill and deepen the axle holes with a special tool such as Ed’s tool. However Lima also modelled a lot of their wagons too high so in an attempt to kill 2 birds with one stone the original axleguards were removed completely.
 I tend to use the Bill Bedford springing units but if mounted to the floor they wont fix the ride height problem. The trick is to mount them to the top side of the floor not the bottom and cut holes for them to poke though. The angled shapes are there so that the wheel doesn’t hit the floor. This mounting to the wrong side of the chassis idea also works for Bachmann TTA’s too.
  You shouldn’t expect springing to sort out sloppy workmanship because it wont. Getting the axles parallel in all 3 dimensions is still important and a handy tool to help with this is the Brassmasters axle spacing gauge as seen above.
 I always solder the bearing in to its carrier and file it down a bit for clearance. The original Lima suspension moulding was distorted to adjust the height so I decided to replace them with spares from a Cambrian SSA kit that I had. These are very thin, plastic mouldings, so a few strips of square 40 though strip were glued in place to act as spacers. It goes without saying – dont bung the springs up!

The finished (ish) chassis. The SSA kit also yields the rather heafty brake gear brackets too. Obviously the body needs work but that’s for another day.
Take a brake
By my era most brake vehicles took the form of a BG of some description however there were some other brake coaches to be found. Most were air conditioned mk2 BFK’s and combining an Airfix BSO and FO together to get one is a common cut and shut project (See example here) I need at least 4 of them so far (2 are for the same train!). However what about the mk2 b’s and c’s
Doing things the hard way
One option is to have a go at improving the lima mk2b. New window frames would be the biggest improvement and I believe Extreme Etches are working on some. The lima underframe is a bit barren and what is there isn’t all that well represented so I have cut away the battery boxes and replaced them with some from Replica Railways. They suffer from the same shallow buffer beam and too high buffers as the mk2fs so these have also been addressed too. Bogies are, again from replica railways but there is some way to go yet on this one.  The easy way
All that is, I admit, a bit of a faff but the coach pictured above is one of the oldest models I own – it must be getting on for 35 years old or something so there’s a little bit of sentiment attached to it. I also plan to do the same with Lima SO’s and FO’s too and have been steadily stock piling them when I see them for a few quid on Ebay. Besides who doesn’t like a challenge?
There is however a much easier way and its linked to the Air Con BFK project mentioned earlier. You see you end up with spares when you do a BFK. If you do them in pairs the discarded half of the BSO can be mated together to make a mk2e (or with a bit more work a mk2f) SO. The discarded halves of the FO’s are a bit useless though. So with all these spare ends featuring wrap round doors it makes sense (to me at least) to lop the end off a Bachmann mk2a and replace it with the scrap end to produce either a mk2b or a mk2c.

Theres a bit more work in the C than the B as the roof will need to be changed and a hatch added (Southern Pride do them and the vents). Some Mk2c’s had the larger toiled window and no vents, some had smaller and vents like a mk2d so there’s a bit more work there too. Adding the airfix end also makes the coach longer too. On the underframe the boxes will need to be raised up as I have done with all of my Bachmann Mk2s and there’s a few extra bits and bobs to add but this is a nice and easy way to something a little different.
13th March 2014
 Its been a good while since I wrote anything for Model Rail Magazine but this months issue has a short article on my model of LEV1 for those who like buses!
back to the Gronks
Once the springs and hangers were added to my class 08’s I started looking at other things that could be improved in the frames area.  The obvious thing missing from the Bachmann model is the speedo drive but its dead easy to add from a few bits of evergreen strip. There are also some holes in the frames that Bachmann missed so these were drilled using photos as a guide.
 On the other side the missing holes were added as well as a drain cock – this was simply made from a brass pin with the head filed down, a bit of fine tube and a bit of brass rod. Fiddly but a nice quick improvement project.
Another DMU Diversion (part 4)
Moving on to the DMBS like the DTS the easy option would to be to use the Lima 117 chassis as is and like the DTS most people will be none the wiser. However hacking DMU underframes about a bit it quite a good way to spend an evening. So first stage is to look at prototype pictures and decide what can be kept and what needs to be removed. The best tool for this is a metal cutting disk in a minidrill.
 The above picture shows what I kept – again the battery boxes were in the right place but too small so they were removed.
 Some parts are repositioned while others are made from bits of plasticard, microstrip or brass pharmacy rod. The radiators are quite distinctive and I do believe unique to the class. These were made with a bit of an old Shawplan class 56 grill for the mesh. Given the position of the filler and the odd curved tops I wonder if these were standard items from a bus? That brings the fabrication part of the project to an end – the gangway will be another Masokits one as shown here before and it’s just a painting and weathering exercise from here. No need to show that so the workbench will move on to the next project, I will add a gallery for this unit to the stock page when its done.

Another DMU Diversion (part 3)
Moving on to the underframes, the obvious thing to do is mount the DMBS on a lima 117 DMBS chassis and to mount the DTS on lima 117 TS chassis. To be honest for most people that would do as provided they can see that the DTS hasn’t got an engine they proberly wont have clue if the chassis matches the real thing or not. (I’m half expecting a high proportion of people to just think that the model is a Bachmann 108 anyway!). However where’s the fun in that?
 The above image (© John Turner/53A Models of Hull Collection and used with kind permission) shows that there is quite a substantial beam running down the middle of the DTC and that there are prominent heating vents under some of the doors. With this is mind I set about seeing what I could keep and reuse from the lima TC chassis. The only part that is in the right place is the battery boxes so you could leave them where they are but as I found when researching class 116’s, the lima battery box is too small. In the end all of the underfloor detail was removed as were all of the footsteps.
 Above the rebuilt chassis. the new Battery boxes are from Replica Railways as are the vac cylinders. the V hangers are from Southern Pride and some of the original lima parts have been repositioned. the rest is just from Evergreen strip. The bogies are spares from the Hornby 110 and the steps are my own etches. The sideframes are mounted on my own design of bogie available from Brassmasters. I tend to use Branchlines wheels on the leading bogies of my DMUs and Gibsons on the others I also mount the non rocking bogie at the gangway end so that any track deviations are not so obviously transmitted to the body. Weather this makes any real world difference I don’t really know.
a few links
John Turner/53A Models of Hull Collection Replica Railways Southern Pride Models Brassmasters